Advertisement
Quick Links
BEFORE YOU BEGIN
• Please read these instructions carefully to familiarize yourself
with the required tools, materials, and installation sequences.
Follow the sections that pertain to your particular installation.
This will help you avoid costly mistakes. In addition to proper
installation, read all operating and safety instructions.
• All information in these instructions is based upon the latest
product information available at the time of publication.
Kohler China. reserves the right to make changes in product
characteristics, packaging, or availability at any time without
notice.
• These instructions contain important care, cleaning, and
warranty information-please leave instructions for the
consumer.
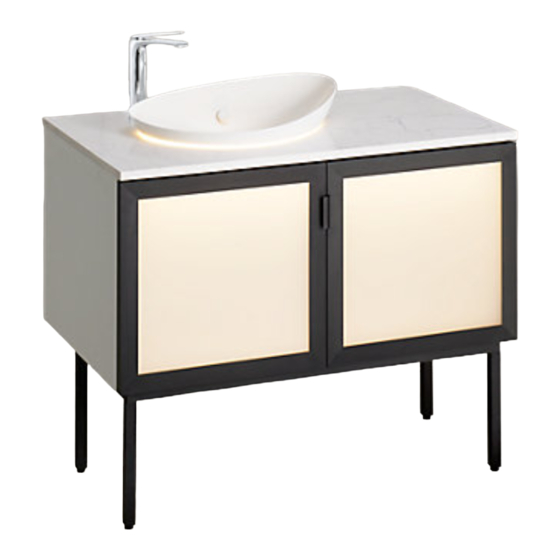
• VEIL Bathroom Furniture adopts E1 grade wood-based
panel of high quality, and with further processing, its harmful
emissions will be less than 1.5mg/L.
• Turn off the water supply.
• The pluming installation must comply with Water Supply
Regulations/Bye-laws, Building Regulations or any particular
regulations and practices, specified by the local water
company or water undertakers. The installation should be
carried out by a plumber.
• Before installation carefully inspect the new fixture for any
signs of damage.
• This product complies with GB24977-2010、GB/T 17743-2007、
GB7000.1-2015 and GB7000.201-2008.
ORDERING INFORMATION
This installation covers the following products in the
VEIL range:
VEIL Bathroom Furniture................................................................. K-21800T-X
SAFETY WARNINGS
Kohler products are precision-engineered and should give continued superior
and safe performance, provided:
1. They are installed, commissioned, operated and maintained in accordance
with the recommendations given in this Manual.
2. Periodic attention is given, as necessary, to maintain the product in good
functional order. Recommended guidelines are given in the MAINTENANCE
section.
Carefully inspect the new fixture for any signs of damage.
When installing Kohler Products, manufacturers guidelines for power tool safety
should be followed.
1356428-T01-A
KOHLER CHINA INVESTMENT CO., LTD NO.158, JIANG CHANG SAN ROAD,
JING'AN DISTRICT, SHANG HAI, PRC
科勒(中国)投资有限公司 上海市静安区江场三路 158 号 邮编:200436
安装之前
• 请仔细阅读本指引,以便熟悉所需工具、物料及安装程序。请
遵照适用的章节来安装本产品,以免安装失当导致不必要的损
失。除了有关正确的安装方法之外,还务请详阅所有操作及安
全指引。
• 本指引所载之一切资料,均以印刷时所有之最新产品情况为基
础,科勒中国保留权利随时更改产品特性、包装或供应情况,
恕不另行通知。安装家具之前,请先确认所有必需的电气工作
均已完成。
• 说明书包括重要的安装、清洁及保养方面的内容,请把这些资
料交给用户阅读,保管。
• 维亚浴室家具选用 E1 级优质饰面人造板精心加工而成,其有
害气体释放量少于 1.5mg/L。
• 关闭供水。
• 管道安装必需遵循当地所有给排水、建筑或者其他的特别规定。
管道安装人员必需具备相应资格。
• 安装之前,仔细检查新产品是否有损伤。
• 本产品符合 GB24977-2010、GB/T 17743-2007、
GB7000.1-2015 和 GB7000.201-2008。
订购信息
此安装说明书适用于以下维亚系列家具的安装:
维亚浴室家具................................................................................... K-21800T-X
安全警告
科勒产品经过精确制造,性能卓越,经久耐用。为保证产品品质,您必须:
1. 按照此手册中推荐的方法进行安装、起动、操作及维护。
2. 如有需要, 定期检查, 令产品保持良好性能状态。日常维护章节中列有推荐方法。
仔细检查新产品是否有损伤。
在安装科勒产品时,必须遵循制造商相关电动工具的安全的指令。
POST CODE: 200436
© Copyright Kohler China Investment Co., Ltd. 2018
- 1 -
VEIL 维亚
INSTALLATION INSTRUCTIONS
安装说明书
BATHROOM FURNITURE
K-21800T-X
© 版权为科勒 ( 中国 ) 投资有限公司所有 2018
浴室家具
Advertisement

Summary of Contents for Kohler VEIL K-21800T-X
- Page 1 • All information in these instructions is based upon the latest 础,科勒中国保留权利随时更改产品特性、包装或供应情况, product information available at the time of publication. 恕不另行通知。安装家具之前,请先确认所有必需的电气工作 Kohler China. reserves the right to make changes in product 均已完成。 characteristics, packaging, or availability at any time without notice.
-
Page 2: Installation
尺寸图 ROUGHING-IN Reference Value UNIT: mm 参考值 单位:毫米 Kohler reserves the right to change marked dimensions without prior notice. 科勒公司保留随时变更图中标示尺寸的权利,无需另行通知。 安装 INSTALLATION A. 安装之前 A. Before Installation 请在安装浴室柜的墙面上预留 0.5m 长的 220V 电源线,用于连接浴室柜上的背景 Before cabinet installation, please reserve 0.5m,220V power line on the wall for 灯(见图... - Page 3 B. 安装脸盆柜 B. Install Washbasin Cabinet 安装管道。 Install the services. 热水(H)及冷水(C)入口必须连接至正确的进水管。 Hot (H) and Cold (C) inlets must be connected to the correct inlet pipes. 根据制造商说明书安装排水。 Install the drain in accordance with the manufacturer's instructions. 我们建议采用墙排水方式,使用 P 弯管连接脸盆去水。 We suggest using P-trap drain. Connect P-trap pipe with washbasin drain. 小心!请确保所有脸盆排水的连接处都装有防水密封圈。...
- Page 4 2. 安装脚架。 2. Install stand. a. 如下图将四只支脚用配套的螺杆和内六角扳手固定在脚架上。 a. Fix the four feet to the stand with the attached screws and a socket head wrench as shown in the figure below. Fig. 4 图 4 b. 将维亚浴柜放倒背部着地,将脚架按下图所示用自攻螺丝固定在底板上。 b. Lay the VEIL cabinet on its back. Fix the stand onto the bottom plate with tapping screws as shown in the figure below.
- Page 5 b. 台面和浴柜线路接口连接。固定好台面后,待胶干透后,找到台面上的 A1 和浴 b. Connect the connector on the counter top with that on the cabinet. After the 柜上的 B2 接口将他们插入连接起来。 (确保插头连接到位,可以试着反方向用 counter top is fixed and the silica gel is completely dried, find the connector A1 力拔开两个接口,无法拔出则连接到位) on the counter top and the connector B2 on the cabinet and connect them together by inserting one into the other.
- Page 6 4. 按照配套龙头和落水的安装说明将龙头和落水安装在浴柜和台盆上,并将龙头 4. Install the faucet and the washbasin drain respectively onto the cabinet and 提拉杆与落水连接起来。 the washbasin by following the attached installation instructions. Connect the faucet pull bar with the drain. 5. 与墙面固定。 5. Fix onto the wall. a. 由两人稍稍抬起浴柜和台盆,将柜体后部的 2 个挂钩挂在墙面预先安装好的托 a.
- Page 7 C. 水电安装 C. Install The Water And Electricity System 1. 由专业人员连接并安装上下水,确保无渗漏。 1. Have the water system connected and installed by a professional plumber to avoid any leakage. 2. 由专业电工将浴柜后部的电源总线与墙面预留的电线(图 9)连接起来,确保安 2. Have the power bus at the back of the cabinet connected with the reserved 全无漏电。...
-
Page 8: User Maintenance
8. In case that any light or the glass door cannot operate normally, do not 后服务,我们将尽快为您解决。 disassemble it by yourself. Instead, promptly contact the after-sales department of Kohler. We will help you solve the problem as soon as possible. 1356428-T01-A - 8 -...


Need help?
Do you have a question about the VEIL K-21800T-X and is the answer not in the manual?
Questions and answers