Advertisement
Quick Links
Wireless Security Camera User Manual
YATWIN
Smart Home
Welcome
Thank you for purchasing YATWIN Wireless Security Camera.
Here you will find useful information about the camera's
installation
Important Security Warning
In order to keep your YATWIN camera secure and
prevent unauthorized access, please make sure to
follow the steps below:
• Always make sure that your camera has the latest firmware
• Always change the default password for your camera. Always
ensure that your password is at least 8-10 characters long and
contains a combination of lowercase characters, uppercase
characters as well as numbers.
1. Getting Started
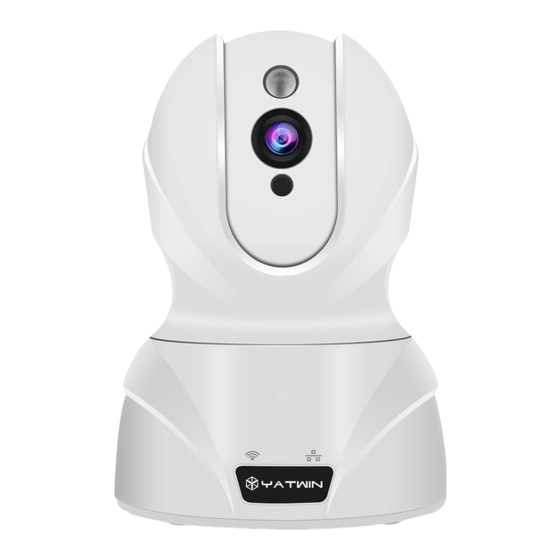
1.1 Device Overview
Advertisement

Related Manuals for YATWIN 826

Summary of Contents for YATWIN 826
- Page 1 Here you will find useful information about the camera’s installation Important Security Warning In order to keep your YATWIN camera secure and prevent unauthorized access, please make sure to follow the steps below: • Always make sure that your camera has the latest firmware •...
- Page 2 The diagram below shows the camera’s profile and rear panel. -------------------------------------------------------------------------------------- 1 Wi-Fi Status Light 2 Speaker 3 IR LED 4 Lens 5 Photosensitive Sensor 6 Wired Network Status Light 7 Microphone 8 Reset Button 9 Power Port (micro USB 5V) 10 Micro SD Card Slot 11 Network Port Status Light 12 Network Port...
-
Page 3: Reset Button
1.1.1 Reset Button (1) One quick Press to reset Wi-Fi configuration or reset camera’s password. (2) Long press about ten seconds to restore factory settings until it says restored complete. 1.1.2 IR LED * The IR LED lights red for about 30 seconds when connecting the camera to power supply or restart it. - Page 4 1.2 Download MIPC App You need “MIPC” app to setup and view your camera. Note: Support Android 2.1 and above, iOS 5.0 and above. For the best experience, download the MIPC app for your smartphone by scanning this QR code or searching for MIPC in the app store.
- Page 5 Note: The username of MIPC account must begin with a letter. You can bind an e-mail to retrieve your MIPC account when you forget your password. 2. Connect Your Camera 2.1 Connect your camera to power supply Please power on your camera, the IR LED lights red for about 30 seconds.
- Page 6 Method 1: Connect Wi-Fi over Ethernet Cable For purposes of this guide, we will use Android, though both apps have the similar interface. (The App Interface may differ slightly from the screenshots below.) (1) After connecting your camera to power supply, connect it to router by Ethernet cable (the network port status lights blink yellow and green)
- Page 7 Then you can Configure Wi-Fi, tap “>” to choose your Wi-Fi, then input your Wi-Fi password and tap Apply button. Note: Please to check your Wi-Fi password and make sure it is correct. If you cannot find your Wi-Fi or Wi-Fi list is blank, please return back to “Device List”...
- Page 8 Note: The camera can only support 2.4G frequency signal, and 802.11b/g/n Wi-Fi network. (4) When the Wi-Fi status light blinks green, your camera configures Wi-Fi successfully. (5) Now your camera is connected to Wi-Fi and Ethernet, the Wi-Fi Status Light and Wired Network Status Light will both blink green.
- Page 9 (3) Tap Wi-Fi connection icon. Following the APP prompts, please one quick press the RESET button. Then check the Wi-Fi Status Light, ensure that the Wi-Fi Status Light blinks red and green alternately, Then Tap “Next” button. (4) Your Wi-Fi will be searched and input your Wi-Fi password.
- Page 10 To view setup videos for many of the steps outlined in this guide, go to http://www.yatwintech.com For access to the quick start guide and other support information, to contact YATWIN support, please do one of the following: Website:www.yatwintech.com • • E-Mail:yatwintech@hotmail.com •...
Need help?
Do you have a question about the 826 and is the answer not in the manual?
Questions and answers