Advertisement
Quick Links
A
x 1 Top Panel
x
1 Panneau supérieur
x 1 Panel superior
E
x 1 Side Panel Right
x 1 Panneau latéral droit
x 1 Panel lateral derecho
I
x 1 Lower Partition Panel
x 1 Panneau de partition
inférieur
x 1 Panel divisorio inferior
Page 1 of 20
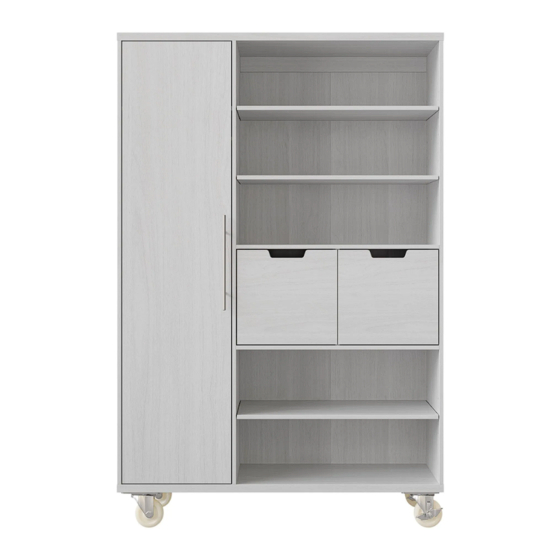
PARTS LIST / LISTE DE PIÈCES / LISTA DE PIEZAS
DIAGRAM / SCHÉMA / DIAGRAMA
Higgins 48in mobile closet / Armoire mobile de 48 pouces Higgins /Armario Higgins
móvil de 48 pulg / SL48CHG
Read carefully before assembling your product / Lisez attentivement avant l'assemblage du
produit / Lea atentamente antes de ensamblar su producto
Retain this manual for future reference. / Conservez ce manuel pour référence ultérieure. /
Conserve este manual para futuras referencias.
B
x 1 Upper Back Stretcher
x 1 Brancard arrière supérieur
x1 Ensanchador trasero superior
F
x 1 Left fixed shelf
x 1 Étagère fixé gauche
x 1 Balda fija izquierda
J
x 1 Vertical Partition panel
x 1 Panneau de partition vertical
x 1 Panel divisorio vertical
C
x 1 Side Panel Left
x 1 Panneau latéral gauche
x 1 Panel lateral izquierdo
G
x 3 Adjustable shelf
x 3 Tablette ajustable
x 3 Repisa ajustable
K
x 1 Left Back Panel
x 1 Panneau arrière gauche
x 1 Panel tresero izquierdo
x 1
Assembly Instructions / Instructions d'assemblage / Instrucciones para el ensamblaje
Made in Vietnam / Fabrique au Vietnam / Hecho en Vietnam
D
x 1 Partition Panel
x 1 Panneau de partition
x 1 Panel divisorio
H
x 1 Upper Partition Panel
x 1 Panneau de partition
supérieur
x 1 Panel divisorio superior
L
x 1 Middle Back Panel
x 1 Panneau arrière du milieu
x 1 Panel tresero de medio
Advertisement

Subscribe to Our Youtube Channel
Related Manuals for drew & jonathan Scott Living Higgins SL48CHG


Summary of Contents for drew & jonathan Scott Living Higgins SL48CHG
- Page 1 PARTS LIST / LISTE DE PIÈCES / LISTA DE PIEZAS DIAGRAM / SCHÉMA / DIAGRAMA Higgins 48in mobile closet / Armoire mobile de 48 pouces Higgins /Armario Higgins móvil de 48 pulg / SL48CHG Read carefully before assembling your product / Lisez attentivement avant l’assemblage du produit / Lea atentamente antes de ensamblar su producto Retain this manual for future reference.
- Page 2 x 1 Bottom Panel x 2 Drawer Left x 2 Drawer Right x 1 Right Back Panel x 1 Panneau inférieur x 2 Tiroir gauche x 2 Tiroir droit x 1 Panneau arrière droit x 2 Parte izquierda de x 2 Parte derecha de x 1 Panel inferior x 1 Panel tresero cajón izquierdo...
- Page 3 x 2 Tipping restraint hardware x 8 Small Cam Lock x 14 M3.5 x 12 mm Screw x 2 Back crosser x 2 Kit de matériel anti‐basculement x 8 Petite attache Camloc x 14 Vis M3.5 x 12 mm x 2 Traverse arrière x 2 Kit de sujeción antivuelco x 8 Cerrojo de leva x 14 M3.5 x 12 mm Perno...
- Page 4 Safety Information / Mesures de sécurité / Información de seguridad Please read and understand these instructions before assembling and using this product. Save these instructions for future reference. Veuillez lire et comprendre ces instructions avant le montage et l'utilisation de cette console. Conservez ces instructions pour une utilisation future.
-
Page 5: Limited Lifetime Warranty
Warranty / Garantie / Garantí a LIMITED LIFETIME WARRANTY This product is warranted to the original purchaser. If there is a failure in this unit due to defects in materials or workmanship, the manufacturer will repair or replace this item at our discretion without charge. - Page 6 CAM LOCK SYSTEM OPERATION HOW THE KNOCK DOWN (KD) ASSEMBLY SYSTEM WORKS 1. Screw the Cam Bolt into the pre-drilled small holes on the panel. Connect both panels together; making sure the Cam Bolt goes into the pre-drilled hole at the end of the panel with the Cam Lock. 2.
- Page 7 DD × 12 Cam Bolt EE × 4 Large Cam Lock FF × 4 Wood Dowel Page 7 of 20 Assembly Instructions / Instructions d’assemblage / Instrucciones para el ensamblaje Made in Vietnam / Fabrique au Vietnam / Hecho en Vietnam...
- Page 8 U × 2 Open Pole Holder DD × 14 Cam Bolt MM × 6 Screw M4 x 15 mm EE × 10 Large Cam Lock FF × 10 Wood Dowel Page 8 of 20 Assembly Instructions / Instructions d’assemblage / Instrucciones para el ensamblaje Made in Vietnam / Fabrique au Vietnam / Hecho en Vietnam...
- Page 9 EE × 4 Large Cam Lock FF × 4 Wood Dowel V × 2 UU × 16 Lock Washer Castor with Brake VV × 16 W × 2 Flat Washer Castor BB × 16 Bolt 1/4” x 25 mm CC × 1 Hex Wrench Page 9 of 20 Assembly Instructions / Instructions d’assemblage / Instrucciones para el ensamblaje...
- Page 10 DD × 6 Cam Bolt EE × 14 Large Cam Lock FF × 14 Wood Dowel Page 10 of 20 Assembly Instructions / Instructions d’assemblage / Instrucciones para el ensamblaje Made in Vietnam / Fabrique au Vietnam / Hecho en Vietnam...
- Page 11 XX × 46 M4 × 15 mm Screw QQ × 3 Slow Close Hinge RR × 6 M3.5 x 15 mm Screw Page 11 of 20 Assembly Instructions / Instructions d’assemblage / Instrucciones para el ensamblaje Made in Vietnam / Fabrique au Vietnam / Hecho en Vietnam...
- Page 12 X × 1 PP × 2 Metal Pole Bolt 5/32’’ x 25 mm LL × 2 RR × 12 M3.5 x 12 mm Screw M3.5 x 15 mm Screw NN × 2 WW × 1 M4 x 16 mm Screw Door Stopper OO ×...
- Page 13 LL × 12 M3.5 x 12 mm Screw Page 13 of 20 Assembly Instructions / Instructions d’assemblage / Instrucciones para el ensamblaje Made in Vietnam / Fabrique au Vietnam / Hecho en Vietnam...
- Page 14 DD × 8 Cam Bolt GG × 8 M4 x32 mm Screw Page 14 of 20 Assembly Instructions / Instructions d’assemblage / Instrucciones para el ensamblaje Made in Vietnam / Fabrique au Vietnam / Hecho en Vietnam...
- Page 15 KK × 8 Small Cam Lock Page 15 of 20 Assembly Instructions / Instructions d’assemblage / Instrucciones para el ensamblaje Made in Vietnam / Fabrique au Vietnam / Hecho en Vietnam...
- Page 16 Page 16 of 20 Assembly Instructions / Instructions d’assemblage / Instrucciones para el ensamblaje Made in Vietnam / Fabrique au Vietnam / Hecho en Vietnam...
- Page 17 HH × 2 M5 x 65 mm Screw Wall / Mur / Pared II × 2 Back crosser Page 17 of 20 Assembly Instructions / Instructions d’assemblage / Instrucciones para el ensamblaje Made in Vietnam / Fabrique au Vietnam / Hecho en Vietnam...
- Page 18 NOTE: The tipping restraint hardware included is for wooden stud wall construction. It must be attached to a wall stud. Depending on your wall construction, different anchor hardware may be required. Please contact your local hardware store for assistance. Young children can be seriously injured by tipping furniture.
- Page 19 Care and Maintenance / Soin et entretien / Cuidado y mantenimiento Periodically check to make certain all components are properly positioned, free from damage and firmly connected. Use a soft, clean cloth that will not scratch the surface when dusting. ...
-
Page 20: Quality Guarantee
QUALITY GUARANTEE We are confident that you will be delighted with this purchase. Should this product be defective in workmanship or materials, or fail under normal use, we will repair or replace it for a period of up to one (1) year from date of purchase.
Need help?
Do you have a question about the Scott Living Higgins SL48CHG and is the answer not in the manual?
Questions and answers