
Related Manuals for Bosch SGV68U53UC/D5


Summary of Contents for Bosch SGV68U53UC/D5
- Page 1 Dishwasher Lave-Vaisselle Operating instructions Guide d’Utilisation 9001164801 (9601)
-
Page 3: Table Of Contents
Dear Valued Customer, Welcome and congratulations on your new Bosch® dishwasher purchase! Our German engineers work tirelessly to craft machines with virtually silent operation, resource-saving efficiency, and optimum quality. We know you’ll be pleased. For other premium Bosch® appliances, visit us online at: www.bosch-home.com/us (USA) -
Page 4: Important Safety Instructions
IMPORTANT SAFETY INSTRUCTIONS: Please READ and SAVE this information WARNING Misuse of the dishwasher can result in serious injury or death. Do not use the dishwasher in any way not covered in this manual or for any purpose other than those explained in the fol- lowing pages. - Page 5 WARNING: To reduce the risk of fire, electrical shock, or serious injury, observe the following: This dishwasher is provided with Installation Instructions and this Use and Care Manual. Read and understand all instructions before using the dishwasher. This appliance must be grounded to a metal, permanent wiring system, or an equipment grounding conductor must be run with the circuit conductors and connected to the equip- ment grounding terminal or lead on the dishwasher.
-
Page 6: Dishwasher Components
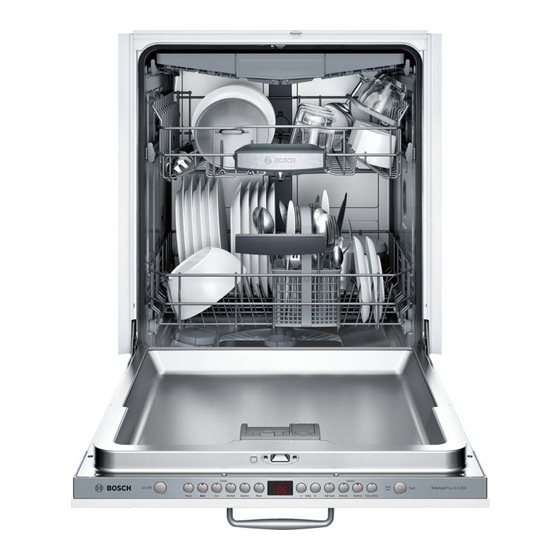
Dishwasher Components Wash Cycles Model Heavy Auto Normal Express Rinse SGV68U53UC SGX68U55UC Wash Cycle Options Model Delay Half Load Delicate Sanitize Extra Shine ® SGV68U53UC SGX68U55UC Additional Features Description ® 3 position adjustable upper rack. The height of the upper rack can be adjusted in 3 Rackmatic positions to create more space. - Page 7 Upper rack spray arm Cutlery drawer Upper rack Flip tines Tab tray / Rack handle Vent hole Lower rack spray arm Salt container Filter system Lower rack Flip tines Rinse aid dispenser Detergent dispenser...
-
Page 8: Dishwasher Setup
Dishwasher Setup Water Softening System Your dishwasher requires soft water to ensure proper washing results and is equipped with an internal water softening system. However, if you have a household water softening system, the internal system pro- vided is not needed. For the water softening system to function properly, it will need to use dishwasher water softening salt. - Page 9 Salt Figure 2 Only refill the salt container, using a funnel to pour, right before turning on the unit to ensure that salt overflow is immediately washed away. This prevents corrosion. See Figure 2. Open the screw cap of the salt container. Fill the container with water (only required when turning on the unit for the first time).
- Page 10 Figure 4 To Close: • Place finger as shown in Figure 4. • Slide door closed and press down firmly until it clicks. Figure 5 To Open: • To open the cover, push the button as shown in Figure 5. •...
-
Page 11: Dishware Materials
Dishware Materials Note: Before using your dishwasher for the first time, check the information in this section. Some items are not dishwasher safe and should be hand washed; others require special loading. Recommended Aluminum: Colored anodized aluminum may fade over time. Minerals in your water may cause the aluminum to darken or spot. -
Page 12: Loading The Dishwasher
Loading the Dishwasher Do not pre-wash items with loosely attached soiling. Remove all food particles, bones, toothpicks and excessive grease. Items having burned-on, baked-on or starchy soils may require some pretreatment. Refer to the Dishware Materials section for more information about dishware suitability. Load only dishwasher safe items into the dishwasher. - Page 13 Suggested Loading Pattern Upper Rack Lower Rack Cutlery Drawer Additional Loading Pattern Upper Rack Lower Rack Cutlery Drawer...
-
Page 14: Rack Features
Rack Features Figure 7 Flip Tines The upper and lower racks consist of tines that can be folded down depending on what you may need to load in the rack. To fold down, grasp the folding tine and release from notch. Push folding tine downward to desired position as shown in Figure 7. -
Page 15: Dishwasher Cycles And Options
Dishwasher Cycles and Options Wash Cycles Note: In order to save energy, it is recommended to set the “Auto Power Off” feature to “P:01” (see the “Auto Power Off” section of this manual). Heavy: Best for cleaning items with baked-on food or grease. These dishes would normally require soaking. Auto: This is the most flexible cycle. -
Page 16: Wash Cycle Information
Wash Cycle Information The cycle times in this Use and Care Manual are based on normal soil loads and 120°F incoming water and will vary based on your actual conditions. Table 3 - Wash Cycle Information Heavy Auto Normal Express Rinse cycle time 110-135 min... -
Page 17: Operating The Dishwasher
Operating the Dishwasher SGV68U53UC / SGX68U55UC NOTE: the door must be opened before changing settings and closed after changing settings. Buttons are sensitive and should be touched gently. Avoid any grease or food particles resting on the but- tons as they could activate the dishwasher. Wiping and cleaning can also activate the dishwasher. For best results, use bare, clean hands when touching the buttons. - Page 18 Setting the Amount of Rinse Aid The amount of rinse aid dispensed can be set from “r:00” to “r:06”. To change the setting: Press the [On/Off] button. Hold down the “A” button (see page 15) and press [Start/Resume] until the display indicates “H:0x”...
- Page 19 Auto Power Off To save energy, the dishwasher is turned off 1 minute after the wash cycle ends. Auto Power Off can be adjusted from P:00 to P:02. To change the setting: Press the [On/Off] button. Hold down the “A” button (see page 15) and press [Start/Resume] until the display indicates “H:0x”...
-
Page 20: Care And Maintenance
Care and Maintenance A regular inspection and maintenance of your machine will help to prevent faults. This saves time and prevents future problems. Overall condition of the machine Never use a steam cleaner to clean your dishwasher. The manufacturer is not responsible for any con- sequential damage. - Page 21 Waste water pump Figure 15 Large food remnants in the rinsing water not retained by the filters may block the waste water pump. The rinsing water does not get pumped out and covers the filters. In this case: • Disconnect the appliance from the power supply. •...
-
Page 22: Troubleshooting Guide
Troubleshooting Guide Dishwashers may occasionally exhibit problems that are unrelated to a malfunction of the dishwasher itself. The following information may help you with a dishwasher problem without involving a repair professional. Problem Cause Action Cycle does 1. Door is opened longer than 4 seconds after a 1. - Page 23 Problem Cause Action Dishes are 1. Rinse aid dispenser is empty. 1. Add rinse aid - the use of rinse aid improves drying. not getting 2. Improper loading of dishes. dry enough 3. Selected cycle does not include drying. 2. Rearrange load to ensure items are not nest- Note: Plastic or Teflon do not typically dry as ing (see “Loading the Dishwasher”...
- Page 24 Problem Cause Action Streaks on 1. Incorrect rinse agent setting. 1. Depending on the hardness of water, adjust glassware or the rinse agent dispenser. Refer to “Dish- residue on washer Setup” section in the manual. the dishes Fascia panel 1. Abrasive cleaner used. 1.
-
Page 25: Customer Service
Do not attempt to repair the appliance yourself. Any work performed by unautho- rized personnel may void the warranty. If you are having a problem with your Bosch® dishwasher and are not pleased with the service you have received, please take the following steps until the problem is corrected to your satisfaction:... -
Page 26: Statement Of Limited Product Warranty
The warranties stated herein apply only to the first purchaser of the Product and are not transferable. Please make sure to return your regis- tration card; while not necessary to effectuate warranty coverage, it is the best way for Bosch to notify you in the unlikely event of a safety notice or product recall. - Page 27 BSH reserves the right to change specifications or design without notice. Some models are certified for use in Canada. BSH is not responsible for products which are transported from the United States for use in Canada. Check with your local Canadian distributor or dealer. BSH se réserve le droit de modifier les données techniques ou le design sans préavis.
Need help?
Do you have a question about the SGV68U53UC/D5 and is the answer not in the manual?
Questions and answers