Table of Contents
Advertisement
Quick Links
Advertisement
Table of Contents

Summary of Contents for Alivida Sauna Controller
- Page 1 Sauna Controller Installation and Operating Manual v2.3...
-
Page 2: Table Of Contents
Stove - requirements General description Controller Temperature sensor and thermal protection RGB LED Control Box (optional) System Installation controller Alivida Touch control panel Temperature sensor and thermal protection Electrical connections Settings System Booting User environment Start Set date and time... -
Page 3: Warnings
Do not make any adjustments to the sauna controller and do not perform maintenance of any kind. There are live parts in this product. Maintenance and service of such a product should only be performed by specialized or qualified personnel. -
Page 4: General Description
2. General description The Alivida Sauna Controller regulates the power of sauna heaters which is controlled by the Alivida Touch Control Panel. The Sauna Controller consists of the following components: - Alivida Sauna Control Box. - Alivida Touch Control Panel. -
Page 5: Temperature Sensor And Thermal Protection
The RGB LED Control Box makes it possible to control a total of 150 Watts of RGB LED strips. This RGB LED Control Box is connected to the sauna control controller via a Buss cable. Through the display of the sauna controller you can choose from 2 color change programs and a number of fixed colors. -
Page 6: System Installation
- Install the controller in a safe place out of reach of the end user. - Attach the controller with the correct clips. Alivida Touch control panel - The control panel can be mounted on the inside or outside of the sauna. -
Page 7: Temperature Sensor And Thermal Protection
Temperature sensor and thermal protection Place the temperature sensor in the housing. Place the sensor cover over the housing and fix it with the 2 screws provided. Mounting location of the temperature sensor - In the ceiling of the sauna cabin. - In the center of the door, +/- 20 to 30 cm from the door. -
Page 8: Electrical Connections
4. Electrical connections... -
Page 9: Settings
5. Settings Configure the system according to the dip-switch setting below (sw v1.1) Dip Switch Nummer ON / OFF Means Default Default Default Heating element nummer 1 installed Heating element nummer 1 NOT installed Heating element nummer 2 installed Heating element nummer 2 NOT installed Heating element nummer 3 installed Heating element nummer 3 NOT installed Default... -
Page 10: System Booting
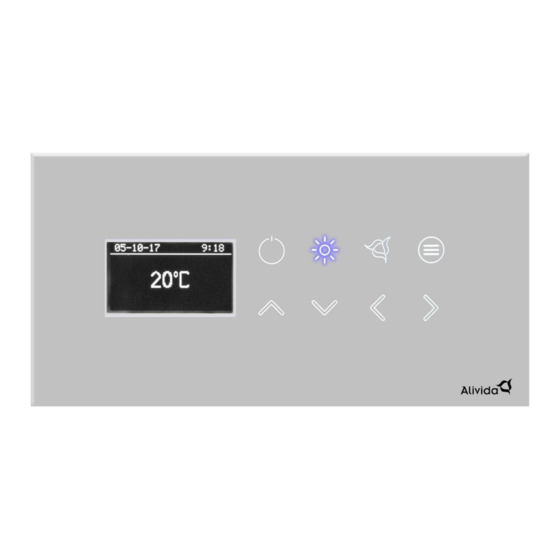
6. System Boot: User environment ICOON FUNCTIE On/off Light: With the light button the lighting is switched on/off. When the RGB LED option is connected, the user can also control the color lighting using this button. Aroma: When the aromatherapy option is enabled, the user can adjust its Intensity in 3 levels. -
Page 11: Start
Start Switch on the main voltage. The Alivida logo appears in the display. Wait for the system to initialize (+/- 8 seconds). Start up control panel In standby mode, the sauna control is in rest position. The on/off button on the display shows a dim white light. -
Page 12: Set Date And Time
Set date and time Press the on/off button so that the control comes out of Idle Mode. The display starts up after which the Alivida logo is displayed. After startup, the display will show the current date, time and temperature. -
Page 13: Sauna Function
Sauna function From idle mode, press the “on/off” button. The display will start up. When the “on/off” button is pressed again, the parameters for the temperature and the session time will appear in the display. The “on/off” button will flash blue. With the arrow keys you can change the temperature and the session time. -
Page 14: Delayed Start
Delayed start function From idle mode, press the “on/off” button. The display will start up. When the “on/off” button is pressed again, the parameters for the temperature and the session time will appear in the display. The “on/off” button will flash blue. Use the arrow keys to change the temperature and session time. -
Page 15: Lighting
Lighting When the “light” button is pressed, the lighting in the cabin will be switched on. Press the button again to switch off the lighting. Thelighting will turn off automatically after 3 hours. RGB color light (optional) If the cabin is equipped with the RGB color light option, after pressing the “light”... -
Page 16: Aromatherapy
Aromatherapy: If the sauna is equipped with aromatherapy (cold scent atomization), it can be activated as soon as the sauna session is active. There are 3 fragrance intensities namely; LOW, MEDIUM, HIGH. The aromatherapy is active when the cabin has reached a temperature of at least 30°C. -
Page 17: Option Menu
Option menu Depending on the configuration of your sauna control, you have 1 or more options at your disposal. When your sauna technique is configured with 1 option, it will be switched on/off by pressing the “option” key. The “option” button lights up as soon as this option is activated. -
Page 18: Messages And Error Codes
Meldingen en foutcodes Error Message Description Possible cause Solution E1_1 Communicatie Bad connection between display and problem between controller Reset controller and display Display or controller malfunction Controller failure E2_1 Thermal protection Fix the error Thermal cut-out problem Thermal cut-out position incorrect Reset Cable connection lost Temperature out of range... -
Page 19: Technical Data
2. Technical data Alivida Sauna Controller Power supply 230V 50/60Hz or 400V 3N 50/60HZ Maximum power 9.0 kW Temperature sensor NTC (cable 3.4 meter) Thermal protection Silicone (cable 3.5 meter) Lighting 0.5A @ 230V Sauna heating elements Max 3 x 3.0 kW @ 230V...
Need help?
Do you have a question about the Sauna Controller and is the answer not in the manual?
Questions and answers