Advertisement
Quick Links
__________________________________________________________________________________________________________________________
N
A
C
E
y
e
N
A
C
E
y
e
(00175)D
M
a
r
k
R
e
c
o
M
a
r
k
R
e
c
o
N
A
C
I
m
N
A
C
I
m
r
d
e
r
E
M
R
-
9
r
d
e
r
E
M
R
-
9
M
a
y
2
0
0
9
M
a
y
2
0
0
9
a
g
e
T
e
c
h
n
o
l
o
g
y
a
g
e
T
e
c
h
n
o
l
o
g
y
EMR-9 Quick Start Guide
Q
u
i
c
k
S
t
a
r
Q
u
i
c
k
S
t
a
r
I
n
c
.
I
n
c
.
t
G
u
i
d
e
t
G
u
i
d
e
1
Advertisement

Summary of Contents for Nac EMR-9
- Page 1 EMR-9 Quick Start Guide __________________________________________________________________________________________________________________________ (00175)D...
- Page 2 EMR-9 Quick Start Guide __________________________________________________________________________________________________________________________ 3. Specifications (00175)D...
-
Page 3: Standard Configuration
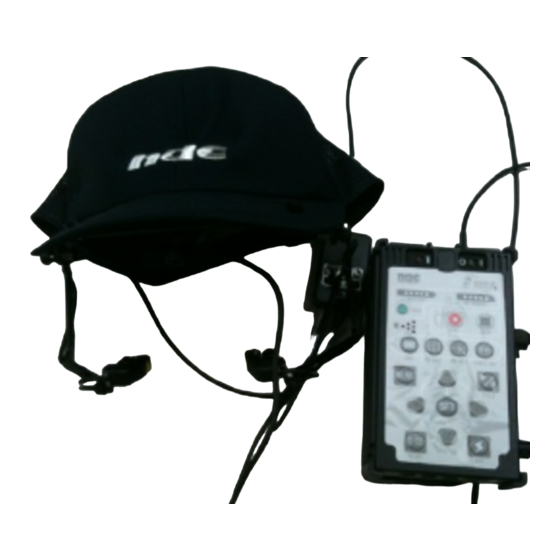
EMR-9 Quick Start Guide __________________________________________________________________________________________________________________________ 1.1. Standard Configuration Head Unit Cap-Type / Glasses-Type (see 1.2) Controller AC Adapter View Lens 44deg. SD Card 1GB AV Cable Carrying Case for Main Unit Manual (00175)D... - Page 4 EMR-9 Quick Start Guide __________________________________________________________________________________________________________________________ 1.2. Head Unit Variations Glasses-Type, Cap-Type, Dual-Eye Detection Dual Eye Detection 1 x Head Unit 1 x Head Unit 1 x Right Eye Detector 1 x Right Eye Detector 1 x Left Eye Detector 1 x Left Eye Detector...
-
Page 5: Optional Items
EMR-9 Quick Start Guide __________________________________________________________________________________________________________________________ 1.3. Optional Items Battery & Charger LCD Viewfinder View Lens Serial Cable 44deg., 62deg., 92deg, 121deg Pointer Cue Switch Head Unit Event/Reset Cable Extension Cable, 3m Carrying Case for EMR-dFactory Accessories EMR-dStation Eye Movement Analysis... - Page 6 EMR-9 Quick Start Guide __________________________________________________________________________________________________________________________ 2) Connect the Head Unit 3) Connect a video monitor 4) Insert a SD card 5) Connect the AC adapter Note: Power must be OFF when connecting devices. 1) Turn off the power. 2) Connect the Head Unit and the Controller.
- Page 7 EMR-9 Quick Start Guide __________________________________________________________________________________________________________________________ Battery Indicator LED SD Card Indicator LED It indicates the battery amount It indicates the SD card amount when pushing the Check Key. If when pushing the Check Key. If the the battery will be running out in...
- Page 8 EMR-9 Quick Start Guide __________________________________________________________________________________________________________________________ 1. Preparations Set the parameters regarding configuration according to system configuration. Following shows the path of essential parameters. Push the key to enter/exit Menu mode. Go to and/or change the parameters using UP /DOWN /LEFT /RIGHT keys.
- Page 9 EMR-9 Quick Start Guide __________________________________________________________________________________________________________________________ 3) View Lens Menu > System > Lens > 44/ 62 / 92 / 121 4) Eye to be detected Menu > User > Eye > L / R / RL 2. Head Unit Adjustments in case of the Cap-Type...
- Page 10 EMR-9 Quick Start Guide __________________________________________________________________________________________________________________________ 2) Wear the Head Unit as shown in the following pictures. 3) Push the key to get back the view image. 4) Adjust the view camera position so that an object in the view image becomes center while a subject watches the object slightly below (about 10degree).
- Page 11 EMR-9 Quick Start Guide __________________________________________________________________________________________________________________________ Head Unit Adjustments in case of the Glasses-Type 1) Push the key to enter Menu mode. In Menu mode, a LED of eye detector is off, and a subject can ware the Head Unit safely.
- Page 12 EMR-9 Quick Start Guide __________________________________________________________________________________________________________________________ 3) Push the key to get back the view image. 4) Adjust a view camera position so that an object in the view image becomes center while a subject watches object slightly below (about 10degree).
- Page 13 EMR-9 Quick Start Guide __________________________________________________________________________________________________________________________ 1) Display an eye image on the monitor. You can change the monitor image by pushing the LEFT RIGHT keys. Ex. View image > Right Eye > Left Eye > Quad image > View image 2) Verify if an eye is displayed within a frame and in focus.
- Page 14 EMR-9 Quick Start Guide __________________________________________________________________________________________________________________________ 1. Auto Binary Image Adjustment for Pupil Detection It allows you to adjust the binary image level of Pupil and Purukinje automatically. If you set “AUTO”, the binary image adjustment automatically starts when you enter the calibration mode.
- Page 15 EMR-9 Quick Start Guide __________________________________________________________________________________________________________________________ 2. Manual Binary Image Adjustment for Pupil Detection 1) Enter Menu and go to: Menu > Video > S-Impose > Pupil & Purkinje. Turn ON the Purkinje by pushing the or DOWN keys. Note: The key will not be used for parameter settings.
- Page 16 EMR-9 Quick Start Guide __________________________________________________________________________________________________________________________ 【NG】Too weak 【NG】Too weak 【NG】Weak 【OK】Fine though bit weak 【OK】Fine 【OK】Acceptable though bit and a pupil diameter may be strong measured bit smaller than actual 【NG】Too strong 【OK】Acceptable though bit 【NG】Strong strong Adjust the binary image level by pushing the UP...
- Page 17 EMR-9 Quick Start Guide __________________________________________________________________________________________________________________________ 5) Push key to go back to the normal image from the binary image. 6) Display the view image on the monitor. You can change the monitor image by pushing the LEFT or RIGHT keys.
- Page 18 EMR-9 Quick Start Guide __________________________________________________________________________________________________________________________ 2) Point out a position where the CAL mark appears on the view image using a laser pointer or a something stick, such as a pen. Tips: It is easier to calibrate on a wall or a fixed plane.
- Page 19 EMR-9 Quick Start Guide __________________________________________________________________________________________________________________________ 2. Calibration Result Check In case of the 9-point calibration, you can check if the calibration is OK or NG, as follows. If the lines are on all of 9 CAL marks, the calibration went well. On the other hand, if the lines are not on or are away from one/some of 9 CAL marks, the calibration was NG.
- Page 20 EMR-9 Quick Start Guide __________________________________________________________________________________________________________________________ 1. Eye Mark Mode Immediately after the calibration, the eye mark (the gazing point of the subject) appears on the view image. This state is called as Eye Mark mode (but the data recording is not made in this mode).
Need help?
Do you have a question about the EMR-9 and is the answer not in the manual?
Questions and answers
First time I am trying to use it. I connecter controler and Laptop by LAN, and open the EMR-dFactory app, but these two are not connceting, I can't see anything, how can I connect controoler with laptopn?