Advertisement
USER MANUAL
Brushless Electronic Speed Controller
10BL60 / 10BL120 Sensored
02
Begin to Use a New Brushless ESC
1
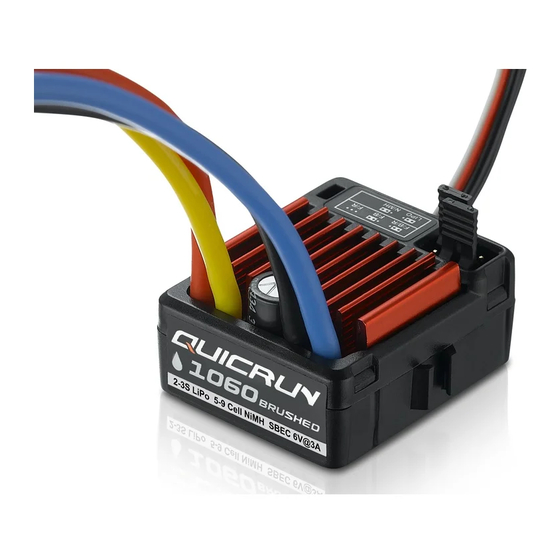
Connections
Yellow (B)
Orange (C)
C
Blue (A)
B
A
Capacitor
Motor
Sensor wire
Sensor port of motor
Receiver
Specifications
Model
Cont. / Peak Current
60A / 380A
Motor Type Supported
Sensored / Sensorless Brushless Motor
Car Applicable
1/10th Touring Car/Buggy/F1/Drift Car & 1/12th On-road
4-6 cells NiMH / 2S LiPo
≥8.5T (1/10 On-road), ≥13.5T (1/10 Off-road)
Motor Limit (Note)
8-9 cells NiMH / 3S LiPo
≥13.5T (1/10 On-road), ≥17.5T (1/10 Off-road)
Battery
4-9 cells NiMH, 2-3S LiPo
BEC Output
6V@2A, Linear Mode
Cooling Fan
6V (The cooling fan gets its power supply from the built-in BEC)
Dimensions / Weight
33 x 28 x 31.5mm (w/ Fan) / 59g (w/ Wires, w/o Fan)
Note: "T" indicates the limit value of motor turns when the ESC timing is set to 0 degree. The larger the timing, the more turns the motor needs. Please pay close attention to temperatures of the motor and the ESC to avoid any
damage to these two equipments.
2
Set the Throttle Range
In order to make sure the ESC fits the throttle range of your transmitter, you must calibrate it when begin to use a new ESC, or a used transmitter if some of its settings have been changed,
like the Throttle Trim, D/R, EPA or other parameters. Otherwise, the ESC cannot work properly. Besides, we strongly recommend users to enable the "failsafe" function of the transmitter, set
the "F/S" of the throttle channel to the Shutdown mode or set the protection value to the neutral position, so the car can be stopped if the receiver fails to get the radio signals from the
IMPORTANT
transmitter. Please calibrate the throttle range according to the following steps.
Hold down the
Turn on the
Release the SET
SET button.
switch
button once the LED
flashes.
Move the throttle stick to the neutral position and press
the SET button.
The Green LED
flashes once and
motor emits
"Beep" tone.
Set the 3 points according to pictures
• The neutral point. • The end point of the forward direction. • The end point of the backward/brake direction.
When the process of calibration is finished, the motor can be started after 3 seconds.
3
Check the LED Status in Normal Running
a) When the throttle stick is in the neutral range, neither the Red LED nor the Green LED lights up.
b) When the car moves forward, the Red LED solidly lights; the Green LED also lights up when the throttle stick is at the top position (100% throttle).
c) When the car brakes, the Red LED solidly lights; the Green LED also lights up when the throttle stick is at the end position and the maximum brake force is set to 100%.
d) When the car reverses, the Red LED solidly lights; the Green LED also lights up when the throttle stick is at the end position and the maximum reverse force is set to 100%.
Congratulations and thanks for purchasing the QUICRUN series electronic speed
controller (ESC). The power system for RC model can be very dangerous, so please
ATTENTION
read this manual carefully. Since we have no control over the installation, application,
use or maintenance of this product, in no case shall we be liable for any damages,
losses or costs.
CAUTIONS
01
Features
• High performance but low price, users can own this reliable race-ready ESC at an affordable cost.
• Compact size, suitable for various car chassis.
• Auto identification system can recognize sensored / sensorless brushless motors automatically.
• Core competition program for excellent control feel & multiple programmable items.
• 8 steps of timing adjustment greatly increase the output power of the motor, and unlock its maximum
potential.
• Proportional brake with 4 steps of Maximum Brake Force adjustment, 8 steps of Drag Brake Force
adjustment and 4 steps of Initial Brake Force adjustment.
• 9 steps of acceleration (punch) adjustment, from "soft" to "very aggressive" to fit for different kinds of
cars, tires and tracks.
• Multiple protections: Low voltage cut-off protection for Lipo or NiMH battery / Over-heat protection /
Throttle signal loss protection / Motor Lock-up protection.
• One-button (the "SET" button on the ESC) to set the ESC, and easy to reset all parameters to the factory
default settings.
20170719
• Compatible with the optional device - the portable Digital LED Program Card, especially convenient for
outdoor use.
Battery
Electronic Speed Controller
Sensored motor wiring
When using sensored brushless motor, please connect the "SENSOR" port of the ESC and the the "SENSOR"
Switch
port of the motor with a sensor wire.
ATTENTION
For sensored brushless motor, the #A, #B, #C wires of the ESC MUST be connected with the motor wire #A, #B,
#C respectively. Do not change the wires sequence optionally! (#A is Blue, #B is Yellow, #C is Orange.)
Sensorless motor wiring
When using sensorless brushless motor, the #A, #B, #C wires of the ESC can be connected with the motor wires
CAUTIONS
freely (without any order). If the motor runs in the opposite direction, please swap any two wire connections.
Please disconnect the battery from the ESC after running the car!
QUICRUN 10BL60 SENSORED
QUICRUN 10BL120 SENSORED
120A / 760A
Sensored / Sensorless Brushless Motor
1/10th Touring Car/Buggy/F1/Drift Car, and etc.
≥3.5T (1/10 On-road), ≥4.5T (1/10 Off-road)
≥8.5T (1/10 On-road), ≥10.5T (1/10 Off-road)
4-9 cells NiMH, 2-3S LiPo
6V@3A,Linear Mode
Powered by the battery
43 x 36 x 33mm (w/ Fan) / 105g (w/ Wires & Fan)
1. Turn on the transmitter, and set parameters (of the throttle channel) like "D/R, "EPA", "ATL" to 100% (if there is no LCD display
on the transmitter, please adjust the corresponding knob to its limit). Set the throttle trim to 0 (if there is no display, then adjust the
knob to the neutral position). For FUTABA
TM
and similar transmitters, set the throttle direction to "REV", while the throttle direction
of others to "NOR". Please disable the built-in ABS brake function in your transmitter.
2. Hold the SET button while sliding the switch to the ON position, and then release the "SET" button the moment when the Red
LED starts to blink. (If you don't release the SET button in 3 seconds, the ESC will enter the program mode, in such a case, please
switch off the ESC and re-calibrate the throttle range again from Step 1.)
Move the throttle stick to the end position of forward
Move the throttle stick to the end position of backward
and press the SET button.
and press the SET button.
The Green LED flashes
twice and motor emits
"Beep-Beep"
tone.
03
Program the ESC
1
Set the ESC by the SET button
Enter the corresponding
Turn off the ESC
programmable item, the
Turn on the transmitter
red LED flashes for
several times, the times
Hold the SET key
Switch on the ESC
presents the current
value of this item.
Red LED flashes
Release
SET key
Green LED flashes
once
Hold SET key for 3 seconds
Release
SET key
Enter the 2
Green LED flashes
"Drag Brake Force"
twice
Hold SET key for 3 seconds
Release
Enter the 3
Green LED flashes
SET key
item"Low Voltage
3 times
Cut-Off"
Hold SET key for 3 seconds
......The following steps are just like the above setps......
Hold SET key for 3 seconds
Green LED flashes
N times
Release
SET key
04
Reset All Items to Default Values
At any time when the throttle is located at neutral position (except in the throttle calibration or parameters program process), press and hold the "SET" key for over 3 seconds, the red LED and green LED will blink
simultaneously , which means each programmable item has be reset to its default value. It needs to be restarted to complete the whole process.
05
Programmable Items
1. Running Mode: With "Forward with Brake" mode, the car can go forward and brake, but cannot go backward, this mode is suitable for competition; "Forward / Reverse with Brake" mode has reverse running function, which is suitable for daily training.
Note: "Forward/Reverse with Brake" mode uses "Double-click" method to make the car go backward. When you move the throttle stick from forward zone to backward zone for the first time (The 1st "click"), the ESC begins to brake the motor,
the motor slows down but it is still running, not completely stopped, so the backward action is NOT happened immediately. When the throttle stick is moved to the backward zone again (The 2nd "click"), if the motor speed is slowed down to zero
(i.e. stopped), the backward action will happen. The "Double-Click" method can prevent mistakenly reversing action when the brake function is frequently used in steering. By the way, in the process of braking or reversing, if the throttle stick is moved
to forward zone, the motor will run forward at once. "Forward/Reverse" mode uses "single-click" method to make the car reverse. When moving the throttle stick from neutral zone to backward zone, the vehicle reverses immediately, so this mode is
usually used by rock crawler.
2. Drag Brake Force: Set the amount of drag brake applied at neutral throttle to simulate the slight braking effect of a brushed motor while coasting.
3. Low Voltage Cut-Off: The function mainly prevents the Lipo battery from over discharging. The ESC detects the battery voltage at any time, if the voltage is lower than the threshold for 2 seconds, the output power will be reduced 70%, after 10
seconds the output power will be completely shut off and the red LED flashes in such a way: "☆-, ☆-, ☆-". Please stop your car at the track side as soon as possible to avoid obstructing other racing cars.
Note: For NiMH battery, if the voltage of the whole NiMH battery pack is higher than 9.0V, it will be considered as a 3 cells Lipo battery pack; If it is lower than 9.0V, it will be considered as a 2 cells Lipo battery pack. For example, if a NiMH battery
pack is 8.0V, and the threshold is set to 2.6V/Cell, so it will be considered as a 2 cells Lipo battery pack, and the low-voltage cut-off threshold for this NiMH battery pack is 2.6x2=5.2V.
4. Start Mode (Also called "Punch" or "Acceleration"): Level 1 has very soft start acceleration, while level 9 has very quick start acceleration. From Level 1 to Level 9, the start force is increasing. If you choose "Level 7" to "Level 9", you should use
good quality battery with powerful discharge ability, otherwise you cannot get the burst start effect as you want. If the motor cannot run smoothly (the motor is cogging), sometimes it is caused by the weak discharge ability, please use a better battery
or increase the gear ratio.
5. Maximum Brake Force: The ESC provides proportional brake function. The brake force is related to the position of the throttle stick. Maximum brake force refers to the force when the throttle stick is located at the end point of the backward zone.
A very large brake force can shorten the brake time, but it may damage the gears.
6. Maximum Reverse Force: Sets how much power will be applied in the reverse direction.
7. Initial Brake Force: It is also called "minimum brake force", which refers to the force when the throttle stick is located at the initial position of the backward zone. The default value is equal to the drag brake force, so the brake action can be very
smoothly.
8. Throttle Neutral Range: This setting adjusts the width of the neutral range.
9. Timing: This function can be used to fine-tune the output power of the motor, the bigger the timing, the faster the motor runs or the larger output power of the motor. As the Boost Timing technology has been introduced into this ESC, so under the
sensored mode, adjust the ESC timing can greatly increase the motor speed. Therefore, please remember to enlarge the gear ratio of the chassis and carefully check temperatures of the motor and the ESC after increasing the timing.
Parameter List of QuicRun-10BL60SD:
(Italics in the form below indicate factory defaults)
Basic Items
Option 1
Option 2
1.Running Mode
*Note
Fwd/Br
Fwd/Rev/Br
2.Drag Brake Force
5%
0%
3. Low Voltage Cutoff
Disable
2.6V/Cell
4. Start Mode (Punch)
Level 1
Level 2
Advanced Items
50%
5. Max.Drag Brake Force
25%
6. Max. Reversing Force
25%
50%
Equals Drag
0%
7. Initial Brake Force
Brake Force
6%
9%
8. Throttle Range
(Narrow)
(Normal)
9. Timing
0.00 deg
3.75 deg
Note: Fwd= Forward, Rev=Reverse, Brk=Brake
06
Trouble Shooting
Trouble(s)
The Green LED flashes
Turn on the switch, no LED lights up, and neither the motor nor fan works.
thrice and motor emits
"Beep-Beep-
After power on, motor doesn't work but emits "beep-beep-, beep-beep-"
Beep" tone.
alert tone. (there's 1-second pause between 2 "beep-beep-").
After power on, the Red LED turns solid red but the motor doesn't work.
The car runs backwards when accelerating forward on radio.
The car suddenly slows down, then stops about 10 seconds later.
The motor stuttering under heavy acceleration.
The car slows down and then stopped. The Red and Green LEDs blink
rapidly and synchronously when throttle stick in neutral.
The motor stutters and can't start up.
Press the SET key to choose the
ATTENTION
programmable value, the RED LED
flashes for several times, the times
presents the serial number of the
value you are choosing.
Red LED flashes once to choose
"Forward with brake"
Press
Red LED flashes twice to choose
Enter the 1
item
st
SET key
"Forward / Reverse with brake"
"Running Mode"
Red LED flashes 3 times to choose
"Forward / Reverse"
Red LED flashes once, choose "0%"
Red LED flashes twice, choose "5%"
Press
Red LED flashes 3 times, choose "10%"
nd
item
SET key
Red LED flashes 4 times, choose "20%"
Red LED flashes 5 times, choose "40%"
Red LED flashes 6 times, choose "60%"
Red LED flashes 7 times, choose "80%"
2
Red LED flashes 8 times, choose "100%"
Set the ESC by Program Card
Red LED flashes once, choose "None"
Press
Red LED flashes twice, choose "2.6V"
The Program Card is optional equipment which needs to be purchased separately. It has 3 digital
SET key
rd
Red LED flashes 3 times, choose "2.8V"
LEDs to display the programmable items' number and the options' number. It is portable and
Red LED flashes 4 times, choose "3.0V"
Red LED flashes 5 times, choose "3.2V"
very easy to use.
Red LED flashes 6 times, choose "3.4V"
(For detailed information, please refer to the user manual of the program card).
Press SET key to choose the value,
the flash times of the RED LED
means the option number.
Enter the N
th
item
(Once means the 1st option,
Press
twice means the 2nd option, etc.)
SET key
Recommended Power System
Option 3
Option 4
Option 5
Option 6
Option 7
Option 8
Option 9
Motor
Fwd/Rev
QUICRUN 3650SD 6.5T G2
10%
20%
40%
60%
80%
100%
QUICRUN 3650SD 8.5T G2
2.8V/Cell
3.0V/Cell
3.2V/Cell
3.4V/Cell
QUICRUN 3650SD 10.5T G2
Level 3
Level 4
Level 5
Level 6
Level 7
Level 8
Level 9
QUICRUN 3650SD 13.5T G2
QUICRUN 3650SD 17.5T G2
QUICRUN 3650SD 21.5T G2
75%
100%
QUICRUN 3650SD 25.5T G2
75%
100%
20%
40%
12%(Wide)
7.50 deg
11.25 deg 15.00 deg 18.75 deg
22.50 deg 26.25 deg
ATTENTION
Possible Causes
No battery voltage is input to the ESC. The switch of the ESC is damaged
The voltage of the battery pack is not in the normal range, it's too high or too low.
The throttle signal wire is oppositely inserted or into the incorrect channel.
The wire connections between the ESC and the motor need to be changed.
The ESC is not suitable for the chassis.
Low voltage cutoff protection (Red LED blinks)
Thermal protection (Green LED blinks)
Low battery discharge rate.
The motor RPM is too high (i.e. the motor runs too fast), and the gear ratio is too small.
The "Punch" setting is too high.
ESC detects abnormal signals from the sensor port of the motor and the ESC changes to
sensorless driving mode automatically.
The connections between the motor and ESC are not A-A, B-B and C-C;
The ESC is damaged
• In the ESC setting process, the motor will emit "Beep" tone at the same time
when the LED is flashing.
• If the "N" is bigger than the number "5", we use a long time flash and long
"Beep—" tone to represent "5", so it is easy to identify the items with the big
serial number.
For example, if the LED flashes as the following:
"A long time flash + 1 short time flash" (Motor sounds "B—B") = the No. 6 item,
"A long time flash + 2 short time flash" (Motor sounds "B—BB") = the No. 7 item,
"A long time flash + 3 short time flash" (Motor sounds "B—BBB") = the No. 8 item,
and so on.
Gear Ratio
Gear Ratio
KV
Main Application
(1/10 on-road)
(1/10 off-road)
5750
6.4 - 8.4
9.0 - 11.0
1/10th buggy racing
4560
5.0 - 6.0
7.0 - 8.5
1/10th buggy racing, drift car
3600
5.0 - 6.5
6.5 - 8.0
1/10th drift car/ Stock racing
2850
4.0 - 5.5
6.5 - 7.5
1/10th Stock racing
2170
3.5 - 5.5
5.5 - 7.0
1/10th Stock racing
1800
3.0 - 5.5
4.0 - 6.0
1/10th Stock racing, F1, rock crawler
1520
1/10th Stock racing, rock crawler
The reference gear ratios in the above form are based on the 1/10 RC cars with 2S Lipo and 0
timing ESC. If the ESC timing is increased, then the gear ratio needs to be increased
accordingly. Besides, please pay attention to the temperature of the ESC and the motor to
avoid any damage to the equipments.
Solution(s)
Check the connections between the battery and the ESC, re-solder the connectors if needed.
Change the switch.
Check the voltage of the battery pack.
Plug the signal wire (Rx lead) correctly into the throttle channel (usually Channel #2) of the receiver.
Swap any two wire connections between the ESC and the motor. (Note: This method is ONLY
available for SENSORLESS motor ) Please don't use the ESC for this special chassis.
Check the battery voltage. If still has some capacity, lower the cut-off threshold voltage;
if not, replace a new battery.
Wait several minutes to cool the ESC. Increase the gear ratio or the T number (Turns) of the motor.
Use a battery pack with better discharge ability.
Use a low-speed motor, or increase the gear ratio.
Set the acceleration (punch) to the softer mode.
Check the sensor wire connection.
The Hall sensors in the motor are damaged, please change the motor.
Check wiring & connections.
Contact the distributor for sales-after service.
Advertisement
Table of Contents

Subscribe to Our Youtube Channel
Related Manuals for Hobbywing QUICRUN Series


Summary of Contents for Hobbywing QUICRUN Series
- Page 1 Congratulations and thanks for purchasing the QUICRUN series electronic speed Program the ESC controller (ESC). The power system for RC model can be very dangerous, so please ATTENTION read this manual carefully. Since we have no control over the installation, application,...
- Page 2 感谢您购买QUICRUN(酷跑)系列有感无刷电子调速器!无刷动力系统功率强大, 设置调速器参数 错误的使用可能造成人身伤害和设备损坏。请您在使用设备前仔细阅读本说明书, ATTENTION 并严格遵守规定的操作程序。我们不承担因使用本产品而引起的任何责任,包括但 不限于对附带损失或间接损失的 赔偿责任;同时,我们不承担因擅自对产品进行 修改所引起的任何责任。我们有权在不经通知的情况下变更产品设计、外观、性能 利用电调上的SET按键进行参数设置 • 指示灯闪烁的同时,电机会发出鸣音“哔”,以便于识别。 CAUTIONS 及使用要求。 车用无刷电子调速器 • 当N≥5时,我们使用一次较长时间的指示灯闪烁(同时伴有一次较长时间的鸣音)来表 进入相应的设定项,红 单击“SET”键选择设定值, 关闭电调电源开关, 使用说明书 ATTENTION 示数字“5”。 灯闪烁,闪烁次数代表 红灯闪烁次数代表选择了该设定项 开启发射机电源开关 比如,电调内绿灯长闪一次(同时电机发出一次长鸣音“哔—”),表示进入第5设定项; 该设定项当前设定值 的第几个设定值 10BL60 / 10BL120 Sensored 产品特色 按住“SET”键,然 若电调内绿灯长闪一次再短闪一次(同时电机发出一次长鸣音“哔—”和一次短鸣音 后打开电调电源开关 “哔”),表示进入第6设定项,依次类推,第7设定项为“哔—哔哔”,第8设定项为 电调上红灯闪烁 ・ 体积小巧,便于安装于各种车架; 红灯闪一次,选择“正转带刹车”...
Need help?
Do you have a question about the QUICRUN Series and is the answer not in the manual?
Questions and answers