Table of Contents
Advertisement
Quick Links
CAUTION
READ INSTRUCTIONS CAREFULLY FOR SAFE
INSTALLATION AND FAN OPERATION.IF UNSURE CONSULT
A QUALIFIED ELECTRICIAN
1. To avoid possible electric shock, turn off the electricity at the main fuse box or circuit panel before you begin
the fan installation or before servicing the fan or installing accessories.
2. Read all instructions and safety information carefully before installing your fan and save these instructions.
3. Make sure all electrical connections comply with local codes or ordinances and the National Electrical Code.
If you are unfamiliar with electric wiring, please use a qualified and licensed electrician.
4. Make sure you have a location selected for your fan that allow clear space for the blades to rotate, and at least
seven (7) feet of clearance between the floor and the fan blade tips. The fan should be mounted at least thirty
(30) inches from walls or other upright structures.
5. WARNING: The outlet box and ceiling support joist used must be securely mounted, and capable of
supporting at least 100 pounds. To reduce the risk of fire, electric shock or personal injury, mount to the outlet
box marked acceptable for fan supported and use mounting screws provided with the outlet box. The box must
be supported directly by the building structure.
6. WARNING: To reduce the risk of fire, electric shock or personal injury, mount to outlet box marked
"acceptable for fan support" and use mounting screws provided with the outlet box most outlet boxes commonly
used for the support of lighting fixtures are not acceptable for fan support and may need to be replaced. Consult
a qualified electrician if in doubt.
7. Electrical diagrams are for reference only. Light kits that are not packed with the fan must UL listed and
marked suitable for use with the model fan you are installing. Switches must be UL. general use switches. Refer
to the instructions packaged with the light kits and switches for proper assembly.
8. After installation is complete, check that all connections are absolutely secure.
9. After making electrical connections, spliced conductors should be turned upward and pushed carefully up
into outlet box. The wires should be spread apart with the grounded conductor and the equipment-grounding
conductor on one side of the outlet box.
10. WARNING:
control device, or rheostat.
11. Do not separate the reverse switch until the fan has come to a complete stop.
12. Do not insert anything into the fan blades while they are rotating.
13. WARNING: To reduce the risk of personal injury, do not bend the blade brackets (also referred to as
"flanges") during assembly or after installation. Do not insert objects in the path of the blades.
14. To avoid personal injury or damage to the fan and other items, be cautious when working around or cleaning
the fan.
15. Do not use water or detergent when cleaning the fan or fan blades. A dry dust cloth or lightly dampened
cloth will be suitable for most cleaning.
NOTE: The important safety precautions and instructions appearing in the manual are not meant to cover all
possible conditions and situations that may occur. It must be understood that common sense and caution are
necessary factors in the installation and operation of this fan.
INSTALLING THE FAN
Tools Required: Phillips screwdriver, Pair of pliers, straight slot screwdriver, adjustable wrench, step ladder, and wire cutters.
INSTALLLING THE MOUNTING BRACKET
The ceiling fan must be installed in a location so that the blades are 12"( 300mm) spacing from the tip of the blade to the nearest objects or walls. When hanging the Fan REMEMBER to turn
off the power. Follow the instruction below to hang your fan properly:
1. For concrete ceiling, drill two holes in
2. For wood ceiling, install the
the ceiling and secure the mounting
mounting bracket to the ceiling which
bracket to the ceiling with two
is capable of carrying a load of at least
Φ0.32"(8mm) ( distance between the
100lbs(45kgs) with two long mounting
two holes should be appropriate)
screws and washers provided. Be sure
expansion screws, flat washers,nuts
at least 0.12"(30mm) of the screw is
provided and tighten with a spanner.
threaded into the support.
NOTE:Hanger after the installation must be able to withstand the weight of 100lbs( 45kgs) or more
Parrotuncle Lighting, 218 Black Tie Lane, Chapel Hill, NC
www.parrotuncle.com
Parrot Uncle YOU CAN BE SURE OF are trademarks of Eileen Grays LLC.
Installation & Operating Instructions for the
Parrotuncle Owner's Installation ,Manual
WARNING: SHUT POWER OFF AT FUSE OR CIRCUIT BREAKER
THANK YOU FOR YOUR PURCHASE
instructions before using the product
NOTE: This product is not intended for use by persons (including children) with reduced physical,
sensory or mental capabilities are different or are impaired, or lack of experience or knowledge,
unless such persons are supervised or trained to operate the appliance by a person responsible for
their safety.
NOTE: Children should be supervised to ensure that they do not use appliances as a toy.
BEFORE INSTALLATION
SKU
R
t a
d e
o V
a t l
e g
R
t a
d e
p
w o
r e
m (
t o
) r o
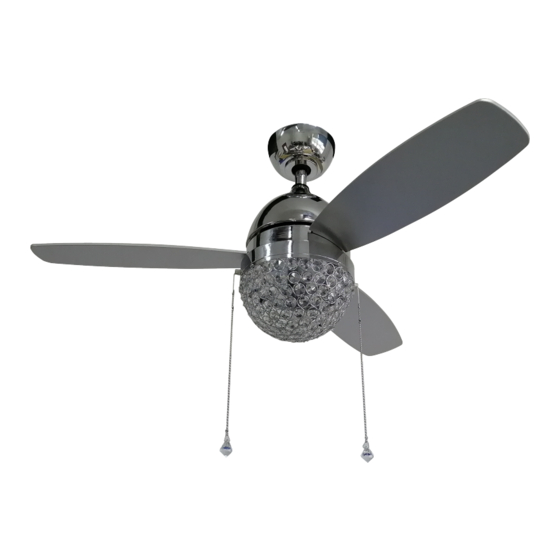
F6273
38W
BEFORE INSTALLATION
Unpack your fan and check the contents.You should have the following:
1
2
3
17 18 19 20
4
5
6
8
7
9
12
10
11
13
14
15
16
1. Mounting bracket
9. Top housing
2. Mounting screws
10. Fan motor assembly
3. Canopy
11. Light Pan
12. Blades
4. Downrod & hanger ball
13. Screws for blade
5. Canopy cover
14. Screws for light shade
6. Coupling cover
7. Bolt
15. Light shade
8. Lock pin
16. Bead pendant
3. For installing to outlet box, secure the outlet box
4. Refer to the Fig. in right for mounting
directly to the building structure. Use appropriate
when the ceiling is angled max. 15
fasterners and building materials. The outlet box and its
degree angle.
support must be able to fully support the moving weight
of the fan(at least 100lbs). Use a UL listed metal outlet
box. Do not use a plastic outlet box. Figure 1& 2
examples to mount the outlet box.
Used under license by Eileen Grays LLC.
All rights reserved.
F6273
Light CCT.
E26 40W(MAX.)EXCLUDE
21
Remove the tool Blades Screws and Washers from the screw package.
1.
2.Insert blade into the slot on flywheel.Install blade with screws and
washers that were removed earlier,aligning each of the holes and tighen
all serews securely.Repeat this process for remaining blades.
3.Install Max.40 watt G45 bulb(bulb not included).
4.Raise and hold the light shade close to the light pan,install the light
17. Wood screws
shade to the light pan by 4 screws that.pre-assembled at the side of the
18. Expansion screws
light pan,Tighten all screws securely.
19. Screw washers
20. Balancing tape
5.Remove the tool Bead pendant from the screw package and install it on the
21. Balancing clip
drawstring switch.
Parrotuncle Lighting, 218 Black Tie Lane, Chapel Hill, NC
Made in China
Parrot Uncle YOU CAN BE SURE OF are trademarks of Eileen Grays LLC.
WARNING: SHUT POWER OFF AT FUSE OR CIRCUIT BREAKER
Coupling
Downrod &
hanger ball
Coupling
cover
INSTALLING THE FAN TO MOUNTING BRACKET ON
CEILING
1.
2.
3.
USING YOUR CEILING FAN
The pull chain located on the switch housing controls the speed of
your fan. When the fan is OFF,pull the chain once for HIGH speed,
twice for MEDIUM speed, three times for LOW speed and fourth time
to turn it off again.
The pull chain located on the switch housing controls the speed of
your light. When the light is OFF,pull the chain once for LIGHT ON,
twice for to turn it off again.
Reverse function
slide the forward /reverse switch on the coupling to get desired airflow
direction.
www.parrotuncle.com
Used under license by Eileen Grays LLC.
F6273
Installation & Operating Instructions for the
Parrotuncle Owner's Installation ,Manual
Canopy
Decorative
canopy cover
Lock pin
Bolt
Set screw
.
All rights reserved.
Made in China
Advertisement
Table of Contents

Related Manuals for Parrot Uncle F6273


Summary of Contents for Parrot Uncle F6273
- Page 1 Parrotuncle Lighting, 218 Black Tie Lane, Chapel Hill, NC www.parrotuncle.com Parrot Uncle YOU CAN BE SURE OF are trademarks of Eileen Grays LLC. Used under license by Eileen Grays LLC. Made in China Parrot Uncle YOU CAN BE SURE OF are trademarks of Eileen Grays LLC.
- Page 2 Parrotuncle Lighting, 218 Black Tie Lane, Chapel Hill, NC www.parrotuncle.com Parrotuncle Lighting, 218 Black Tie Lane, Chapel Hill, NC www.parrotuncle.com Parrot Uncle YOU CAN BE SURE OF are trademarks of Eileen Grays LLC. Used under license by Eileen Grays LLC. All rights reserved. Made in China Parrot Uncle YOU CAN BE SURE OF are trademarks of Eileen Grays LLC.
Need help?
Do you have a question about the F6273 and is the answer not in the manual?
Questions and answers