
Related Manuals for RF 40019309

Summary of Contents for RF 40019309
- Page 1 40019309 NOTICE D’UTILISATION OPERATING INSTRUCTIONS 40019309 GEBRUIKSAANWIJZING BEDIENUNGSANLEITUNG MANUALE DI ISTRUZIONI MANUAL DE INSTRUCCIONES INSTRUKCJA OBSŁUGI...
-
Page 2: Table Of Contents
1 Présentation 1.1 Introduction 1.2 Avertissements 1.3 Présentation de votre appareil 2 Installation de votre appareil 2.1 Avertissements 2.2 Raccordement de l’appareil FRANÇAIS 3 Utilisation de votre sèche-serviettes mixte ENGLISH 3.1 Utilisation en chauffage central 3.2 Utilisation en chauffage électrique NEDERLANDS 4 Mise en service de la commande à... -
Page 3: Présentation
à l’utilisation de l’appareil en toute sécurité et en comprennent bien les dangers potentiels. Les enfants âgés entre 3 ans et 8 ans ne doivent ni brancher, ni régler ni nettoyer l’appareil, et ni réaliser l’entretien de l’utilisateur. 40019309 05/2019... -
Page 4: Présentation De Votre Appareil
IMPORTANT L’exemple montré ici ne concerne que le cas d’une baignoire. Pour les autres types d’équipements de salle de bains, consultez obligatoirement votre installateur. IMPORTANT L’installation doit être équipée d’un dispositif de coupure omnipolaire ayant une distance d’ouverture de contact d’au moins 3 mm. 40019309 05/2019... -
Page 5: Raccordement De L'appareil
2.2 Raccordement de l’appareil Les caractéristiques techniques de votre appareil sont indiquées sur son étiquette signalétique. Veillez à en prendre note préalablement à son installation et à toute demande d’intervention * Voir notice de pose pour la valeur de X 40019309 05/2019... -
Page 6: Utilisation De Votre Sèche-Serviettes Mixte
IMPORTANT : La mise sous tension de l’appareil doit s’effectuer uniquement si celui-ci est Le câble souple monté d’origine est destiné à être relié au réseau correctement rempli d’eau (sous risque d’annulation de la garantie). par l’intermédiaire d’une fiche de prise de courant. 40019309 05/2019... -
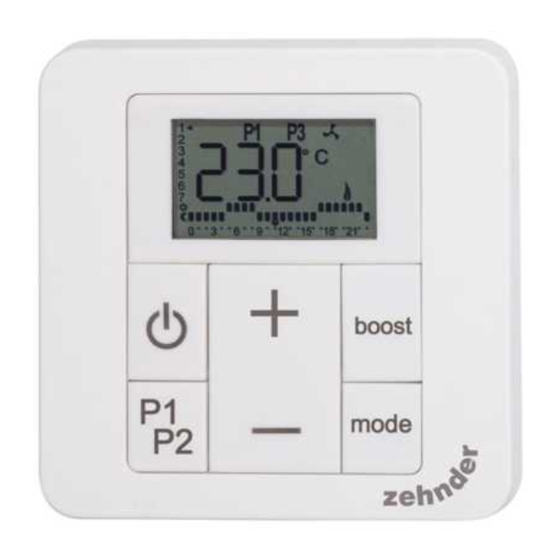
Page 7: Mise En Service De La Commande À Distance
été effectué (voir chapitre 4.3). SONDE ≠ LED) ATTENTION Le visuel de la LED peut varier suivant le modèle d'appareil (voir page 3 de couverture). CLIC x 2 40019309 05/2019... -
Page 8: État De La Led
Synchronisation l’heure n’auront pas été réglées. Défilement heures de la journée (prog) En cas d'échec de l'appairage, l'affichage de la commande revient à rF 0. Une commande Relancez la procédure d'appairage en appuyant à distance déjà 5 secondes sur la touche +. Vérifiez avant que le boîtier appairée ne peut pas... -
Page 9: Réglage De L'heure Et Du Jour
P1P2 & mode Réglage de l’heure et du jour (voir chapitre 4.5) sont maintenant peut être effectuée à enregistrés. tout moment. mode P1P2 & mode Accès au paramétrage avancé (voir chapitre 5.3) (avec la commande à distance éteinte) 40019309 05/2019... -
Page 10: Utilisation De La Commande À Distance
Par défaut votre appareil fonctionne en mode éco associé. Les changements de modes émis par une centrale fil pilote (non fournie avec votre appareil) ne seront pas désactivés par cette fonction. La LED de votre boîtier récepteur s'allume en vert. mode 40019309 05/2019... - Page 11 Confort (ex. : votre température Éco ne pourra pas être supérieure à 18°C si votre température de Confort est réglée sur 19°C). Sans réglage de votre part, la température Éco dissociée prend la valeur par défaut de 15,5°C. 40019309 05/2019...
- Page 12 La LED de votre boîtier récepteur s'allumera dans la couleur correspondant au mode de fonc- tionnement envoyé par la centrale (voir chapitre 4.2). La commande à distance fera clignoter l'icône correspondant au mode de fonctionnement envoyé par la centrale. Exemple : la centrale envoie un ordre de mode Éco 40019309 05/2019...
-
Page 13: Paramétrage Avancé De La Commande À Distance
Température Valeur 0 (température éco dissociée) ou 1 (température éco éco associée : T° de confort moins 3,5°) Après une minute sans appui sur une touche, la commande à distance sortira auto- matiquement des paramètres avancés et s'éteindra. 40019309 05/2019... -
Page 14: Choix De La Sonde De Mesure De Température
En cas de réinitialisation de la commande à distance (voir chapitre 5.3, paramètre 9), le paramètre 4 appuyez sur la touche - la sonde active par défaut reviendra au réglage de sortie d’usine. jusqu’à ce que la commande affiche -2°C (soit 21-2=19°C). 40019309 05/2019... -
Page 15: Détection D'ouverture / Fermeture Fenêtre
60 minutes la fonction de mode mode maximum de de 15 détection d’ouverture / fermeture de fenêtre, le temps que la température de la pièce se minutes. 120 minutes). stabilise. 40019309 05/2019... - Page 16 La marche forcée se déclenchera pendant les modes Éco, Confort, P1 ou P2 et prendra la main boost ment en cours. boost sur le fonctionnement normal de votre appareil. mode mode Vous pouvez désormais activer votre boost programmé. 40019309 05/2019...
- Page 17 Le programme pour pouvoir activer la L'icône clignote pendant est activé et marche forcée automatique toute la durée du boost. (voir chapitre 4). en attente. La durée du boost en cours est affichée. mode mode 40019309 05/2019...
-
Page 18: Réglage D'un Programme P1 Et/Ou P2
à l'heure suivante. mode mode Indicateur d'heure à programmer Après avoir sélectionné le mode de fonctionnement de la dernière heure d'une journée, la boost programmation passe automatiquement à la première heure du jour suivant. boost 40019309 05/2019... - Page 19 La commande à boost boost programme distance garde en mémoire journalier en la programmation effectuée, mode cours. mode mode mode même en cas de sortie en boost boost boost cours de program- mation. mode mode 40019309 05/2019...
-
Page 20: Conseils D'entretien Et Dépannage
Contacter votre installateur ou le le tiroir derrière le radia- Il n'impacte en rien sur le ture ambiante jusqu'à ce que l'écran d’autres couleurs : défaut. service SAV. teur) devient noir. fonctionnement de votre retrouve son aspect normal. commande. 40019309 05/2019... -
Page 21: Réinitialisation Complète
à distance conserve indiqué sur la commande à distance (ex. : envoi d'un le contrôle de votre appareil. à distance. ordre de mode Éco par la cen- trale alors que la commande est réglée sur Confort). 40019309 05/2019... -
Page 22: Remplacement Des Piles
à distance. Le réappairage est opéré automatiquement lors d'un changement de piles. Si l’écran affiche tout de même RF 0 et que l’icône clignote, cela signifie que la commande à distance est en train de chercher le récepteur. Si elle ne le trouve toujours pas après plusieurs Consommation en veille de l’appareil <... - Page 23 1 Overview 1.1 Introduction 1.2 Warnings 1.3 Overview of your appliance 2 Installing your appliance 2.1 Warnings 2.2 Connecting the appliance 3 Using your dual-energy towel radiator 3.1 Use as central heating 3.2 Use as electrical heating 4 Putting the remote control into service 4.1 Fitting batteries 4.2 Initial pairing 4.3 Status of LED...
-
Page 24: Overview
1. Overview been given supervision or instruction concerning use of the appliance in a safe way and understand the ha- 1.1 Introduction zards involved. Children shall not play with the appliance. Cleaning and user maintenance shall not be made by Dear customer, children without supervision. -
Page 25: Overview Of Your Appliance
2. Installing your appliance 1.3 Overview of your appliance ELECTRICAL TOWEL DRYER OR RADIATOR: 2.1 Warnings This heating appliance is filled with a precise quantity of specific oil. Any repair work requiring the oil tank to be opened should only be carried out by the manufacturer or their after-sales service depart- The flexible cable supplied with your appliance is designed to be ment, which should also be contacted in the event of an oil leak. -
Page 26: Connecting The Appliance
To ensure your system is safe: - ensure that an area of at least 50 cm in front of the appliance is clear of objects which might hinder air circulation (furniture, chairs, etc.); ≥100mm ≥100 - position a shelf at least 10 cm above the top of your radiator; ≥100mm - use mounting screws suitable for your wall;... -
Page 27: Using Your Dual-Energy Towel Radiator
3. Using your dual-energy towel radiator When connecting the appliance to the mains, you must observe: • the voltage indicated on the nameplate; • conventional colour coding: – blue or grey: neutral IMPORTANT This appliance has been designed to be used ei- –... -
Page 28: Putting The Remote Control Into Service
4. Putting the remote control into service IMPORTANT This radiator is equipped with a resistance which has an integrated power shut- off and fuse. Using the radiator without water will permanently damage the fuse as well as the resistance. In this case it must be changed though "not under the manufacturer’s gua- rantee". -
Page 29: Status Of Led
Scroll through times of day (prog) If pairing fails, the display on the A remote control goes back to rF 0. Start the pairing procedure again by pressing the + key for 5 seconds. control which has Check beforehand that the receiver unit is still ready for... -
Page 30: Setting The Time And Day
4.5 Setting the time and day ICON EXPLANATION Press for Frost-free mode operation 2 seconds on the P1P2 Eco mode operation and mode keys from any Comfort mode operation operating mode. boost mode Programmed mode operation Manual or programmed boost The time 00:00 is displayed. -
Page 31: Use Of Remote Control
5. Use of remote control 5.2 Operating mode selection 5.1 Operating remote control ON/OFF boost The remote control is turned on: it emits an audible 5 basic operating modes: Frost-free, Eco, Comfort, mode signal. programmes P1 & P2 boost ... - Page 32 ECO MODE (continued) COMFORT MODE A) Linked Eco operation The linked eco (economy) mode allows the temperature to be reduced by 3.5°C compared to the desired temperature level for the Comfort setting. (recommended if the room is occupied) The setpoint temperature can be adjusted from 7 to 28°C in boost 0.5°C steps.
- Page 33 TEMPERATURE OVERRIDE PILOT WIRE CONTROL (continued) In the programmed operating modes for your appliance (P1 or P2) you can override the ope- ration of your appliance temporarily, by changing the preferred temperature level. When your installation is fitted with a load shedding system connected at the pilot wire input, this can send your appliance a priority command to turn off (the appliance LED goes off) or for Frost-free mode (the appliance LED shows blue).
-
Page 34: Advanced Parameter Setting For Remote Control
5.3 Advanced parameter setting for remote control Parameter Description Default Setting setting Pilot wire Value 0 (pilot wire disabled) or 1 (pilot wire enabled) Press the WARNING! Access to parameter setting is possible only when the remote control is off. Some parameters on your remote control can be adjusted according to how you use it. -
Page 35: Selection Of Temperature Sensor
5.4 Selection of temperature sensor 5.5 Calibration of temperature setting The temperature of your room can be measured either by the receiver unit under your appliance Once your appliance has been working for several days, if you notice a difference between the or by the remote control. -
Page 36: Window Open/Close Detected
6. Heating boost 5.6 Window open/close detected Your appliance may detect a significant drop in temperature, caused for instance by a window standing open in winter. It will automatically adapt and operate to save energy. This function provides extra heat when required. When it is activated, the appliance operates at full power, no matter what the temperature set from the remote control. - Page 37 USE OF MANUAL BOOST (continued) SETTING A PROGRAMMED BOOST The expected duration of Press and the boost is hold P1P2 finished. and boost The appliance simulta- boost boost boost returns to boost neously. normal operating mode mode mode mode mode. The start time required can now be set.
- Page 38 ACTIVATION AND RUNNING PROGRAMMED BOOST ACTIVATION AND RUNNING PROGRAMMED BOOST (continued) You can quit a programmed boost Press on the at all times by pressing boost key for the boost key. 2 seconds. The expected duration of the boost is finished. boost boost The appliance returns to normal...
-
Page 39: Setting A P1 And/Or P2 Programme
7. Setting a P1 and/or P2 programme SETTING EACH HOUR OF THE DAY Your appliance's remote control includes two daily programmes, P1 and P2, which you can adapt to suit your needs. There are two modes possible for each hour of the day: COMFORT or ECO. The temperatures previously set for these modes (see chapter 5.2) will be applied. - Page 40 COPY/PASTE FUNCTION (help for programming) MANUAL MOVE TO PREVIOUS DAY boost boost Back to previous mode mode day, positioned Long press on on hour 0. P1P2: back to previous day, copies the current boost boost daily programme. boost boost MANUAL MOVE TO NEXT DAY mode mode boost...
-
Page 41: Maintenance And Troubleshooting
8. Maintenance and troubleshooting tips Problem Diagnosis Procedure Your appliance is not Check your appliance is properly powered up. connected and powered (see chapter 2.2). 8.1 Routine maintenance operations The appliance is not Your appliance is not turned Check the remote control is properly working. -
Page 42: Complete Reset
8.3 Complete reset Problem Diagnosis Procedure The battery level indicator Batteries drained. Change batteries (see chapter 8.4). on your remote control If your appliance freezes completely, or cannot be paired, the whole system has to be reset, then is displayed. pairing started again from the beginning (see chapter 4.1). -
Page 43: Replacing Batteries
Re-pairing takes place automatically when batteries are changed. If the screen is still showing RF 0, and the icon flashes, this means the remote control is looking for the receiver. If it has still not found the receiver after several minutes, carry out a Standby consumption for the appliance <... - Page 44 1 Uitleg 1.1 Inleiding 1.2 Waarschuwingen 1.3 Presentatie van uw apparaat 2 Het toestel installeren 2.1 Waarschuwingen 2.2 Het toestel aansluiten 3 Verdere informatie 3.1 Gebruik in de centrale verwarming 3.2 Gebruik in de elektrische verwarming 4 Ingebruikneming van de afstandsbediening 4.1 De batterijen installeren 4.2 Eerste koppelpoging 4.3 Status van de LED...
-
Page 45: Uitleg
1. Uitleg Dit apparaat kan worden gebruikt door kinderen in de leeftijd van minimaal 8 jaar en door personen met een verminderde sensorische of mentale capaciteit of personen zonder ervaring of kennis, indien zij goed onder toezicht staan of als er instructies voor het veilige 1.1 Inleiding gebruik van het apparaat zijn gegeven en de mogelijke risico's goed zijn begrepen. -
Page 46: Presentatie Van Uw Apparaat
2. Het toestel installeren 1.3 Presentatie van uw apparaat BIJ EEN ELEKTRISCHE RADIATOR OF HANDDOEKRADIATOR: 2.1 Waarschuwingen Dit verwarmingstoestel is gevuld met een nauwkeurige hoe- veelheid speciale olie. Reparaties waarvoor het oliereservoir moet worden geopend, mogen slechts door de fabrikant worden uitge- De flexibele, oorspronkelijk gemonteerde kabel is bestemd voor voerd of door zijn after-sales-service die gewoonlijk dient te worden aansluiting op het stroomnet via een aansluitdoos die zonder een... -
Page 47: Het Toestel Aansluiten
Om de veiligheid van de installatie te garanderen dient u: - plaats alle objecten (meubels, stoelen) minimaal 50 cm uit de buurt van de voorzijde van het toestel om de luchtcirculatie te ≥100 bevorderen; - laat een ruimte van 10 cm vrij tussen de bovenzijde van het ≥100mm toestel en platen;... -
Page 48: Verdere Informatie
3. Verdere informatie IP: beschermingsklasse van het toestel tegen het IP XX binnendringen van vaste stoffen en tegen spatwater Tijdens de installatie in acht te nemen spanning en 230V ~ XXXXW vermogen BELANGRIJK Dit apparaat werd ontworpen om apart in de mo- XXX–XXX–XXX–XX Toestelspecificatie dus centrale verwarming of in de elektrische modus te worden... -
Page 49: Ingebruikneming Van De Afstandsbediening
4. Ingebruikneming van de afstandsbediening BELANGRIJK Deze radiator heeft een verwarmingspatroon met een geïntegreerde stroomver- breker en een smeltveiligheid. Wanneer de radiator zonder water wordt gebruikt, heeft dit de definitieve beschadiging van de smeltveilig-heid tot gevolg en dus die van de verwarmings- patroon: dit voorval, «niet door de garantie constructeur gedekt», maakt zijn vervanging 4.1 De batterijen installeren volstrekt noodzakelijk. -
Page 50: Status Van De Led
Schuifbalk uren van de dag (prog) In geval het koppelen mislukt Een reeds keert het opdrachtscherm terug naar rF 0. Start de koppelprocedure opnieuw op door gekoppelde afstands- de toets + 5 seconden in te drukken. bediening kan niet opnieuw Controleer eerst of de ontvanger klaar is om te worden worden gekoppeld. -
Page 51: Datum- En Tijdinstelling
4.5 Datum- en tijdinstelling ICOON UITLEG Toestel werkt in Vorstvrij-modus Druk 2 seconden lang op de P1P2 Toestel werkt in Eco-modus en mode toetsen in ongeacht welke Toestel werkt in Comfort-modus bedieningsmodus. boost Toestel werkt in geprogrammeerde modus mode Handmatige of geprogrammeerde Boost Open raam gedetecteerd (icoon knippert) De tijd 00:00 wordt weergegeven. -
Page 52: Gebruik Van De Afstandsbediening
5. Gebruik van de afstandsbediening 5.2 De bedrijfsmodus kiezen 5.1 Bediening van afstandsbediening AAN / UIT boost 5 basisfuncties: Vorstvrij, Eco, Comfort, programma's P1 De afstandsbediening licht op: er klinkt een pieptoon. & P2 mode De afstandsbediening gaat uit: er klinken twee pieptonen. - Page 53 ECO-MODUS (vervolg) COMFORT-MODUS A) Gekoppeld eco-bedrijf De Eco-modus (economy) maakt een temperatuurverlaging mogelijk van 3,5°C ten opzichte van (aanbevolen als de ruimte bezet is) de ingestelde temperatuur voor de Comfort-stand. De ingestelde temperatuur kan in stappen van 0,5°C worden aangepast van 7 tot 28°C. boost De LED van uw ontvangerdoos licht rood op.
- Page 54 AANPASSING VAN DE TEMPERATUUR BEDIENING VIA DE STUURDRAAD In de geprogrammeerde werkwijzen van uw apparaat (P1 of P2) is kan de werking van uw apparaat tijdelijk worden onderbroken door de ingestelde temperatuur te wijzigen. Als uw installatie is uitgerust met een systeem voor belastingafschakeling dat op de ingang van de stuurdraad is aangesloten, kan dit een voorrangscommando naar uw toestel sturen om uit te schakelen (de LED van het toestel gaat uit) of voor de Vorstvrij- modus (de LED van uw toestel brandt blauw).
-
Page 55: Geavanceerde Instellingen Van De Afstandsbediening
5.3 Geavanceerde instellingen van de afstandsbediening Instelling Omschrijving Standaard- Afstelling waarde LET OP! Toets + of - Stuurdraad Waarde 0 (stuurdraad gedeactiveerd) of 1 (stuurdraad Toegang tot de instellingen is alleen mogelijk als de afstandsbediening uit staat. geactiveerd) indrukken Bepaalde instellingen van uw afstandsbediening kunnen aan uw gebruik worden aangepast. Toets + of - Ijking Instelbaar van -5,0°C tot 5,0°C in stappen van 0,5°C... -
Page 56: Keuze Van De Temperatuurvoeler
5.4 Keuze van de temperatuurvoeler 5.5 Ijking van de ingestelde temperatuur De temperatuur van uw vertrek kan worden gemeten door de ontvangerdoos die zich onder Als uw apparaat enige dagen in bedrijf is en u een verschil waarneemt tussen de temperatuur uw apparaat bevindt of door de afstandsbediening. -
Page 57: Detectie Open / Gesloten Raam
6. Verwarmingsboost 5.6 Detectie open / gesloten raam Uw toestel kan een sterke temperatuurdaling waarnemen, bijvoorbeeld als het raam langere tijd openstaat in de winter. De werking zal dan automatisch worden aangepast, zodat u energie kunt besparen. Met deze functie kunt u extra verwarming toevoegen op het gekozen tijdstip. Wanneer het apparaat op volle kracht wordt geactiveerd, zonder rekening te houden met de op de afstandsbe- Op uw afstandsbediening is de functie Detectie open/gesloten raam standaard geactiveerd. - Page 58 GEBRUIK VAN DE HANDMATIGE BOOST (vervolg) EEN GEPROGRAMMEERDE BOOST INSTELLEN De ingestelde P1P2 duur van boost en boost is afgelopen. tegelijkertijd Het toestel eenmaal lang boost boost keert terug indrukken. boost boost naar zijn normale mode mode bedrijf. mode mode U kunt nu de gewenste starttijd ingeven.
- Page 59 ACTIVERING EN VERLOOP VAN DE GEPROGRAMMEERDE ACTIVERING EN VERLOOP VAN DE GEPROGRAMMEERDE BOOST (vervolg) BOOST Het is altijd mogelijk een geprogrammeerde Druk boost tijdens de werking 2 seconden te verlaten door de toets boost in te drukken. op de toets boost.
-
Page 60: Een Programma P1 Et/Of P2 Instellen
7. Een programma P1 et/of P2 instellen INSTELLING VAN ELK UUR VAN DE DAG De afstandsbediening van uw apparaat heeft twee dagprogramma's P1 en P2 die u kunt aanpassen aan uw behoeften. Voor elk tijdstip van de dag zijn er twee werkwijzen mogelijk: COMFORT of ECO. De eerder gede- finieerde temperaturen zijn van toepassing op deze Werkwijzen (zie hoofdstuk 5.2). - Page 61 FUNCTIE KOPIËREN/PLAKKEN (hulp bij het programmeren) HANDMATIG TERUGKEREN NAAR DE VORIGE DAG boost boost Terug naar de mode mode P1P2 lang vorige dag en indrukken: terug instelling op uur 0. naar de vorige dag en het huidige boost boost dagprogramma boost boost kopiëren.
-
Page 62: Aanbevelingen Voor Het Onderhoud En Het Verhelpen Van Storingen
6. Aanbevelingen voor het onderhoud en het Probleem Diagnose Procedure verhelpen van storingen Het toestel krijgt geen Controleer of het toestel naar beho- stroom. ren is aangesloten en van stroom wordt voorzien (zie hoofdstuk 2.2). 6.1 Dagelijks onderhoud Het toestel is niet aangezet. Controleer of de afstandsbediening is Het toestel werkt niet. -
Page 63: Volledige Reset
STUURDRAAD (vervolg) Probleem Diagnose Procedure De indicator batterij- Batterijen leeg. Vervang de batterijen (zie Probleem Diagnose Procedure verbruik wordt op uw hoofdstuk 8.4). afstandsbediening De temperatuur van het De stuurdraad is mogelijk verbonden Deactiveer de stuurdraad weergegeven. vertrek komt niet ove- met een programmeercentrale in de geavanceerde reen met de ingestelde... -
Page 64: De Batterijen Vervangen
Tijdens het vervangen van de batterijen vindt automatisch een nieuwe koppeling plaats. Als RF 0 op het display wordt weergegeven en pictogram knippert, betekent dit dat de afstandsbediening de ontvanger zoekt. Als deze na enkele minuten nog steeds niet is gevonden, Verbruik van het toestel in waakstand <... - Page 65 1 Beschreibung 1.1 Vorwort 1.2 Warnhinweise 1.3 Überblick über Ihren Heizkörper 2 Installation 2.1 Warnhinweise 2.2 Anschluss 3 Gebrauchsempfehlungen zu Heizkörper für Mixbetrieb 3.1 Betrieb des Mixbetrieb-Heizkörpers über die Zentralheizung 3.2 Betrieb als rein elektrischer Heizkörper 4 Inbetriebnahme des Steuergeräts 4.1 Einlegen der Batterien 4.2 Anfänglicher Pairing-Vorgang 4.3 Zustand der LED...
-
Page 66: Beschreibung
Kinder dabei beaufsichtigt werden oder in die sichere Bedienung des Geräts eingewiesen wurden und sich der möglichen Gefahren bewusst sind. Kinder zwischen 3 und 8 Jahren dürfen das Gerät weder anschließen, einstellen oder reinigen noch durch den Bediener auszuführende Wartungsarbeiten daran durchführen. 40019309 05/2019... -
Page 67: Überblick Über Ihren Heizkörper
BITTE BEACHTEN Die Installation muss eine allpolige Trennvor- richtung mit einer Kontaktöffnungsweite von mindestens 3 mm umfassen. Vor dem Anschluss immer die Stromversorgung (Schutzschalter + Steuerdraht) trennen. Der Heizkörper darf in keinem Fall mit der Elektronikeinheit nach oben installiert werden. 40019309 05/2019... - Page 68 Fensters. Das Gerät sollte möglichst nahe an dem Fenster positioniert werden und keinesfalls in der Nähe einer Tür. Zusätzlich zur Positionierung des Geräts innerhalb des Zimmers haben die am Gerät eingestellte Temperatur und die Außentemperatur einen Einfluss auf die Funktion. 40019309 05/2019...
-
Page 69: Anschluss
Verschüttetes Wasser nehmen Sie einfach mit einem Schwamm auf. Sollte der Druck nicht hoch genug sein, um den Heizkörper zu entlüften: - füllen Sie die Zentralheizung mit Wasser, bis der Druck auf dem Manometer stimmt, - fragen Sie Ihren Installationsbetrieb um Rat, - wenden Sie sich an die Hausverwaltung (bei Mehrfamilienhäusern). 40019309 05/2019... -
Page 70: Inbetriebnahme Des Steuergeräts
Pairing noch nicht ausgeführt worden ist (siehe Absatz 4.2). SENSOR ≠ ACHTUNG LED) Gehäuse der Elektronik- einheit und Position der LED unterscheiden sich je nach Modell (siehe Umschlag- seite 3). CLIC x 2 40019309 05/2019... -
Page 71: Zustand Der Led
Datum Synchronisation und die Uhrzeit eingestellt sind. Tagesablauf im Stundentakt (Prog) Schlägt das Pairing fehl, kehrt die Anzeige auf rF 0 zurück. Ein bereits 5 Sekunden lang auf die Taste + drücken, gepairtes Steuergerät um den Pairing-Vorgang zu wiederholen. Vorher sicherstellen, dass das Empfängergehäuse bereit für den... -
Page 72: Uhrzeit- Und Datumseinstellung
Steuergeräts kann Die Stunden und boost P1P2 & mode Uhrzeit- und Datumseinstellung (siehe Absatz 4.5) jederzeit vorgenom- der Tag sind jetzt gespeichert. men werden. P1P2 & mode Zugang auf die erweiterten Einstellungen mode (bei ausgeschalteter Fernbedienung) (siehe Absatz 5.3) 40019309 05/2019... -
Page 73: Benutzung Des Steuergeräts
Komforttemperatur zu koppeln oder zu entkoppeln. 5 Sekunden mode lang auf - und mode ACHTUNG: mode drücken. Standardmäßig ist Ihr Steuergerät werkseitig so eingestellt, dass die Spartemperatur an die Komforttemperatur gekoppelt ist. boost Die LED des Empfängergehäuses leuchtet grün. 40019309 05/2019... - Page 74 Temperatur abweichen (z. B.: die Spartemperatur darf nicht höher sein als 18 °C, Sie können die Programme P1 und P2 je nach Ihren Bedürfnissen verändern (siehe wenn die Komforttemperatur auf 19 °C eingestellt ist). Standardmäßig ist die Spartemperatur Absatz 7). auf 15,5 °C eingestellt. 40019309 05/2019...
-
Page 75: Erweiterte Einstellungen Des Steuergeräts
Mit Taste + oder - Fenster- Wert 0 (Funktion deaktiviert) oder 1 (Funktion aktiviert) offen- Erkennung Spartempe- Wert 0 (entkoppelte Spartemperatur) oder 1 (an Komfort- Mit Taste + oder - ratur temperatur gekoppelte Spartemperatur = Komforttempera- tur abzüglich 3,5°) 40019309 05/2019... -
Page 76: Auswahl Des Temperaturfühlers
Im Fall der Rücksetzung der Fernbedienung (siehe Absatz 5.3, Parameter 9) stellt sich Wird eine Minute lang keine Taste betätigt, verlässt die Fernbedienung automatisch der standardmäßig aktive Fühler auf die Werkseinstellung zurück. die erweiterten Einstellungen und schaltet sich ab. 40019309 05/2019... -
Page 77: Kallibrierung Der Solltemperatur
Änderung des Betriebsmodus, schalten die Fenster-offen/geschlos- meter 4 befindet, die Taste - betätigen, sen-Erkennung des Heizkörpers für 60 Minuten lang aus, bis die Raumtemperatur sich bis das Steuergerät -2 °C anzeigt stabilisiert hat. (d. h. 21-2=19 °C). 40019309 05/2019... -
Page 78: Heizungs-Boost
Der Zwangsbetrieb aktiviert sich in den Betriebsmodi Sparbetrieb, Komfort, P1 oder P2, und hat Dauer des die Dauer Vorrang vor dem normalen Betrieb des Heizkörpers. boost Zwangsbetriebs des Zwangs- boost boost in Schritten betriebs in von 15 Minu- Schritten von ten (maximale 15 Minuten. mode mode Betriebsdauer 120 Minuten). 40019309 05/2019... - Page 79 Boost-Funktion startet. Das Programm Das Symbol leuchtet ist aktiviert und während der ganzen Betriebs- in Bereitschaft. dauer der Boost-Funktion. Die Dauer der laufenden Die programmierte Boost-Funktion kann jetzt aktiviert Boost-Funktion wird angezeigt. werden. mode mode 40019309 05/2019...
-
Page 80: Einstellung Eines Programms P1 Und/Oder P2
Die ununterbrochene boost Gesamtdauer der Boost- Funktion beträgt max. Zur Erinnerung: 2 Stunden (120 mode Die Startzeit muss Minuten). eingestellt werden, um den automatischen Zwangsbetrieb aktivieren zu können (siehe Absatz 4). Anzeige der zu programmierenden Uhrzeit boost boost 40019309 05/2019... - Page 81 Programmierung auch bei mode Verlassen im Laufe der boost boost Programmierung. mode mode Nach der Auswahl des Betriebsmodus der letzten Stunde eines Tages springt die Program- mierung automatisch zur ersten Stunde des nächsten Tages. 40019309 05/2019...
-
Page 82: Hinweise Für Instandhaltung Und Störungsbeseitigung
Nehmen Sie das Steuergerät aus Steuergeräts (in Schwärzung. Sie hat keinen der Schublade und lassen Sie sie bei der Schublade hin- Einfluss auf den Betrieb Ihres Raumtemperatur stehen, bis der Bild- ter dem Heizkör- Steuergeräts. schirm wieder normal erscheint. per) wird schwarz. 40019309 05/2019... - Page 83 Stromausfalls getrennt. Geräts ist erforderlich. Bei einem Stromausfall Das Gerät stellt seine mit einer Dauer von Einstellungen jedoch unter einer Stunde innerhalb einer Stunde wirkt es zunächst, als automatisch wieder her. seien die Einstellungen des Geräts verloren gegangen. 40019309 05/2019...
-
Page 84: Vollständige Neuinitialisierung
Einstellung von Tag und Uhrzeit des Steuergeräts. Das Pairing wird nach dem Batterie-wechsel automatisch ausgeführt. Wenn das Display dennoch RF 0 anzeigt und das Symbol blinkt, bedeutet das, dass das Steuergerät nach dem Empfänger sucht. Wenn dieser nach einigen Minuten nicht gefunden wird, eine vollständige Neuinitialisierung vornehmen (siehe Absatz 8.3). -
Page 85: Kundendienst Und Gewährleistung
6 Marcia forzata riscaldamento 7 Regolazione di un programma P1 e/o P2 8 Consigli di manutenzione e risoluzione problemi 8.1 Operazioni di manutenzione ordinaria 8.2 Risoluzione dei problemi 8.3 Reinizializzazione completa 8.4 Servizi e garanzia 9 Servizi e garanzia 40019309 05/2019... -
Page 86: Avvertenze
I bambi- ni dai 3 agli 8 anni non devono collegare, regolare o pulire l’apparec- chio, né provvedere alla manutenzione prevista da parte dell’utente. 40019309 05/2019... -
Page 87: Presentazione Dell'apparecchio
Per quanto riguarda altre situazioni è necessa- rio consultare obbligatoriamente il vostro installatore. IMPORTANTE L’installazione deve essere dotata di un disposi- tivo di interruzione onnipolare che abbia una distanza di apertura dei contatti di almeno 3 mm. 40019309 05/2019... -
Page 88: Collegamento Dell'apparecchio
2.2 Collegamento dell’apparecchio Le caratteristiche tecniche del radiatore sono riportate sull’etichetta segnaletica. * Leggere le istruzioni d’installazione per il valore di X Prendete nota di tali caratteristiche prima dell’installazione dell’apparecchio e prima di qualsiasi richiesta d’intervento del Servizio Post-Vendita. 40019309 05/2019... -
Page 89: Raccomandazioni D'uso
• avvisare la società che gestisce il riscaldamento collettivo. SCHEMA DI COLLEGAMENTO CON SPINA D'ALIMENTA- ZIONE MONTATA IN ORIGINE (CLASSE I): Il cavo flessibile montato in fabbrica è progettato per essere colle- gato alla rete tramite una spina per presa di corrente. 40019309 05/2019... -
Page 90: Messa In Funzione Del Comando A Distanza
: L’apparecchio ripartirà normalmente. rosa fissa, per segnalare che l'accoppiamento non è ancora avvenuto (cfr. capitolo 4.2). SONDA ≠ LED) ATTENZIONE L'aspetto visivo del LED può variare a seconda dell'apparecchio (cfr. pagina 3 della copertina). CLIC x 2 40019309 05/2019... -
Page 91: Stato Del Led
In caso di fallimento distanza già accoppiato dell'accoppiamento, sul comando si non può essere accoppiato visualizzerà di nuovo rF 0. Rilanciare la procedura nuovamente. In caso di di accoppiamento tenendo premuto per 5 secondi il tentativo, il ricevitore pulsante +. Verificare che la centralina di ricezione sia... -
Page 92: Regolazione Dell'orario E Della Data
L’ora e il giorno boost impostato in qualsiasi P1P2 & mode Regolazione dell'orario e della data (cfr. capitolo 4.5) sono stati salvati. momento. mode P1P2 & mode Accesso alle impostazioni avanzate (con il comando a distanza spento) (cfr. capitolo 5.3) 40019309 05/2019... -
Page 93: Utilizzo Del Comando A Distanza
Per default l'apparecchio funziona in modalità Eco associata. I cambiamenti di modalità emessi da una centralina a filo pilota (non fornita con l'apparecchio) non saranno disattivati da questa funzione. Il LED della centralina di ricezione s'illumina di verde. mode 40019309 05/2019... - Page 94 Comfort (ad es. la temperatura Eco non può superare i 18°C se la tempe- ratura Comfort è impostata su 19°C). NOTA: Per default la temperatura Eco dissociata è impostata a 15,5°C. È possibile definire programmi P1 e P2 personalizzati (cfr. capitolo 7). 40019309 05/2019...
- Page 95 Il LED dell'apparecchio si illuminerà con la luce del colore corrispondente alla modalità di funzionamento inviata dalla centralina (cfr. capitolo 4.2). Il comando a distanza farà lampeggiare l'icona corrispondente alla modalità di funzionamento inviata dalla centralina. Esempio: la centralina invia un comando di modalità Eco 40019309 05/2019...
-
Page 96: Impostazioni Avanzate Del Comando A Distanza
Valore 0 (temperatura Eco dissociata) o 1 (temperatura Pressione sul tasto + o - tazioni il pulsante Eco associata: T° Comfort meno 3,5°) Dopo un minuto senza avere premuto alcun pulsante, il comando a distanza uscirà automaticamente dalle impostazioni avanzate e si spegnerà. 40019309 05/2019... -
Page 97: Scelta Della Sonda Di Misurazione Della Temperatura
In caso di reinizializzazione del comando a distanza (cfr. capitolo 5.3, impostazione 9), tazione 4, premere sul pulsante - fino la sonda attiva di default tornerà all'impostazione di fabbrica. a quando il comando non mostra -2°C (ossia 21-2=19°C). 40019309 05/2019... -
Page 98: Rilevamento Di Apertura/Chiusura Di Una Finestra
Il lancio o l'arresto di una marcia forzata (manuale o programmata), così come un 15 minuti. massima di cambio della modalità di funzionamento, mettono in pausa per 60 minuti la funzione 120 minuti). di rilevamento di apertura/chiusura di una finestra, fino a quando la temperatura della stanza non si ristabilizza. 40019309 05/2019... - Page 99 (cfr. capitolo 5.3 impostazione 0). modalità di funzionamento La marcia forzata inizierà nelle modalità Eco, Comfort, P1 o P2 e prevarrà sul funzionamento boost boost in corso. normale dell'apparecchio. mode mode Ora è possibile attivare la marcia forzata programmata. 40019309 05/2019...
- Page 100 Il programma attivare la marcia forzata L'icona lampeggia per tutta è attivato e in automatica (cfr. la durata della marcia forzata. attesa. capitolo 4). La durata della marcia forzata in corso è visibile. mode mode 40019309 05/2019...
-
Page 101: Regolazione Di Un Programma P1 E/O P2
Eco e passa giorno 1, ora 0 boost all'ora successiva mode mode Indicatore dell'ora da programmare Dopo avere selezionato la modalità di funzionamento dell'ultima ora della giornata, la programmazione passa automaticamente alla prima ora del giorno successivo. boost boost 40019309 05/2019... - Page 102 Il comando a distanza copiando il pro- memorizza la programmazione gramma giorna- effettuata anche in caso di mode mode mode mode liero in corso. boost boost boost uscita durante la program- mazione. mode mode 40019309 05/2019...
-
Page 103: Consigli Di Manutenzione E Risoluzione Problemi
Il LED lampeggia in giallo + altri Contattare il proprio installatore o il cassetto dietro al radia- influisce minimamente sul ambiente fino a quando l’aspetto colori: problema. Servizio post-vendita. tore) diventa nero. funzionamento del comando. dello schermo non torna normale. 40019309 05/2019... -
Page 104: Reinizializzazione Completa
Se il LED mostra una luce rosa fissa dopo il lampeggiamento rapido anche se si sta namento tramite filo pilota. capitolo 5.3, impostazione 3). ancora tenendo premuto il pulsante, significa che la reinizializzazione non è avvenuta. Riprendere la procedura al punto 1. Se l’accoppiamento risulta impossibile, contattare il servizio post-vendita. 40019309 05/2019... -
Page 105: Servizi E Garanzia
L'accoppiamento è effettuato automaticamente in caso di cambio delle pile. Se sullo schermo compare comunque RF 0 e l’icona lampeggia, significa che il comando a distanza sta cercando il ricevitore. Se nonostante ciò non lo trovasse dopo diversi minuti, pro- cedere a una reinizializzazione completa (cfr. - Page 106 1 Presentación 1.1 Introducción 1.2 Advertencias 1.3 Presentación del aparato 2 Instalación de su radiador 2.1 Advertencias 2.2 Conexión del radiador 3 Recomendaciones de uso 3.1 Utilización en calefacción central 3.2 Utilización en calefacción eléctrica 4 Puesta en marcha del mando a distancia 4.1 Colocación de las pilas 4.2 Apareamiento inicial 4.3 Estado del LED...
-
Page 107: Presentación
Los niños de entre 3 y 8 años no deben enchufar, ajustar ni limpiar el aparato, ni realizar el mantenimiento que debe realizar el usuario. 40019309 05/2019... -
Page 108: Presentación Del Aparato
Para los demás tipos de equipa- miento de cuarto de baño, consulte con su instalador. IMPORTANTE La instalación debe estar equipada con un dispo- sitivo de corte omnipolar que tenga una distancia de apertura de contacto de 3 mm como mínimo. 40019309 05/2019... -
Page 109: Conexión Del Radiador
≥100mm 2.2 Conexión del radiador ≥500 Las características técnicas de este radiador figuran en la etiqueta de características. Consúltela antes de proceder con la instalación y de solicitar una intervención del servicio posventa. 40019309 05/2019... -
Page 110: Recomendaciones De Uso
El cable flexible montado inicialmente debe conectarse a la red IMPORTANTE: La puesta en tensión del aparato debe realizarse únicamente si éste se eléctrica mediante una toma de corriente. encuentra correctamente lleno de agua (de lo contrario podría provocar la anulación de la garantía). 40019309 05/2019... -
Page 111: Puesta En Marcha Del Mando A Distancia
(ver capítulo 4.2). SONDA ≠ LED) ATENCIÓN La imagen del LED puede variar según el modelo de aparato (ver página 3 de cobertura). CLIC x 2 40019309 05/2019... -
Page 112: Estado Del Led
Desarrollo horas del día (prog.) Si falla la vinculación, el indicador de la orden se pone en rF 0. Relanzar el procedimiento de vinculación pulsando No se puede durante 5 segundos la tecla +. Antes, compruebe que aparear un mando a la caja receptora está... -
Page 113: Ajuste De La Hora Y La Fecha
P1P2 & mode configurar en cualquier Ajuste de la hora y la fecha (ver capítulo 4.5) la hora y el día. momento. mode P1P2 & mode Acceso a la configuración avanzada (con el mando a distancia apagado) (ver capítulo 5.3) 40019309 05/2019... -
Page 114: Uso Del Mando A Distancia
Por defecto, el aparato funciona en modo Eco asociado. Los cambios de modos transmitidos por una central cable piloto (no suministrada con el aparato) no se desactivan con esta función. El LED de su caja receptora se enciende en verde. mode 40019309 05/2019... - Page 115 18°C si la temperatura de Confort está establecida en 19°C). También puede personalizar el funcionamiento específico de los programas P1 y P2 Sin un ajuste por parte del usuario, la temperatura Eco disociada se pone en su valor por (ver apartado 7). defecto de 15,5°C. 40019309 05/2019...
- Page 116 El LED del aparato se enciende en el color correspondiente al modo de funcionamiento trans- mitido por la central (ver apartado 4.2). El mando a distancia hace parpadear el icono correspondiente al modo de funcionamiento transmitido por la central. Ejemplo: la central transmite una orden de modo Eco 40019309 05/2019...
-
Page 117: Configuración Avanzada Del Mando A Distancia
Valor 0 (temperatura Eco disociada) o 1 (temperatura Pulsación del botón + o - eco asociada: Temp. de comfort menos 3,5°) Tras un minuto sin presionar ninguna tecla, el mando a distancia sale automática- mente de los ajustes avanzados y se apaga. 40019309 05/2019... -
Page 118: Selección De La Sonda De Medición De Temperatura
En caso de reiniciar el mando a distancia (ver capítulo 5.3, parámetro 9), por defecto gurada en el mando a distancia es de la sonda activa adoptará la configuración de fábrica. 21°C. Cuando esté en el parámetro 4, presione la tecla – hasta que la orden muestre -2°C (es decir, 21-2=19°C). 40019309 05/2019... -
Page 119: Detección De Apertura / Cierre De Ventana
60 minutos la mode mode máxima de 120 función de detección de apertura / cierre de la ventana, durante el periodo en que se minutos). estabiliza la temperatura de la estancia. 40019309 05/2019... - Page 120 La marcha forzada se activa en los modos Eco, Confort, P1 o P2 y controla el funcionamiento boost boost en curso. normal del aparato. mode mode Ya se puede activar la sobrepresión programada. 40019309 05/2019...
- Page 121 El icono parpadea durante está activo y activar la marcha forzada todo el tiempo de funciona- automática (ver en espera. miento de sobrepresión. apartado 4). Se muestra la duración de sobrepresión en curso. mode mode 40019309 05/2019...
-
Page 122: Configuración De Un Programa P1 Y/O P2
Indicador de hora de programación Una vez seleccionado el modo de funcionamiento de la última hora de un día, la programa- ción va automáticamente a la primera hora del día siguiente. boost boost 40019309 05/2019... - Page 123 El mando a distancia copiando el memoriza la programación programa diario realizada, incluso si se mode mode mode mode actual. abandona durante la boost boost boost programación. mode mode 40019309 05/2019...
-
Page 124: Consejos De Mantenimiento Y Reparación
(situada en el ennegrecimiento. No afecta cajón y dejarlo reposar a tempera- cajón detrás del radiador) de ninguna manera al fun- tura ambiente hasta que la pantalla se pone de color negro. cionamiento del mando. recupere su aspecto normal. 40019309 05/2019... -
Page 125: Reinicio Completo
(p. ej., envío mando a distancia siga contro- mando a distancia. de una orden de modo Eco lando el aparato. por la central y el mando está configurado en Confort). 40019309 05/2019... -
Page 126: Cambio De Las Pilas
El reapareamiento se realiza automáticamente con el cambio de pilas. humana. Si en la pantalla se muestra RF 0 y el icono parpadea, significa que el mando a distancia está buscando el receptor. Si no lo encuentra después de varios minutos, proceder a reiniciar Consumo del aparato en suspensión <... - Page 127 1 Opis 1.1 Wstęp 1.2 Ostrzeżenia 1.3 Opis urządzenia 2 Instalacja urządzenia 2.1 Ostrzeżenia 2.2 Podłączenie urządzenia 3 Użytkowanie hybrydowej suszarki do ręczników 3.1 Użytkowanie w trybie pracy z centralnym ogrzewaniem 259 3.2 Użytkowanie w trybie pracy z zasilaniem elektrycznym 4 Uruchomienie pilota zdalnego sterowania 4.1 Umieszczenie baterii 4.2 Wstępne parowanie...
-
Page 128: Opis
że dzieci są nadzorowane lub zostały poins- truowane w zakresie bezpiecznej obsługi urządzenia i że rozumieją potencjalne zagrożenia. Dzieci w wieku od 3 do 8 lat nie mogą podłączać, nastawiać ani czyścić urządzenia, ani przeprowadzać czynności konserwacyjnych wykonywanych przez użytkownika. 40019309 05/2019... -
Page 129: Opis Urządzenia
P2. WAŻNE Podany przykład dotyczy jedynie przypadku wanny. W przypadku innego rodzaju wyposażenia łazienki, należy zasięgnąć porady instalatora. WAŻNE Instalacja powinna być wyposażona w wyłącznik wielo- biegunowy, którego rozstaw otworów stykowych wynosi co najm- niej 3 mm. 40019309 05/2019... -
Page 130: Podłączenie Urządzenia
2.2 Podłączenie urządzenia Parametry techniczne grzejnika są podane na tabliczce znamionowej. Prosimy wziąć je pod uwagę przed jego zainstalowaniem i przed złożeniem prośby o interwencję * Wartość X jest podana w instrukcji montażu. Działu Obsługi Posprzedażowej. 40019309 05/2019... -
Page 131: Użytkowanie Hybrydowej Suszarki Do Ręczników
• zasięgnąć porady u instalatora centralnego ogrzewania, • powiadomić firmę obsługującą instalację (w przypadku instalacji zbiorowego centralnego ogrzewania). ZASADA PRZYŁĄCZENIA PRZY UŻYCIU MONTOWANEJ FABRYCZNIE WTYCZKI DO GNIAZDKA ELEKTRYCZNEGO (KLASY I): Giętki kabel założony fabrycznie jest przeznaczony podłączenia do gniazdka sieci za pośrednictwem wtyczki. 40019309 05/2019... -
Page 132: Uruchomienie Pilota Zdalnego Sterowania
Po pierwszym włączeniu urządzenia dioda LED zapala się i świeci w ciągłym kolorze różowym, sygnalizując tym samym, że parowanie nie zostało jeszcze zakończone (patrz rozdział 4.2). SONDY ≠ LED) UWAGA Wygląd diody LED może się różnić w zależności od modelu urządzenia (patrz 3 strona tytułowa). CLIC x 2 40019309 05/2019... -
Page 133: Stan Diody Led
Pasek przewijania godzin (prog) Jeżeli parowanie urządzenia nie powiodło się, ekran sterowania powróci do etapu rF 0. Uruchom ponownie procedurę parowania, naciskając klawisz + przez 5 sekund. Pilot zdalnego Sprawdź, czy odbiornik jest gotowy do parowania: sterowania, który został... -
Page 134: Ustawianie Godziny I Daty
P1P2 & mode Ustawianie godziny i daty (patrz rozdział 4.5) zdalnego sterowania można Godzina i data boost dokonać w dowolnym zostały zapisane. P1P2 & mode momencie. Dostęp do ustawień zaawansowanych mode (z wyłączonym pilotem zdalnego (patrz rozdział 5.3) sterowania) 40019309 05/2019... -
Page 135: Użytkowanie Pilota Zdalnego Sterowania
5.3 „Ustawienia zaawansowane”. UWAGA: UWAGA: Zmiany trybów wprowadzone z poziomu centrali sterującej pozostaną aktywne (centrala Urządzenie pracuje domyślnie z powiązanym trybem ekonomicznym. sterująca nie jest dostarczana z urządzeniem). Wskaźnik LED na odbiorniku zapala się na zielono. mode 40019309 05/2019... - Page 136 18°C, jeśli temperatura w trybie komfortowym została ustawiona na 19°C). UWAGA: W zależności od potrzeb można również samodzielnie zdefiniować działanie W przypadku gdy użytkownik nie dokona żadnych ustawień, temperatura przy wyłączonym programów P1 i P2 (patrz rozdział 7). powiązaniem z trybem ekonomicznym zostanie ustawiona domyślnie na 15,5°C. 40019309 05/2019...
- Page 137 Dioda LED zapala się na urządzeniu w kolorze odpowiadającym wybranemu trybowi pracy z poziomu centrali sterującej (patrz rozdział 4.2). Zdalne sterowanie powoduje migotanie ikony odpowiadającej trybowi pracy wybranemu z poziomu centrali sterującej. Przykład: centrala sterująca wysyła polecenie włączenia trybu ekonomicznego 40019309 05/2019...
-
Page 138: Zaawansowane Ustawienie Pilota Zdalnego Sterowania
Eko: Temp w trybie komfort minus 3,5°) przycisku + lub - ekonomic- znym Jeśli w ciągu jednej minuty nie zostanie naciśnięty żaden przycisk, pilot zdalnego sterowania wyjdzie automatycznie z menu ustawień zaawansowanych i następnie się wyłączy. 40019309 05/2019... -
Page 139: Wybór Czujnika Temperatury
Jeśli pilot zdalnego sterowania zostanie zresetowany (patrz rozdział 5.3, parametr 9), sterowania. Po wybraniu parametru 4 naciskaj przycisk -, aż zostanie domyślny aktywny czujnik zostanie przywrócony do wyjściowego ustawienia fabrycz- wyświetlona wartość -2°C nego. (tj. 21 - 2=19°C). 40019309 05/2019... -
Page 140: Funkcja Wykrywania Otwartego/Zamkniętego Okna
Uruchomienie lub zatrzymanie funkcji Boost (ręcznie bądź automatycznie), jak w symalny czas mode mode przypadku zmiany trybu pracy, spowoduje zatrzymanie funkcji wykrywania otwarte- przedziałach trwania wynosi go/zamkniętego okna przez 60 minut, do czasu, aż temperatura w pomieszczeniu się co 15 minut. 120 minut). ustabilizuje. 40019309 05/2019... - Page 141 Funkcja ta włączy się podczas trybu Ekonomicznego, trybu Komfortowego, trybu P1 lub P2 oraz boost boost trakcie. przejmie kontrole nad normalnym działaniem urządzenia. mode mode Możesz teraz rozpocząć aktywacje trybu Boost zaprogramowanego. 40019309 05/2019...
- Page 142 Włączony pro- automatycznie. uruchomić automatyczną gram pozostaje Na ekranie miga ikona przez pracę urządzenia z pełną w stanie cały czas pracy w trybie Boost. mocą (patrz rozdział 4). oczekiwania. Czas trwania trybu Boost jest wyświetlany na ekranie. mode mode 40019309 05/2019...
-
Page 143: Ustawianie Programu P1 I/Lub P2
Pozycja wyjściowa: Ekonomicznym dzień 1, godzina 0 i przejdź do boost następnej godziny. mode mode Wskaźnik godziny do zaprogramowania Po wybraniu trybu pracy i zaprogramowaniu na ostatnią godzinę dnia, program ustawia auto- matycznie pierwszą godzinę dnia następnego. boost boost 40019309 05/2019... - Page 144 WYJŚCIE Z MENU PROGRAMOWANIA (w każdym momencie) Naciśnij długo przycisk mode, aby przejść do Pilot zdalnego dnia następnego, boost boost sterowania zapamiętuje kopiując dzienny wykonane programowanie, program. mode mode mode mode nawet po wyjściu z menu w boost boost boost trakcie programowania. mode mode 40019309 05/2019...
-
Page 145: Wskazówki Dotyczące Konserwacji I Naprawy
Wyjmij pilota z szuflady i pozostaw go rowania (przechowywa- spowodowane przez zbyt w temperaturze pokojowej do czasu, nego w szufladzie za wysoką temperaturę. Nie aż ekran znowu zacznie wyglądać grzejnikiem) staje się wpływa ono w niczym na normalnie. ciemny. działanie pilota. 40019309 05/2019... -
Page 146: Pełny Reset
Włącz funkcję obsługi kabla Pilot zdalnego sterowania nie jest procedurę od kroku nr 1. sterującego w ustawieniach ustawiony na pracę z poziomu kabla pilota (patrz rozdział 5.3, sterującego. parametr 3). Jeśli nadal nie możesz sparować urządzenia, skontaktuj się z serwisem. 40019309 05/2019... -
Page 147: Wymiana Baterii
środowiska i zdrowia człowieka. Parowanie urządzenia odbywa się automatycznie w trakcie wymiany baterii. Jeżeli na ekranie nadal wyświetlany jest komunikat RF 0, a ikona miga, oznacza to, że pilot zdalnego sterowania szuka odbiornika. Jeżeli połączenie nie nastąpi w ciągu kilku minut, należy Poziom zużycia w trybie czuwania <...
Need help?
Do you have a question about the 40019309 and is the answer not in the manual?
Questions and answers