Table of Contents
Advertisement
Quick Links
Advertisement
Table of Contents

Related Manuals for CHARGETRONIX TP-EVPD-160kW


Summary of Contents for CHARGETRONIX TP-EVPD-160kW
- Page 1 Installation Manual 160 kW DC Charger Product #TP-EVPD-160kW...
- Page 2 This manual contains procedural directions and guidance regarding the electrical and mechanical installation procedure(s) for the ChargeTronix TP-EVPD-160kW charger. ChargeTronix reserves the right to make changes as necessary in order to comply with industry changes, to account for any errors or omissions, and to ensure a safe, reliable installation process.
-
Page 3: Table Of Contents
TABLE OF CONTENTS TABLE OF CONTENTS ............................3 CRITICAL SAFETY ............................. 4 INSTALLATION OVERVIEW ..........................7 OUTLINE OF DRAWING - 160kW DCFC ......................8 CHARGER ANATOMY ............................9 MECHANICAL INSTALLATION ........................10 CHARGER INSTALLATION..........................11 AC Input Power Wiring .................................13 AC Input Termination................................13 HOW TO START A CHARGING SESSION ...................... -
Page 4: Critical Safety
Shut off power to the charger at the electrical disconnect or at the breaker if such damage does occur or is present. Then, immediately contact ChargeTronix support. If there are any questions regarding this process, please contact ChargeTronix customer support. - Page 5 (1 to 2 minutes) with high-voltage power, even after the main power has been disconnected. Always test with a voltmeter before any maintenance or service is performed. This manual offers guidance and instructions on the electrical and mechanical installation procedure(s) for the ChargeTronix HPC-160-480 charger.
- Page 6 Product Number TP5-160-480 HPC-160-480 Input Voltage 480V (3P + N + PE), 60Hz Output Voltage 150–1000 VDC Max Output Current Up to 200A per connector Up to 400A per connector FLA || Breaker Rating 215A || 300A Power Factor >0.98 Efficiency >94% at nominal output power CCS1 and CCS1...
-
Page 7: Installation Overview
The charger is rated IP54. In areas which see flooding, heavy rain, storms, snow, or other harsh weather conditions, ChargeTronix recommends erecting a canopy over and above the charger for the equipment’s Additional notes protection. -
Page 8: Outline Of Drawing - 160Kw Dcfc
OUTLINE OF DRAWING - 160kW DCFC Figure 1 Charger Outline Figure 2 - Charger Bottom View... -
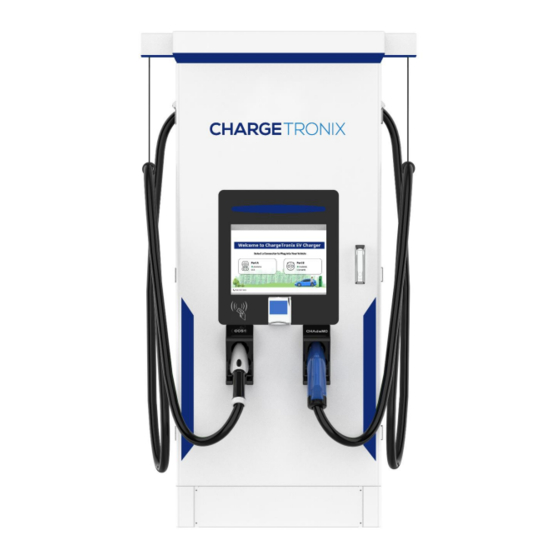
Page 9: Charger Anatomy
CHARGER ANATOMY... -
Page 10: Mechanical Installation
MECHANICAL INSTALLATION CONCRETE PAD A concrete pad constructed from 3,000-4,000 psi-concrete should be used. Electrical conduit for AC power should be positioned such that it exits the concrete pad at the Main AC power line opening (see: Figure 2). PREPARATION Ground Rod Connection: Use acorn clamps to two #2 bare copper wire from the ground rod to the first rear anchor bolt,... -
Page 11: Charger Installation
CHARGER INSTALLATION ADA Consideration There are a range of recommended best practices when installing electric vehicle chargers that incorporate ADA requirements in the charger installation. Such practices include parking space striping, adequate allowance for wheelchair movement, and bollards to protect the charger. This equipment has been designed to meet ADA requirements when installed as prescribed in this manual;... - Page 12 INSTALL BASE FASTENERS - 4 PLACES Install 1/2” x 1” x 1/8” thick washer, then the ½” lock washer and the 1/2-13 UNC nut and torque to Hilti specification.
-
Page 13: Ac Input Power Wiring
AC Input Power Wiring INPUT VOLTAGE The charger requires an input voltage of 480 VAC (3 Phase + Neutral + Earth), 60Hz, and a current of 215 amps. Schematic diagram of the input connection of the charger. AC Input Termination COMPONENTS •... -
Page 14: How To Start A Charging Session
HOW TO START A CHARGING SESSION RFID CARD 1) Please select the connector compatible with your EV 2) Plug the connector into your EV 3) The display on the charger will provide options to select the authorization/payment method 4) Swiper the RFID card 5) The charging session will begin within 60 seconds 6) To stop charging: swipe the same RFID card again or use the STOP button the screen QR CODE / MOBILE APP... -
Page 15: Charger Settings
PSM MID VOLTAGE PSM MID CURRENT PSM MIN VOLTAGE To access settings window: PSM MIN CURRENT 1) Touch the ChargeTronix Logo 20000 PMAX 2) Provide the password. Password will be shared with the ETH1 CCS NETWORK 1 authorized representative. -
Page 16: Maintenance And Service
VISUAL CHECK ITEMS Check for abnormal sounds from running fans and power units If there is an abnormal sound present, please contact ChargeTronix at +(1)949-694-1644 for further assistance Check the device for abnormal odors, changes in inner materials, corrosion, anomalies in appearance, etc. -
Page 17: Troubleshooting
TROUBLESHOOTING ERROR CODES If an error occurs, check the nature of the error by referring to the following “Error Code List” and take appropriate actions according to instructions by the manufacturer ERROR DESCRIPTION POSSIBLE SOLUTION ERROR FLAG 0 Lightning protection device failure Check the SPD and GFCI circuit The insulation check on the EV has failed. - Page 18 This icon indicates that the charger is not connected to a server network. It can also indicate a loss of internet connectivity. If no network is connected, the charger works as a stand-alone device with ChargeTronix RFID cards. This icon indicates that the charger is connected to a server network; it can be authorized with registered RFID cards or the mobile app.
-
Page 19: Customer Responsibilities
Appoint a trained person(s) responsible for the safe maintenance/service of the charger Neither ChargeTronix, nor any of its affiliates, shall be liable to the operator/owner/customer of this product or third parties for damages, losses, costs, or expenses incurred as a result of an... -
Page 20: Warranty
Period, either repair or replace, at ChargeTronix’s choice, the Product if it proves to be defective. ChargeTronix will also pay for shipping charges for the failed part. If the returned part has not failed the customer will pay for shipping charges for the replacement part and the associated returned part. Under this guarantee, ChargeTronix liability is limited to repair or replacement of the product with the same or equivalent, or reconditioned product warranted for the original warranty period. -
Page 21: Appendix
APPENDIX...
Need help?
Do you have a question about the TP-EVPD-160kW and is the answer not in the manual?
Questions and answers