Advertisement
Overview

Description of Symbols
The rating plate on your tool may show symbols. These represent important information about the product or instructions on its use.

Wear hearing protection.
Wear eye protection.
Wear breathing protection.
Wear head protection.

Wear hand protection.

Read instruction Manual.

Laser Safety
Do not stare directly at the laser beam. A hazard may exist if you deliberately stare into the beam. Please observe all safety rules.
 Conforms to relevant legislation and safety standards.

Environmental Protection
Waste electrical products should not be disposed of with household waste. Please recycle where facilities exist. Check with your local authority or retailer for recycling advice.
Specification
| Recommended use | Indoor |
| Measuring Range | 0.6 – 15m / 2' – 50' |
| Calculation range | Length/Area/Volume |
| Resolution | 0.01m/1m |
| Laser wavelength | 630 – 660nm |
| Temperature measurement range | -40°C - +40°C |
| Laser Class | II |
| Power supply | 1 x 9V Battery (not included) |
| Working temperature range | 0°C - +40°C |
As part of our ongoing product development, specifications of Silverline products may alter without notice.
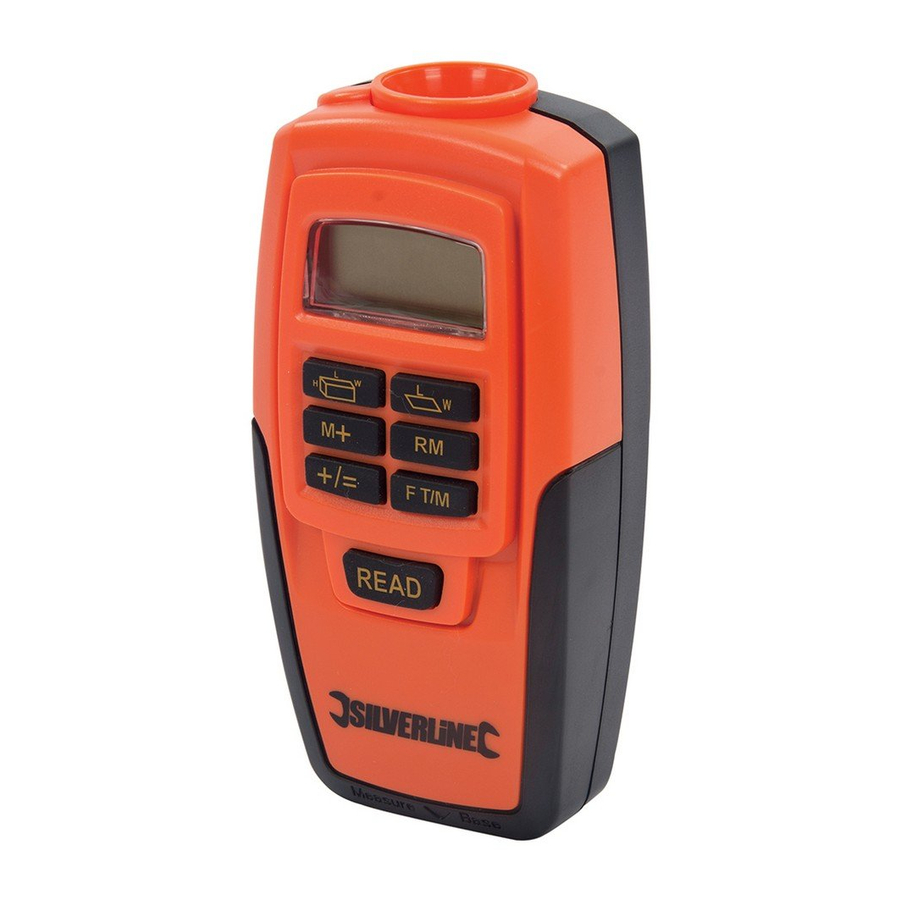
Product Familiarisation
| 1 | Ultrasonic Sensor |
| 2 | Screen with 2 Row LCD Display |
| 3 | Calculate Area Key |
| 4 | Recall Memory Key |
| 5 | Metric/Imperial Key |
| 6 | Read Key |
| 7 | Base Measurement Marker |
| 8 | Plus/Equals Key |
| 9 | Memory Plus Key |
| 10 | Calculate Volume Key |
| 11 | Laser |
| 12 | Current Measurement |
| 13 | Low Battery Warning |
| 14 | Sq ft Icon |
| 15 | Cu ft Icon |
| 16 | Sq Metre Icon |
| 17 | Cu Metre Icon |
| 18 | Memory/Calculation Display |
| 19 | Memory Icon |
| 20 | Area/Volume Icon |
| 21 | Plus Icon |
General Safety

This appliance is not intended for use by persons (including children) with reduced, physical or mental capabilities or lack of experience or knowledge unless they have been given supervision or instruction concerning use of the appliance by a person responsible for their safety. Children must be supervised to ensure that they do not play with the appliance.
Personal Safety
Stay alert, watch what you are doing and use common sense when operating this tool. Do not use while you are tired or under the influence of drugs, alcohol or medication.
Do not overreach. Keep proper footing and balance at all times. This enables better control in unexpected situations.
Safety rules for laser lights
The laser used in this device is a Class 2 laser with maximum power of ≤1mW and a wavelength of 630-660nm.
These lasers do not normally present an optical hazard, although staring at the beam may cause flash blindness.
Avoid direct eye contact.
A hazard may exist if you deliberately stare into the beam, please observe all safety rules as follows:
- The laser shall be used and maintained in accordance with the manufacturer's instructions
- Never aim the beam at any person, and particularly not into the eyes of any person or animal.
- Do not change the laser light assembly. Repairs must only be carried out by the laser manufacturer or an authorised agent. Do NOT exchange with a different type of laser

Use of controls or adjustments or performance of procedures other than those specified herein may result in hazardous radiation exposure.
Please refer to the relevant EN standards, EN60825-1/A1:2002 for more information on Lasers.
Unpacking Your Tool
Carefully unpack and inspect your tool. Familiarise yourself with all its features and functions.
Ensure that all parts of the tool are present and in good condition. If any parts are missing or damaged, have such parts replaced before attempting to use this tool.
Operating Instructions

This product emits a laser beam. Do not stare into the laser beam. Never point this product at anyone else.
Switch on
- To switch on, press the Read Key (6). The unit automatically switches off after a period without use
Measuring Distance
To gain an accurate reading:
- Be sure to hold the Base Measurement Marker (7) against the surface from which you are taking a measurement
- Ensure there are no obstructions between the unit and the target point; this will cause a false readout
- The longer the distance being measured, the wider the ultrasonic signal pattern so more likely obstructions will affect the reading
- Do not attempt to measure through glass
- Measured surfaces should be smooth, flat, hard and of a similar material to get accurate measurements
- Sound absorbing surfaces such as foam, sponge and padding will prevent accurate measurements
Length measurement
Important: To reset the Digital Range Measure to length measurement mode after measuring area or volume, complete the measurements for either of those functions and then hold down the Read Key (6) for 2 seconds
- Holding the Base Measurement Marker (7) against the wall from which you want to measure a distance, press the Read Key (6) to make the measurement. The projected laser beam, displaying as a red dot, will indicate the central point to which the measurement is made
- The Digital Range Measure will calculate the distance from the base measurement marker to the projected laser point and display the distance in the Current Measurement (12) of the screen
- Press the Metric/Imperial Key (5) to alternate between metric and imperial measurements
- To reset the measure to zero, press the Plus/Equals Key (8) twice
Notes:
- If either side of the Digital Range Measure is within 50cm of a hard surface, such as another wall, a false reading may be given
- The line between the Digital Range Measure and the projected red dot MUST be at 90° + -20° maximum, to the surface being measured
- If you hold down the Read Key (6) the Digital Range Measure will make continuous readings in length measurement mode
Adding measurements, without using the M+ (Memory Plus) Function
- Having gained the first measurement, as described above, press the Plus/Equals Key (8). The Plus Icon (21) will be displayed above the original measurement. The original measurement will also be displayed in the Memory/Calculation Display (18) of the screen
- Hold the Base Measurement Marker (7) against the wall from which you want to take the next measurement
- Press the Read Key (6) to take the next measurement. The new measurement will be displayed in the Current Measurement (12) of the screen. If required you can re-take the measurement for the second figure
- To add the two measurements together, press the Plus/Equals Key (8). The total measurement will be displayed in the Memory/Calculation Display (18) of the screen
- To add further measurements, press the Read Key (6) to take the next measurement and then press the Plus/Equals Key (8) to add that value to the total measurement in the Memory/Calculation Display (18). This can be repeated to add further values
- If you press the plus/equals key twice without pressing the read key for a measurement in-between, both displayed values will be reset to zero
- The value in the memory/calculation display can be stored using the Memory Plus Key (9) which will be indicated by the Memory Icon (19). The value stored can be recalled by pressing the Recall Memory Key (4) and will be displayed in the memory/calculation display. Once the value is recalled it is removed from memory Press the memory plus key again to re-store it in memory if required
- Once the recalled value is displayed, pressing the plus/equals key will add the previous value displayed in the memory/calculation display and the recalled value together
- Although the display will turn off after some inactivity the display and memory values are stored and will be available next time the measure is turned back on
Calculate Area
- Press the Calculate Area Key (3) to change the mode to area calculation. The Area/ Volume Icon (20) will display on the screen. The 'L' (for length) will be flashing
- Measure the length of the target area by pressing the Read Key (6). The Digital Range Measure will automatically store the length and display this measurement in the Current Measurement (12) of the screen
- The 'W' (for width) in the Calculate Area icon on the screen will now be flashing
- Measure the width of the area by pressing the read key
- The Digital Range Measure will automatically calculate the area and display this in the Memory/Calculation Display (18) of the screen
Notes:
- If you wish to re-measure, press the Calculate Area Key (3) again to reset the values to zero
- To review the measurements taken, press the Read Key (6) and it will cycle between the measurements taken for length and width
- To completely reset the measure to zero except for memory value: Hold down the Read Key (6) for 2 seconds after completing measuring. It will reset to initial length measuring mode
If you wish to add 2 or more area values together
- After the initial area has been calculated press the Memory Plus Key (9) to store the area value
- Press the Calculate Area Key (3) and input 2 new measurements for length and width. The calculated area will be displayed
- Press the Plus/Equals Key (8) and then the Recall Memory Key (4) and then the plus/equals key again to add the 2 area values together. The result will be displayed
- If you wish to add further area figures, press the memory plus key to store the result displayed and then repeat from step 2
Calculate Volume
- Press the Calculate Volume Key (10) to change the mode to volume calculation. The Area/Volume Icon (20) will display on the screen. The 'L' will be flashing
- As with the area calculation the first measurement will be length (L), followed by width (W), followed by height (H)
- Follow the process for taking these measurements as described in 'Measuring Distance'. Take care not to point the laser beam into your eyes when taking the height measurement
- The Digital Range Measure will automatically calculate the volume of the space and display this in the Memory/Calculation Display (18) of the screen
- If you wish to re-measure, press the calculate volume key again to reset the values.
- To review the individual measurements taken, press the Read Key (6) and it will cycle between the measurements taken for length, width and height
If you wish to add 2 or more volume values together
- After the initial volume has been calculated press the Memory Plus Key (9) to store the volume value
- Press the Calculate Volume Key (10) and input new measurements for length, width and height. The calculated area will be displayed
- Press the Plus/Equals Key (8) and then the Recall Memory Key (4) and then the plus/equals key again to add the 2 volume values together. The result will be displayed
- If you wish to add further volume figures press the memory plus key to store the result displayed and then repeat from step 2
Temperature measurement
Press and hold the Read Key (6) then press the Metric/Imperial Key (5) to switch between temperature readings and measurement readings.
- While the temperature is displayed, press the metric/imperial key to switch between Fahrenheit and Celsius measurements
- To return directly to measurement readings, press the read ke
Troubleshooting
Inaccurate measurements may be the result of the following:
- Battery is low – check for Low Battery Warning (13) on screen
- Rechargeable batteries that only output 7.2V instead of 9V may be incompatible – check for the Low Battery Warning (13) on screen
- The measured distance may be outside the measuring range of this product. Refer to the product specification to check
- This product cannot add volume measurements to area measurements
- Other ultrasonic devices interfere with the effectiveness of this product and should be located and turned off prior to use
- The environment can affect this product. Humidity or temperatures outside the working temperature of this product will have an adverse effect
Disposal
Always adhere to national regulations when disposing of electronic equipment that is no longer functional and is not viable for repair.
- Do not dispose of waste electrical and electronic equipment (WEEE), with household waste
- Contact your local waste disposal authority for information on the correct way to dispose of electronic equipment
EC Declaration of Conformity
The undersigned: Mr Darrell Morris a
s authorised by: Silverline Tools
Declares that the
Product Code: 255664
Description: Digital Range Measure Conforms to the following Directives:
- EMC Directive 2004/108/EC
- RoHS 2011/65/EU
- EN 61326-1:2006
- EN 61326-2-2:2006
- EN 60825-1:2007
The technical documentation is kept by: Silverline Tools
Notified body: Jiangsu TUV Product Service
Place of declaration: Shanghai, China Date: 10/04/13
Signed by: 
Name and address of Manufacturer or Authorised representative:
Silverline Tools, Boundary Way, Lufton Trading Estate, Yeovil, Somerset,
BA22 8HZ United Kingdom

Documents / ResourcesDownload manual
Here you can download full pdf version of manual, it may contain additional safety instructions, warranty information, FCC rules, etc.
Download Silverline Digital Range Measure 0.6-15m Operating Instructions
Advertisement


Need help?
Do you have a question about the 255664 and is the answer not in the manual?
Questions and answers