Advertisement
Quick Links
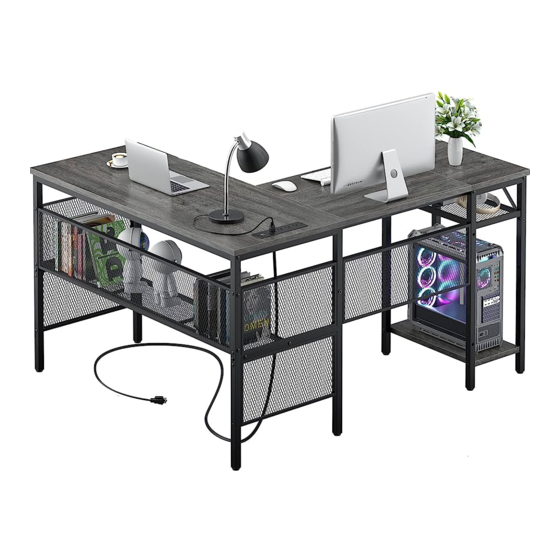
Program A
Thank you for purchasing our products.
As a reliable seller, we have been pursuing to provide customers with 100% satisfied products and services,
so we hope that you will enjoy this shopping experience.
If you find any damage, missing parts or dissatisfaction after receiving the product, pls feel free to contact us at the
first time, we will provide you with 100% satisfactory solution.
Thanks again for your order. And pls feel free to contact us from Amazon or support@unikito.com in case of any
problem regarding assembling or product itself. We will do everything we can to resolve it.
TIPS:
1.Two people are recommended to install,which will greatly improve your installation efficiency.
2.The desktops are reversible. Please choose your favorite direction first. Then assemble it according to the specific
direction's steps.
3.Put the screws in loosely until all pieces are together and then tighten them all. It will save your time if you make a
mistake while installing.
support@unikito.com
1/16
Program B
Advertisement

Related Manuals for Unikito Program A

Summary of Contents for Unikito Program A
- Page 1 100% satisfactory solution. Thanks again for your order. And pls feel free to contact us from Amazon or support@unikito.com in case of any problem regarding assembling or product itself. We will do everything we can to resolve it.
- Page 2 2/16...
- Page 3 ① ② ③ M6x35 ø6x30 M6x27 ④ ⑤ ⑥ ⑦ M6x14 M5x45 ⑧ ⑨ M4x12 3/16...
- Page 4 Program A Program B 4/16...
- Page 5 Program A Installation tips: 1.Align the fittings and accessories when installing the frame, then tighten the screws. Assemble the shelve on the left. 2.When installing the board, first screw all screws into holes loosely then tighten them. 5/16...
- Page 6 Steps(1) ① Note: Please keep these holes on the same side on Part E and F. ① ⑨ ⑨ ① Steps(2) ③ ③ ⑥ ⑥ ⑥ ③ 6/16...
- Page 7 Steps(3) ① ① ⑨ Note: Please confirm the holes on Part L is in position. ⑨ ① Steps(4) ③ ③ ① ① ③ ① 7/16...
- Page 8 Steps(5) ① ① Note: Please put the desk and shelf frame upside down and then connect Part K with screws (Part 1). ① Steps(6) ⑤ ④ ③ ③ Please assemble Part N and fix it on the frame with screws (Part 3) ⑤...
- Page 9 Steps(7) ② ② Note: Please connect the panel A and B with wood dowel (Part 2) ② Steps(8) ③ ③ Note: Please fix all of the desktop panel A, B and C on the frame with screws (Part 3). ③ 9/16...
- Page 10 Steps(9) ⑤ ④ ⑤ ④ Note: Please insert hex nut(Part 5) into hole from the inner side and use finger to hold it, put the brace bracket in place and fix the screws (Part 4) from outside. ⑤ ④ Steps(10) ⑧...
- Page 11 Program B Installation tips: 1.Align the fittings and accessories when installing the frame, then tighten the screws. Assemble the shelve on the right. 2.When installing the board, first screw all screws into holes loosely then tighten them. 11/16...
- Page 12 Steps(1) Note: Please keep these holes on ① the same side on Part E and F. ① ⑨ ⑨ ① Steps(2) ③ ③ ⑥ ⑥ ⑥ ③ 12/16...
- Page 13 Steps(3) ① ① ⑨ Note: Please confirm the holes on Part L is in position. ⑨ ① Steps(4) ③ ③ ① ① ③ ① 13/16...
- Page 14 Steps(5) ① ① Note: Please put the desk and shelf frame upside down and then connect Part K with screws (Part 1). ① Steps(6) ⑤ ④ ③ ③ Please assemble Part N and fix it on the frame with screws (Part 3) ⑤...
- Page 15 Steps(7) ② ② Note: Please connect the panel A and B with wood dowel (Part 2) ② Steps(8) ③ ③ Note: Please fix all of the desktop panel A, B and C on the frame with screws (Part 3). ③ 15/16...
- Page 16 Steps(9) ⑤ ④ ⑤ ④ Note: Please insert hex nut(Part 5) into hole from the inner side and use finger to hold it, put the brace bracket in place and fix the screws (Part 4) from outside. ⑤ ④ Steps(10) ⑧...
Need help?
Do you have a question about the Program A and is the answer not in the manual?
Questions and answers