
Summary of Contents for Roaprobe E0397WST4H4PR
- Page 1 USER MANUAL Model: E0397WST4H4PR-V1 WIRELESS COLOR WEATHER STATION WITH 3 REMOTE SENSORS English...
- Page 2 Please read the entire instruction manual before using the product and then save it for future reference. We reserve the right for any errors in test or images and any necessary changes made to technical data. Things to consider: The other wireless equipment with the same frequency band can reduce the transmission range.
-
Page 3: Power Supply
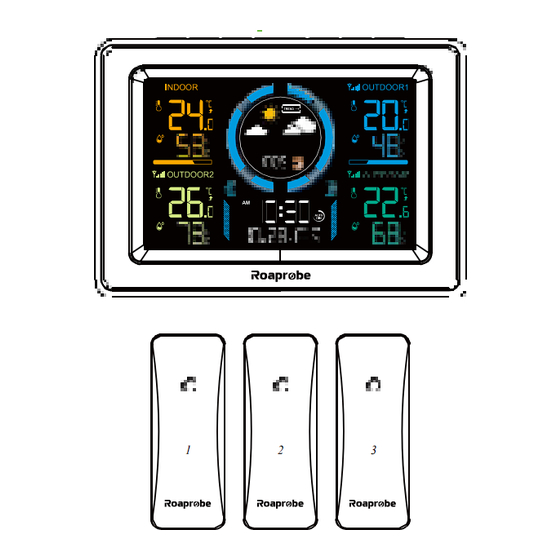
POWER SUPPLY MAIN UNIT INSTALLATION Remove the battery compartment cover. Insert 3 x AA batteries matching the correct polarity (+and-) (Not included). Connect the adaptor with power. SENSOR INSTALLATION Remove the battery compartment cover, according to the number marked on the surface of the sensor, dial to the corresponding channel. - Page 4 OVERVIEW MAIN UNIT 3 4 5 11 9 10 1. Indoor temperature and humidity 2. Max/min record of indoor temperature and humidity 3. Weather forecast Weather forecast for next 12-24 hours 4. Barometric pressure Barometer display in mmHg, inHg or hPa/mb 5.Moon phase 6.Temperature and humidity of channel1/2/3 7.Max/min record of channel 1/2/3...
-
Page 5: Outdoor Sensor
OUTDOOR SENSOR 1. Signal light 2. Hanging hole 3. Battery compartment 4. Channel 1-2-3 switch FEATURES • Clear color LCD display • WWVB atomic time • Weather forecast for next 12-24 hours with barometer • Measures in/out humidity and temperature (℉/℃) •... -
Page 6: Barometer Calibration
BAROMETER CALIBRATION After power on, the pressure reading will be flashing for 10 seconds. If there is no need for calibration, touch 【SNOOZE/ LIGHT 】 button to exit setting. If calibration is required, you can press 【+】or【-】 button to adjust data; press and hold 【+】or 【-】 button will quickly change the value by 8 steps. - Page 7 4. Manual receiving: press and hold 【+】 button to enter RCC signal receiving. 5. During receiving, press and hold 【+】 button to exit RCC receiving. *RCC symbol display: When receiving signal , RCC icon will be flashing . When signal successfully received, LCD will display complete RCC icon and exit RCC receiving.
-
Page 8: Alarm Clock Setting
RCC ON/OFF TIME ZONE SELECTION CALENDAR YEAR CALENDAR DATE FORMAT (MONTH-DAY or DAY-MONTH) CALENDAR MONTH CALENDAR DATE TIME FORMAT 12/24H CLOCK HOUR CLOCK MINUTE AIR PRESSURE UNIT SELECTION WEATHER PATTERN Exit ALARM CLOCK SETTING In standard mode, single press【ALARM】key to view the set alarm time. -
Page 9: Snooze Setting
SNOOZE SETTING The alarm sound will last for 2 minutes then be canceled automatically. It will make sound as follow: 0-10 seconds: Beep per second 11-20 seconds: Beep x 2 per second 21-30 seconds: Beep x 4 per second 31-120 seconds: Keep BI sound When the alarm is ringing, press any other button except 【SNOOZE/ LIGHT 】... -
Page 10: Low Battery Indicators
RF- RE-REGISTRATION Press and hold the【CH】 button to clear all sensors data and start receiving signal again. MAX AND MIN RECORD 1. Press 【MEM】 button to check maximum temperature and humidity, the value will display for 5 seconds. 2. Press 【MEM】 button second time to check the minimum temperature and humidity, the value will display for 5 seconds. - Page 11 TEMPERATURE 1. After power on, the indoor temperature will display automatically, it will update reading each 30 seconds and start to receive outdoor signal which lasts for max 3 minutes. 2. Indoor temperature display range:14℉~ 122℉(-10℃~ 50.0℃); for temperature lower than 14℉,the reading will be :”LL.L”; for temperature higher than 122℉,the reading will be :”HH.H”.
-
Page 12: Weather Forecast
3. Accuracy: when the temperature is between 68℉~ 78.8℉ (20℃~26℃) and the humidity is between 40-80%,the accuracy is ±5%,if out of this range the accuracy will be ±8%. 4. Arrow indication for humidity changes: will display when the reading increase by 3% RH within one hour or compared with last reading. - Page 13 Outdoor Sensor For a more accurate reading and weather forecast, please place the sensor at a proper place: 1.Avoid exposing to direct rain, sunlight or other heat/cold source. 2.Make sure there is enough air flow around the sensor to reflect the changes of environment (Well-ventilated).
- Page 14 Tips 1.The product must not be dismantled or modified in any way. 2.The weather station must not be exposed to rain or moisture. The product is not intended to be used as a reference thermometer and we will not beheld liable for any damage which may result from inaccurate readings.
Need help?
Do you have a question about the E0397WST4H4PR and is the answer not in the manual?
Questions and answers
We have a roaprobe changed batteries in it to day and now it won’t stay on it comes on and then goes very dim I want it on all the time
The Roaprobe E0397WST4H4PR may turn on but then go dim and not stay on because it is powered by batteries only. In this mode, pressing the 【SNOOZE/LIGHT】 button lights up the screen only temporarily for 20 seconds. Continuous backlight brightness control (BRIGHT–DIM–OFF) is only available when the device is powered by the adapter.
This answer is automatically generated
Won’t connect to internet