Table of Contents
Advertisement
Quick Links
----------------------------------------------------------------------------------------------------------------------------------------------
AMH1K-7ODRXZT1 for Outdoor Tankless Applications without Built-In Pump in the Tankless Heater
Installation and Operating Instructions for Instant Hot Water Recirculation Systems
NSF/ ANSI 372 Approved, UL, ULC Listed
Thank you for choosing the AMH1K-7ODRZXT1 Instant Hot Water Recirculation System by AquaMotion, Inc for single pipe tankless systems. Please
read and follow these step by step instructions to ensure that the system operates properly and reliably. The AquaMotion ODR Valve is a small, quiet,
stainless/brass hot water recirculation valve. It can be installed at the fixture, furthest from the hot water tankless heater. When installed at the furthest
fixture, all fixtures in between will benefit and will produce hot water moves quickly. It acts in conjunction with a circulator to supply instant hot water.
The ODR Valve mounts below the fixture between hot and cold supply lines. It installs on the cold water shut off valve at point of use. As hotter water
reaches the ODR Valve it begins closing when a 95°F temperature is reached, the valve automatically adjusts to maintain this temperature. The
circulator can be installed indoors or outdoors.
Inspection
Inspect the system components to ensure no damage has occurred to them during shipping. Avoid dropping the circulator which may be damaged if
dropped.
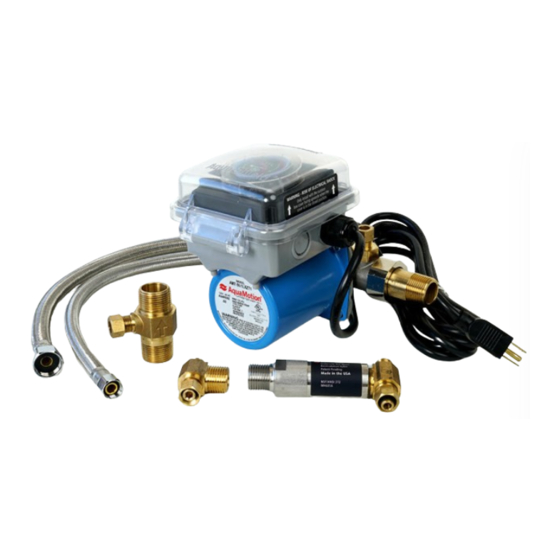
The AMH1K-7ODRXZT1 Kit includes:
AM7 AquaMotion Circulator with check valve, built-in timer, 10 Ft line cord and flow control to bypass up to 1 GPM.
ODR Undersink Valve, Tee, 3/8" Compression 24" hose ½" x ½"
Two 3/4" NPT Male Tail Pieces with 1" Union Nuts and Gaskets
2 Ft. Stainless Braided Hose, 3/8" compression x 3/8" Compression
3/4" NPT x 3/4" NPT x 3/8" Compression Tee Fitting (Contains Check Valve)
Tools Needed:
5/8" open end wrench
1" open end wrench or an adjustable crescent wrench that opens to 1"
Two Pipe wrenches that open to 1.5"
NSF Pipe Dope or Teflon Tape
Limits
Maximum water temperature 150⁰F
Maximum Pressure Rating 125 psi
Pump Installation
Warning: Do not plug the pump in until the pump install is complete.
Follow National and Regulation Plumbing Codes.
Warning: Risk of Electrical Shock. Only install with the outdoor box cover
facing upwards when the cover is in the closed position.
Mount the pump where it will not be exposed to direct sunlight, sprinklers or rain.
1)
Shut off the power or unplug the tankless heater. If no plug or switch is available, shut off the tankless heater at the breaker box.
2)
On gas fired tankless heaters, shut the gas valve off to the tankless heater.
3)
Shut off the cold water supply to the water heater. The valve may be on the cold supply line above the tank or located where the water line enters
the residence.
4)
Open a hot water faucet in the residence and allow the water to run until it stops. Leave the faucet open until the installation has been completed.
5)
Remove the hot water line from the tankless heater at the threaded outlet port at the bottom or side of the tankless heater. Use a bucket or basin to
catch any water. (If installing Tee sitting remotely from the heater, choose a location that will accommodate the pump and fittings.)
Place one of the 1" union nuts over one of the ¾" male tail pieces and thread the tail piece into the outlet port of the tankless heater or adapter (not
6)
supplied) if room is needed to allow the timer cover to open. (If installing the pump remotely from the heater, thread the tail piece onto the outlet line
of the tankless heater) using pipe dope or Teflon tape on the threads. Note: The timer cover must face upwards to protect the pump from water
intrusion.
Allowing room for the pump (5") thread the other tail piece and nut onto the hot water line to the fixtures. Ensure there is space available to open
7)
the cover.
8)
Install the pump between the two union nuts with gaskets between the pump and the fittings.
9)
Remove cold water inlet line from the tankless heater at the threaded inlet port at the bottom or side of the tankless heater. Use a bucket or basin to
catch any water. (If installing the pump remotely from the heater, choose a location that will accommodate the Bypass Tee.
10) Thread the ¾" MNPT threads on the Tee into the inlet port of the tankless heater. Make sure the arrow on Tee points to tankless inlet. thread the
cold water inlet line onto the ¾" FNPT threads on the Nipple Check Valve using pipe dope or Teflon tape on the threads.
Install the braided hose onto the 3/8" OD compression connections between the pump and the Tee and tighten the compression nuts. When
installing remotely, if a longer connection is needed, use 3/8" OD copper tubing*. *If the braided hose is used, discard the 2 compression nuts
and ferules. Reopen the cold water supply valve to the hot tankless heater. Allow the water to run at the faucet to purge air from the lines.
Close the faucet.
11) Check for leaks.
12) Turn on or plug in the power for the tankless heater.
13) Open the gas valve if it is a gas fired tankless heater.
14) Plug the circulator into a GFCI 115V outlet. Set the timer, see Mechanical Timer Operation or Digital Timer sections. Place the stainless bolt and
nut into the locking tabs on the timer cover and base.
AquaMotion Inc. 88 C Jefferson Blvd., Warwick, RI 02888 Tel: 401-785-3000 Fax: 401-785-3033
Copyright 2017 – AquaMotion Inc.
Printed in USA
Instruction Sheet
Kit No. AMH1K-7ODRXZT1
Patented & Patent Pending
Effective 3/16/2020
IS-AM09-599
Page 1 of 2
Advertisement
Table of Contents

Related Manuals for AQUAMOTION AMH1K-7ODRXZT1

Summary of Contents for AQUAMOTION AMH1K-7ODRXZT1
- Page 1 Thank you for choosing the AMH1K-7ODRZXT1 Instant Hot Water Recirculation System by AquaMotion, Inc for single pipe tankless systems. Please read and follow these step by step instructions to ensure that the system operates properly and reliably. The AquaMotion ODR Valve is a small, quiet, stainless/brass hot water recirculation valve.
- Page 2 Instruction Sheet IS-AM09-599 3/16/2020 Kit Components Components for Under Sink Installation Valve Installation Installation and Operating Instructions Warning: This is not an anti-scald valve. Valve Installation Note: Pipe dope and Teflon tape are Not required for any of the valve threads. The valve is normally installed at the faucet that is furthest away from the hot water tankless heater.
Need help?
Do you have a question about the AMH1K-7ODRXZT1 and is the answer not in the manual?
Questions and answers