Advertisement
INTRODUCTION
To fully enjoy a safe and happy ride, please read the full content of these operating instructions before you start. Your road safety is not only related to your skills but also to the operation and knowledge of motorbike mechanics. Each time before driving, check the basic parameters of the motorbike and its parts. Periodic maintenance of motorbikes components is a prerequisite for complete satisfaction in using the vehicle. It should be remembered that some operations may require carrying out by a qualified diagnostic or repair station. We recommend regular visits to qualified diagnostic or repair stations.
Read the entire instruction manual before riding an electric motorbike!
This product is intended for transport and is environmentally friendly. The following are the features and benefits of an electric motorbike.
- High performance brushless DC motor.
- Digital controller with indicator and overvoltage and undervoltage protection.
- Braking system with power cut-off to ensure safe driving.
- High-performance battery for greater electric current and longer driving range.
- Front and rear suspension for a smooth and comfortable ride.
 ATTENTION:
- Familiarize yourself with the local laws and ordinances that regulate or limit the age of the driver who will be able to use this electric vehicle. Laws and regulations sometimes differ significantly depending on the country in which you reside. It is your responsibility to know and comply with local restrictions.
- Do not remove or disassemble the vehicle parts yourself. Contact a qualified diagnostic or repair station to replace or repair parts.
- Do not lend your vehicle to anyone who does not have the required license to drive this vehicle.
- To prevent an accident, avoid sudden stopping or braking.
- Never drive with one hand, avoid driving under the influence of alcohol or other intoxicants.
SAFE DRIVING RULES
The main rules
- When driving this vehicle, always wear an approved, certified helmet and follow the helmet manufacturer's instructions regarding fit, use and care.
- When driving, you must comply with the same traffic rules as all other road vehicles, including giving way to pedestrians and stopping at the red traffic light and stop signs. You are a road participant with all the consequences.
- Drive predictably and in a straight line. Never perform sudden maneuvers, especially in traffic jams. Drive conservatively and confidently. You may be hard to see for other road users. Use the correct indicator lights to indicate turning or stopping. Use appropriate protective clothing with parts that ensure visibility in the evening and at night.
- Focus on the road ahead. Avoid holes, gravel, wet roads, oil stains, curbs, speed thresholds, drainage grates and other obstacles that may cause slip or wheel/wheels blockage.
- Expect the unexpected. Pay special attention to situations such as the sudden opening of a car door or an unexpected appearance of a vehicle from behind of another vehicle. Use extreme caution at intersections and when preparing to overtake other road users.
- Get to know all the functions of your vehicle. Practice using the warning lights, braking and using the horn.
- Do not carry packages or passengers that could interfere with the visibility or control of your vehicle. Do not use objects that may limit hearing.
- Keep a comfortable distance to ensure proper and collision-free braking in front of other vehicles or objects on the road. The safe braking distance and forces applied to the vehicle depend on the prevailing weather conditions.
- If you have a poor pavement or uncertain pavement, drive slowly and carefully.
- Do not exceed the maximum load of your vehicle.
This will affect the driving range.
Rainy weather
- Use extreme caution in rainy weather.
- Brake earlier to keep a greater distance to stop.
- Reduce your speed, avoid sudden braking and turn with extreme caution.
- Be more visible on the road.
- Wear reflective clothing, use safety lights.
- In the rain, slippery surfaces, such as road markings or lanes at pedestrian crossings, become very dangerous and threaten wheel slip when braking. Communication wells or tram tracks also become more dangerous when wet.
Night driving
- Make sure the headlights are on.
- Wear bright and reflective clothing.
- Ride at night only when needed. If possible, slow down and use known roads with street lighting.
ATTENTION: Modifying the vehicle is illegal. Modifying the vehicle will affect its structure or performance, which will shorten its lifetime. The modified vehicle will not be covered by the warranty. It is necessary to buy original spare parts from authorized dealers. The manufacturer is not able to guarantee the quality or durability of the vehicle when buying non-original spare parts on the market.
ATTENTION: Familiarize yourself with the local laws and ordinances that regulate or limit the age of the driver when using this electric vehicle. Laws and regulations sometimes differ significantly depending on the country in which you reside. It is your responsibility to know and comply with local restrictions.
TECHNICAL SPECIFICATIONS
- Vehicle category: L1e-B
- Required driving permissions: depends on the specific country
- Battery: lithium-ion, removable
- Battery capacity: 60 V / 20 Ah (160 cells)
- Cell manufacturer: Samsung
- Battery weight: 9 kg
- Input voltage: 230/240 V
- Charging time: 5-6 hours
- Number of charging cycles: 800
- Charger: external with cooling, 67.2 V / 8 A
- Motor power: 2000 W
- Motor type: brushless
- Maximum torque: 35 Nm (at 2000 W power)
- Power transmission: directly in the wheel
- Maximum speed: 45 km/h
- Maximum range: 60* km
- Hill climbing ability: 15°
- Weight: 65 kg (without batteries)
- Maximum load: 150 kg
- Length: 1670 mm
- Width: 700 mm
- Height: 1120 mm
- Wheelbase: 1225 mm
- Front tire: tubeless, 3.00-10, 42J, 43J
- Rear tire: tubeless, 3.00-10, 42J, 43J
- Front brake: disc, Ø180 mm
- Rear brake: drum brake
* actual range depends on many factors, including temperature, mass of traveler, degree of inclination, driving dynamics etc.
ATTENTION: Due to continuous product improvement, the specifications and design of the device are subject to change without notice.
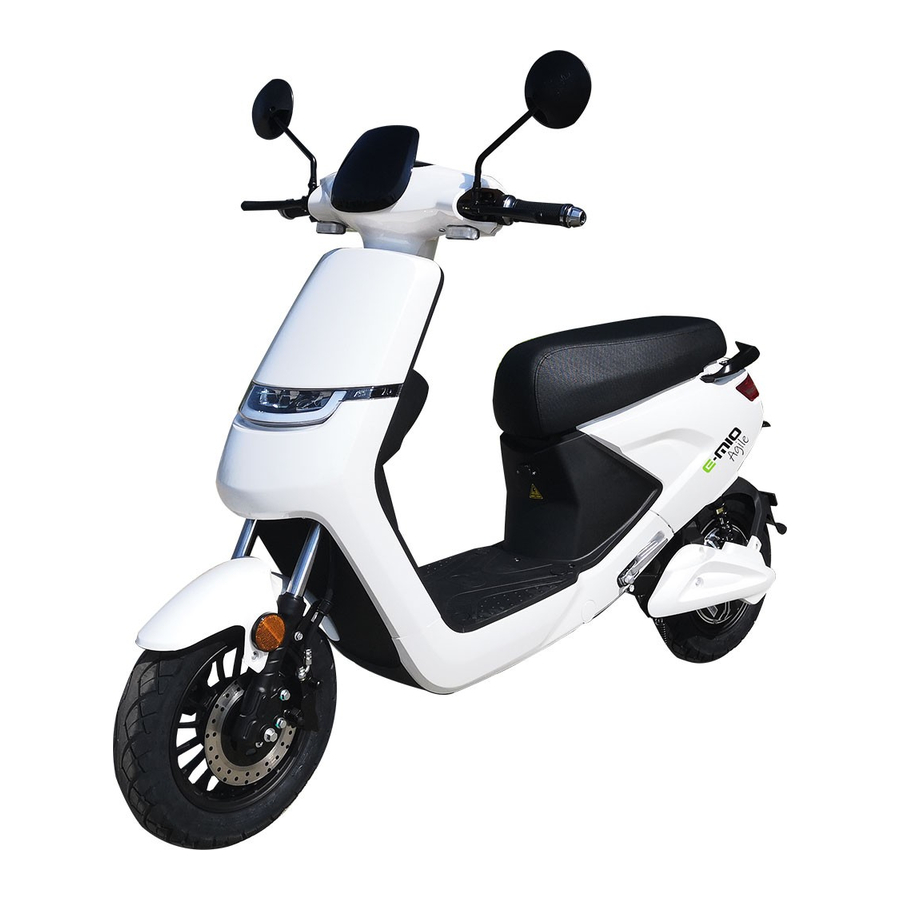
CONSTRUCTION OF AN ELECTRIC MOTORBIKE
- Rear-view mirrors (right and left)
- Wind deflector
- Headlight with direction indicators (left and right)
- Front wheel
- Dashboard
- Acceleration handle and brakes (rear and front)
- Storage box with USB charger
- Floor
- Seat (opens with access to storage and battery)
- Rear lights
- Place for the license plate
- Rear wheel
- Passenger footrests (left and right)
- Central foot
- Side foot
ATTENTION: Do not use the horn in the area of non-use.

DASHBOARD
- Left turn signal indicator
- Gear indicator
- Speed indicator
- Traffic lights indicator
- Right turn signal indicator
- Indicator of traveled kilometers
- Battery charge and usage indicator: green means the battery is fully charged, red means the battery is at low charge. When the indicator indicates a yellow area, the battery is half charged. When the indicator indicates a red area, the battery needs charging.
- Left rear view mirror
- Right rear view mirror
- Accelerator handle
- Rear brake lever
- Front brake lever
- Light switch: parking and traffic lights
- Horn
- Turning signal switch (left and right)
- Alarm switch
- Reverse gear switch
IGNITION SWITCH
- Insert the key in the ignition and turn right to the ON position to start the vehicle.
- With the vehicle running, turn the ignition key to the OFF position to turn off the vehicle.
- With the vehicle switched off, turn the ignition key to the left to open the storage compartment under the seat.
- With the vehicle switched off, press the ignition key into the steering column and turn it to the left to lock the front wheel of the vehicle.

ATTENTION: Never push the scooter when the handlebar is locked. This can result in a loss of balance and a fall of the vehicle.
ATTENTION: Lock the vehicle and take the key after parking.
BATTERY CHARGING
Before using the electric motorbike for the first time, charge the batteries for 6-9 hours with the supplied charger.
Important charging instructions
- The power switch lock must be in the OFF position when charging the electric motorbike.
- The motorbike uses a 60 V lithium battery. The electric motorbike must be charged after each ride. You must charge the electric motorbike if it has not been used for 30 days or more. The charging time
Charging an electric motorbike via the charging socket: Turn off the motorbike by turning the ignition key to the OFF position. Insert the output plug into the charging socket of the motorbike (see fig. 1) and connect the 220/110 V input plug to the wall socket (see fig. 2). The battery is fully charged when the charger indicator is green. We suggest extending the charging time by 1-2 hours to achieve better battery condition. When charging is complete, unplug the charger's input plug and then the output plug. 
Direct charging of the electric motorbike battery: Switch off the motorbike by turning the ignition key to the OFF position. Open the storage compartment under the seat. Carefully remove the plug from the battery. Insert the output plug into the battery charging socket (see fig. 1) and connect the 220/110 V input plug to the wall socket (see fig. 2). The battery is fully charged when the charger indicator is green. We suggest extending the charging time by 1-2 hours to achieve better battery condition. When charging is complete, unplug the charger's input plug and then the output plug.

ATTENTION:
- Do not place the battery near heat or fire.
- Do not place the charger near water.
- For safety reasons, use only the original charger supplied with the vehicle. Follow the loading instructions.
Foot
- Central foot: use when parking for a long time.
- Side foot: use for temporary parking.
ATTENTION: The side cut-out function is activated when the side stand is folded out, which prevents the scooter from moving when the accelerator handle is accidentally moved. The electric scooter will only be able to move with the side foot folded in.
Reverse gear
Use reverse gear only when the vehicle is standing still. After stopping the vehicle, press the reverse button and gently rotate the accelerator lever. The vehicle will move backwards.
Floor
Do not place any heavy objects on the floor. This will affect the balance of the motorbike and may cause danger.
Seat
- Seat lock: turn the key in the ignition switch to the left - you will be able to raise the seat and gain access to the storage compartment and battery.
- Press the seat down and it will lock automatically.
Front (disc) and rear (drum) brakes
To adjust the brakes to your requirements and adjust their clearance, use the adjustable nut.
ATTENTION:
- The brake works according to its sensitivity. You should brake by simultaneously pressing the front and rear brake levers to ensure a better and more effective braking process.
- Avoid continuous braking for a long time as this may overheat the brakes and reduce
- When pressing the brake lever, release the accelerator handle.
BEFORE DRIVING
Before riding an electric motorbike, do the following. This will ensure a safe and satisfying ride.
- Check the condition of the tires, make sure they are not worn or cracked.
- Check the tire pressure.
- Check the condition of the drive, make sure it moves the wheel correctly.
- Check the condition of the lights, make sure that all the bulbs light up correctly and the lights respond to commands given by switches.
- Check the condition of all parts, make sure all bolts are tight, check the tension of the front and rear brake cables and make sure the brakes are working properly.
- Check all moving parts such as the steering wheel. Make sure that they move lightly and without unnecessary resistance, lubricate them if necessary.
- Charge the battery regularly when you don't use the electric motorbike too often. To extend the battery life, charging should take place every 15 days in summer and every 30 days in winter.
DRIVING INSTRUCTIONS
- Fold the foot (center or side, depending on which you use) and hold the steering wheel steady with both hands. Take a well-balanced position, put your foot on the ground.
- Insert the key in the ignition switch and turn to the ON position. After turning on the power, grasp the accelerator lever.
- Slowly rotate the accelerator lever to avoid sudden acceleration. Move your foot to the vehicle floor. The speed of the electric scooter will increase as the accelerator handle is turned.
- Release the accelerator lever and press the brake lever to stop the vehicle. Control the speed of the electric scooter using the accelerator levers and brakes.
- Pressing the brake lever will cut off the acceleration power.
MAINTENANCE AND ADJUSTMENT
Battery
To extend the life of the battery, store the electric motorbike in the garage to prevent low temperature, which significantly affects battery performance.
- Do not disassemble batteries and cells.
- Keep batteries and cells out of reach of children.
- Do not connect the chargers cathode and anode during the charging and discharging process. It is forbidden to use any wires to connect the cathode with the anode. This will cause a short circuit.
- Do not immerse the battery in water.
- Do not heat the battery to temperatures above 60 Celsius degrees. Do not place the battery next to high temperature sources such as a fireplace, wall heating, etc.
- Do not smash, do not puncture, do not pierce or throw the battery.
- In the event of a battery leak and eye contact, rinse immediately with plenty of water and seek medical attention.
- If you notice a strange smell of the battery, its warming up, color change, distortion or other irregularities, immediately stop using the battery and move away.
Recommendations for the storage and use of lithium-ion batteries
To extend battery life, follow these guidelines:
Charging:
- Use only the charger provided with the electric motorbike. Connect the power supply to the charger. Insert the charger output connector into the battery input connector. When the indicator light for fully charged battery comes on, first pull the plug from the battery input connector. The usual charging time is about 4-5 hours. If the battery is damaged, charging or discharging must stop.
- Avoid over-discharging the battery, charge the battery before it is completely discharged. Full discharge of
Storage:
- Do not store the battery in rooms where it is too hot/ cold and/or humid. The optimum battery storage temperature is from -20 to 55 Celsius degrees. The room must be dry and clean. Batteries cannot be stored in a stacked order.
- The battery cannot be stored for a long time without charging. Charge the battery once a month. The battery should be stored fully charged.
Maintenance:
- When you test a single battery cell, you must test it directly, not through, for example, a wire. In this way a voltage drop can be avoided.
- You must put on gloves or cut nails before removing a single battery cell so as not to damage the cell and as a protection against the substances in the cell. Pay special attention to the battery cover, do not damage it.
- It is forbidden to bend the battery cell, drop it, hit it, short circuit it or damage its seal.
- When assembling the battery, there are a few important things to remember: the temperature of the soldering iron should not exceed 350 Celsius degrees, the soldering time should not exceed 3 seconds, the soldering frequency should not exceed 5 times, the next soldering can be applied to the previous ones only after it has cooled down.
Vehicle cleaning
- Do not use high pressure water to clean the electric motorbike. Wetted/wet electrical parts and wiring will affect the vehicle's performance.
- Do not apply grease to the drum brake and tire.
- Use appropriate cleaning medium to clean the metal parts of the electric motorbike. This will protect the metal parts of the vehicle against corrosion.
- Use a cleaning medium to clean varnished plastic parts and clean them with a dry cloth.
Brakes check
Main front and rear wheel brake checkpoints:

- Press the adapter (1), turn the adjusting nut (3) while holding the brake lever (2) and squeezing the brake lever until the distance is 1/3-1/2 L. The brake shoes must fit snugly against the brake disc. Press the brake lever. When it reaches the braking performance, tighten the adjustment nut.
- The distance between the brake shoes and the brake disc should be 1.5 mm.
- Replace the brake shoes when the usable area reaches 1/2.
Charger control
- Use only the original charger supplied with the motorbike scooter. Remember to check the mains voltage in your country. Do not confuse the 110 V charger with the 220 V charger.
- The motorbike must be turned off during charging.
- Do not move, rotate or subject the battery to damage while charging.
- Check the charger sockets, make sure that the soldered components are not damaged.
Engine and driver maintenance
- During the rainy season, do not let the water cross the engine center line. This is to protect the engine against burnout and damage
- Do not press the brake lever and accelerator handle while starting the engine to avoid damaging other parts of the vehicle.
- Slow down when the weather conditions on the road are not good. High vibrations and humidity can break the connection of electrical parts.
Maintenance schedule

TROUBLESHOOTING
| Problem | Cause | Solution |
| The power indicator will light up but the electric otorcycle is still not working. |
|
|
| The power indicator does not work when the power is turned on |
|
|
| The distance traveled on one charge is smaller than usual |
|
|
| The electric motorcycle is losing speed |
|
|
| The engine is not working. |
|
|
ATTENTION: If you encounter other problems, do not disassemble the electric scooter yourself, contact an authorized dealer.

Documents / ResourcesDownload manual
Here you can download full pdf version of manual, it may contain additional safety instructions, warranty information, FCC rules, etc.
Advertisement

Need help?
Do you have a question about the Agile and is the answer not in the manual?
Questions and answers