Advertisement
Quick Links
Advertisement

Summary of Contents for ZEBSBOARDS TAO
- Page 1 MOUNTING KIT ASSEMBLY GUIDE ZEBSBOARDS.COM © 2022...
-
Page 2: General Safety
BEFORE YOU BEGIN Working with electricity comes with huge risks that should never be taken lightly, safety should always come first. To avoid personal injury, possible damage to equipment or danger of fire, all work on electronic equipment should be conducted following these safety procedures. General Safety Before working on any electronics, consider following these basic safety precautions to help reduce any hazards. - Page 3 Static Damage Prevention Static electricity can damage electronic devices and your system. To avoid damage, keep static-sensitive devices in their static-protective bags until you are ready to install them. To reduce the possibility of electrostatic discharge, observe the following precautions: •...
- Page 4 Table of Contents Kit Includes …....................Mainboard Assembly …................. Power Board …..................….. AddOn Board …..................…….
- Page 5 Included in kit TAO Mainboard Chassis TAO Left Side/ATX Mount TAO Right Side Mount TAO AddOn Board Clips TAO Power Board Mounting Arms Hardware Package...
-
Page 6: Mainboard Assembly
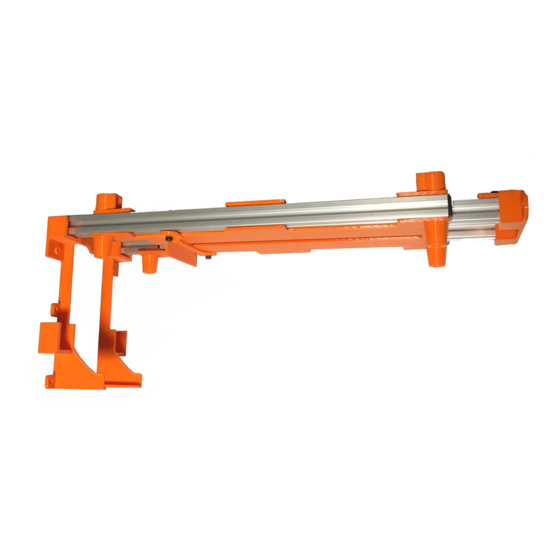
Mainboard Assembly Install the ATX power supply (not included) in the Left Side/ATX bracket with the AC Mains power connector to the bottom of the bracket as shown. Ensure that the retaining bracket on the underside of the mainboard is oriented with the retaining strip facing toward the right side of the mainboard and using the supplied 3mm hex key loosen the 2 mounting screws to allow for it to slide. - Page 7 Slide retaining bracket to a position where it holds the ATX power supply in position and lock down the mmounting screws. Extend the mainboard chassis to the width of the cabinet interior by grasping the right side handle handle and pulling outwards.
- Page 8 Locate the bracket and power supply in a position that suits the interior of your cabinet from the front to the back and install on the left side of the cabinet leaving a minimum of 2 1/2”-3” from the underside of the playfield monitor using the 6 screws provided.
- Page 9 Optional Power Board Mounting Mount the power board to the mounting arms using the provided screws as shown below. Install the 4mm x 8mm screws and Tnuts. Slide 2 x M6 Solenoid mounting Tnuts toward left side of the mainboard and 4 x M6 Solenoid mounting Tnuts toward right side on BOTH sides of chassis and install assembly onto mainboard.
- Page 11 Optional AddOn Board Mounting Slide the mounting clips onto the board and install on extension rails by 1 hooking the rear tabs to the underside of the rail and gently pulling the front tabs out while lowering onto front rail. It helps to do this in stages by 1 hooking into the front t slot on both the left and right side and then hooking further down to the bottom of the rail on the left and right sides.
Need help?
Do you have a question about the TAO and is the answer not in the manual?
Questions and answers