
Summary of Contents for HOLZKLUSIV OPAL 180
- Page 1 Instruction Manual: Hot Tub Date: 23/05/2022 Revision: 09 No.: BA-2021-01 Styles: OPAL, SAPPHIRE, JADE Models: 180 and 200...
-
Page 2: Imprint
Please note, therefore, that illustrations and features are subject to the chosen model and may differ from those of the delivered product. Holzklusiv GmbH reserves the right to change this documentation, including the descriptions and technical data contained therein, without prior notice. -
Page 3: Table Of Contents
Content Table of Contents Imprint ............................1 Manufacturer’s contact details ..................... 1 Copyright ............................. 1 Validity ..............................1 Purpose of this manual ....................5 Personal safety ........................ 6 Due diligence ........................6 Symbols and notices ......................6 Residual risks ......................... 6 Signs by the hot tub ...................... - Page 4 Content 5.4.4 Optional: Assembling the wooden housing for the sand filter unit ....31 5.4.5 Optional: Assembling the skimmer ................32 Initial start-up ........................ 33 Requirements for personnel carrying out the installation ........33 Checking the position of the residual current circuit breaker ......33 Cleaning the hot tub for the first time ................
- Page 5 Content Replacing LEDs ........................46 Ventilation ..........................46 8.10 Winter preparations ......................46 8.11 Using salt water ........................47 8.12 Long periods of non-use ....................47 8.13 Summary of the maintenance and servicing steps ..........47 Decommissioning/Dismantling/Disposal ............... 49 Attachment 1 - Circuit diagram .................... 50 Attachment 2 - EU Declaration of Conformity ..............
-
Page 6: Purpose Of This Manual
1 Purpose of this manual This instruction manual will help you to transport, set up, assemble, start running, operate, maintain, and service the hot tub as intended, in a proper, effective, and safe manner, as well as to dismantle, stop running, and dispose of it. That is why it is important that you read the following chapters carefully. -
Page 7: Personal Safety
2 Personal safety 2.1 Due diligence For your own safety and for the purpose of maintaining the hot tub during all stages of its service life, please read and follow the instructions contained within this manual. Do not make any modifications to, or repair, the hot tub yourself. For proper use, you, the user of the hot tub, must read and follow the instructions of this manual, paying attention, in particular, to the safety instructions given in this chapter. - Page 8 DANGER Danger of drowning and risk of hand injuries / risk of trapped hand/finger in the jets / water inlets and return pipes! Children and persons with mental illnesses must be supervised by an adult at all times. Do not reach into the jets or water inlets and return pipes.
-
Page 9: Signs By The Hot Tub
WARNING Burn hazard from overloading the stove! Take care not to load the stove with too much firewood, which can fall out when the stove door is opened. When extinguishing the embers with water (not recommended), make sure to keep a safe distance to avoid coming into contact with the hot steam. -
Page 10: Health And Safety Devices
Figure 2: Warnings attached to the hot tub regarding the supervision of children and the prohibition of sticking fingers into the jets. Figure 3: Warning notice attached to the hot tub for risk of electrocution 2.5 Health and Safety Devices The hot tub is designed and manufactured in such a way that leaks within the water-bearing assemblies are virtually impossible when the product is used as intended. -
Page 11: Product Description
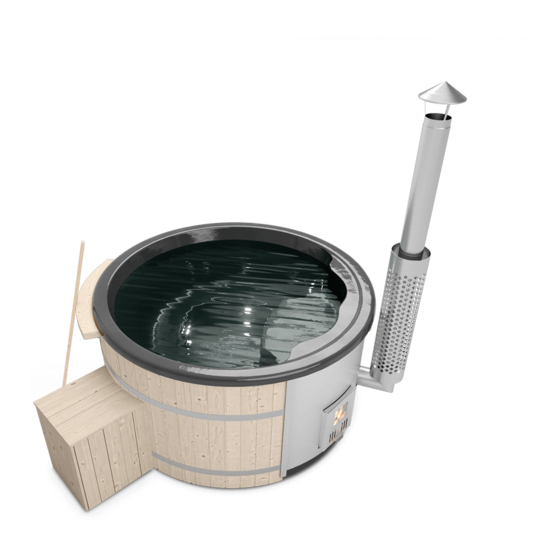
3 Product description 3.1 Description of the hot tub The hot tub is a wood-fired hot tub heated by a stainless steel wood stove for outdoor use. The tub is available in three different styles and three different sizes (170 cm length, 180 cm or 200 cm diameter), with two different stove positions (internal and external), and comes in a variety of wooden cladding options. - Page 12 stove. The water, which is automatically set in motion by heating it, will then flow into the inner area of the hot tub. This creates natural water circulation without the need for external pumps. The heating time for an optimal bathing temperature of 37 to 40°C is about 2 to 3.5 hours (depending on the design of the hot tub, the outside temperature, the type of cover, the amount of water, the heating, and the insulation).
- Page 13 26. Wooden housing fo 1. Glass-fibre reinforced tub the sand filter unit (shown here: 200 model) 19. UV lamp 20. UV lamp 25. Water inlet for 27. RCD fuse box pump the sand filter unit 18. Sand filter 28. Service hatch unit 10.
-
Page 14: Hot Tub Styles And Optional Accessories
This manual describes the hot tub styles "OPAL", "SAPPHIRE", and "JADE" as well as the features listed in Table 2 (standard and optional). Access the link below to create your very own bespoke hot tub: https://holzklusiv.de/konfigurator/ Instruction Manual: Hot Tub... - Page 15 Table 2: Hot tub features incl. optional accessories (item numbers refer to Figure 5 and Figure 6) Item Feature Type Available styles / Description Available in white, blue and anthracite and adapted Glass-fibre to the different styles and the number of jets. Standard equipment reinforced plastic Without a recess for the stove for hot tubs with an...
-
Page 16: Intended Use
Flue pipe Standard equipment With rain cover and heat shield Skimmer Optional Please see separate manual Sand filter unit Optional Please see separate manual UV lamp Optional With its own water circuit The UV lamp operates independently of the sand Pump for UV lamp Optional filter. -
Page 17: Foreseeable Misuse
3.3 Foreseeable misuse The hot tub must not be used for any other purposes. The following examples of foreseeable misuse are not permitted: • Using the hot tub indoors • Setting down the hot tub on non-flat, insufficiently stable or combustible substrates deviating from the requirements described in Chapter 5 •... -
Page 18: Technical Data
3.4 Technical data The most important technical data for the hot tub are summarised in Table 3 and Table 4. Table 3: Higher-level technical data for the hot tub Properties Hot Tub 180 Hot Tub 200 Hot Tub (SAPPHIRE and (SAPPHIRE and (OPAL) JADE) -
Page 19: Type Label
Table 4: Optional hot top features and their electrical properties (may vary slightly depending on availability of features) Feature Power consumption [W] Voltage [V] Protection rating 3 LEDs 230 AC IPX5 Pump for the 6-jet SPA 1,100 230 AC IP55 hydromassage Pump for the 10-jet SPA 1,500... -
Page 20: Dimensions
3.4.2 Dimensions The two illustrations below depict the two "180" and "200" models in "SAPPHIRE", including all dimensions. The dimensions 3 x 3 m or 3.5 x 3.5 m are especially relevant when it comes to placing down the hot tub on the bearing surface (see Chapter 5.2). -
Page 21: Control Panel
3.5 Control panel The following Figure 10 depicts a sample control panel for the hot tub. Control panel Head for Intensity Control panel for the switching on regulator for for SPA SPA air bubble the auxiliary UV lamp LED control the SPA hydromassage massage... -
Page 22: Transport To The Installation Site
4 Transport to the installation site Required tools / resources • If necessary, a crane (or similar, e.g.: forklift) • Slips or chains, if applicable • Carpet knife or scissors DANGER Risk of falling objects! Please note that there is a risk of falling objects when transporting the hot tub. -
Page 23: Disposal
WARNING Risk of injury from lifting loads that are too heavy! Be careful when moving heavy loads. Lift correctly and do not exceed your carrying capacity. People with existing back problems should avoid lifting altogether. Wear protective gloves. 4.2.1 Disposal Dispose of the packaging properly and in accordance with the specifications of your local waste disposal company. -
Page 24: Set-Up, Assembly, And Installation
5 Set-up, assembly, and installation Required tools / resources • Spirit level • Screwdriver or cordless screwdriver (slotted) • Open-end spanner or appropriately sized ratchet spanner • Electric drill • Metre stick • Carpet knife or scissors • Pencil 5.1 Requirements for personnel carrying out the installation The manufacturer recommends using our trained specialists to set up, assemble, and install the hot tub. - Page 25 Figure 12: Bearing surface (coloured red) The following specifications for the installation site must be observed: • For the 180 hot tub: 3 m x 3 m bearing surface (see also Figure 8) • For the 200 hot tub: 3.50 m x 3.50 m bearing surface (see also Figure 9) •...
-
Page 26: Set-Up
Figure 13: Correctly prepared installation site NOTE If there is no compacted floor, so that the hot tub sinks in up to the lower edge (approx. 2 cm), there is a risk of material damage and the warranty will be invalidated. -
Page 27: Assembly
The following procedure is recommended by the manufacturer: After removing the foil in the upper area, turn the hot tub with the help of 3 to 5 physically strong people. 2. The stepped edge (approx. 2 cm high) makes it easier to set down the hot tub. You must hold the hot tub by this edge when setting it down. - Page 28 Please follow the steps below to assemble the flue pipe: Remove the parts stored securely in the stove and in the tub. The following parts must be included in the scope of delivery of the hot tub (see following Figure 14):...
- Page 29 4. Attach the connecting clamp to the stove spigot (see Figure 15). However, please do not tighten it completely yet, so that adjustments can still be made afterwards. 5. Now insert the corner piece into the connecting clamp and turn the corner piece so that it is pointing upwards.
- Page 30 Figure 15: Fastening the fixing clamp to the stove spigot Figure 16: Assembling the lower pipe Figure 17: Sheet metal springs for the heat shield Instruction Manual: Hot Tub...
-
Page 31: Assembling The Drinks Shelf
Please also see our video instructions, which you can access via the following link / QR code, for a detailed explanation of how to assemble the drinks shelf. https://holzklusiv.de/montage1 Please follow the steps below to assemble the drinks shelf: We recommend testing the hot tub a few times beforehand so that you know where your favourite spot is. -
Page 32: Optional: Assembling The Sand Filter Unit
If you have not ordered a sand filter unit, please skip this chapter. Figure 19: Sand filter unit NOTE Holzklusiv guarantees you the proper operation of the sand filter unit for temperatures up to 42 °C. Instruction Manual: Hot Tub... -
Page 33: Optional: Assembling The Wooden Housing For The Sand Filter Unit
Please also see our video instructions, which you can access via the following link / QR code, for a detailed explanation of how to assemble the sand filter unit. https://holzklusiv.de/montage2 Please follow the steps below to assemble the wooden box: Remove the parts stored securely in the stove and in the tub. -
Page 34: Optional: Assembling The Skimmer
Do not carry out any independent modifications or repairs to the unit. If you have not ordered a skimmer, please skip this chapter. Figure 22: Skimmer NOTE Holzklusiv guarantees that the skimmer will operate properly for temperatures up to 42 °C. Instruction Manual: Hot Tub... -
Page 35: Initial Start-Up
6 Initial start-up Required tools / resources • Sponge / cleaning cloth • Hot Tub Clean Care • Firewood in accordance with Table 5 6.1 Requirements for personnel carrying out the installation The personnel carrying out the installation must read and understand this manual before proceeding. -
Page 36: Chemical Cleaning
Please see the following link for the Hot Tub Clean Care detergent: https://holzklusiv.de/produkt-kategorie/hot-tub-zubehoer/ The detergent reliably restricts the growth of bacteria and fungi. A thin layer of detergent must be applied to the entire surface of the tub (floor and walls) before it is filled for the first time. -
Page 37: Running The Stove
6.8 Running the stove NOTE The water inlet for the stove must be filled with water before running the hot tub so as not to damage it. The water level of the tub must therefore be at least 50 mm above the upper edge of the water inlet for the stove. Do not use treated or damp wood. -
Page 38: Optional: Switching On The Pumps
Appropriate material for lighting (e.g.: kindling or cardboard) should be placed either on the ash pan or directly onto the grate beneath the wood (see Figure 25). Use a lighter or match to light the kindling. When inserting and lighting the wood, make sure there is sufficient air supply. As a rule, the stove door should be closed. -
Page 39: Optional: Pump For Spa Air Bubble Massage
DANGER Risk of electrocution! Only use appropriately designed garden sockets with an IP protection rating of at least IPX5. Figure 27: 230 V earthed plug for hot tub (to the right: Preparatory work for the sand filter unit (water return pipe to the sand filter unit)) 6.9.1 Optional: Pump for SPA air bubble massage Switch the pump for the SPA air bubble massage on and off using the push button (see push button on the far right... -
Page 40: Optional: Switching On The Sand Filter Unit
6.9.5 Optional: Switching on the sand filter unit It is assumed that the sand filter unit has been installed in accordance with the instructions provided in Chapter 5.4.3. Once correctly installed, follow the manufacturer’s instructions to switch on the sand filter unit. -
Page 41: Using The Hot Tub
7 Using the hot tub Required tools / resources • Firewood as per Table 5 • Hot Tub Clean Care 7.1 Requirements for personnel carrying out the installation The user must read and understand this manual before using the hot tub. You must follow all instructions given in this chapter while the hot tub is in use to make sure that the product is operated correctly and protect the safety of all users. -
Page 42: Bathing
WARNING Burn hazard from overloading the stove! Take care not to load the stove with too much firewood, which can fall out when the stove door is opened. When extinguishing the embers with water (not recommended), make sure to keep a safe distance to avoid coming into contact with the hot steam. -
Page 43: Maintenance And Care
• Using fresh water as bathing water. If circumstances change, the following intervals must be adjusted accordingly. Holzklusiv is happy to answer any questions you may have. As far as stove design is concerned, it should be noted that "316" model stoves are more resistant to corrosion than "304"... -
Page 44: Filtering And Cleaning The Water Regularly
Chapter 6.7 for further information. You must check and, where necessary, adjust the pH level or alkalinity of the water before each use at least. DANGER Risk of toxic or harmful cleaning products! Make sure that the chemical care products you use when maintaining the hot tub are kept out of the reach of children. -
Page 45: Disinfecting The Water
Please maintain and service the skimmer in accordance with the skimmer's instruction manual. 8.3.2.3 Suction pool cleaner If, despite using the sand filter unit and the skimmer, you notice increased contamination at the bottom of the tub, use a commercially available suction pool cleaner if necessary. 8.3.3 Disinfecting the water The best way to disinfect your water is to use the UV lamp as intended (see Chapter 8.3.3.1) in conjunction with the Hot Tub Clean Care detergent (see Chapter 8.3.5). - Page 46 The following steps are to be carried out twice a year: Please contact us for details on where the UV lamp is to be installed. Then remove the corresponding profile boards by removing the screws with a screwdriver 2. Disconnect the cable (see D in Figure 28) from the lamp 3.
-
Page 47: Emptying And Cleaning The Stove
8.4 Emptying and cleaning the stove The stove must be emptied and cleaned after each use. First of all, you will need to wait until it has cooled down completely before you can empty and clean the stove, (optimally overnight) and then empty the ash pan and / or remove the rest of the ash using an ash shovel or scraper (see). -
Page 48: Wood Treatment
NOTE To avoid damage to your lawn, do not drain the water directly onto your lawn after chemical treatment or chlorination. 8.7 Wood treatment The manufacturer recommends staining and oiling the wood 2 to 3 times a year to prevent mould and cracks in the wood. -
Page 49: Using Salt Water
Drain the water and switch on all jet buttons and the sand filter unit to allow all the water to escape from all the pipes. Let the systems run for approx. 30 minutes 2. If you use an optional cover, the water will not cool down as quickly. This means that it can remain in the hot tub at lower outside temperatures without freezing compared to other models without an optional cover. - Page 50 Runni Maintenance and servicing steps for the hot tub (for Time intervals recommended by the manufacturer, in chronological order maintenance tasks for optional accessories please refer order to Chapters 8.3.2.1, 8.3.2.2 8.3.3.1 Filtering the water using the sand filter unit as per Chapter 10 to 12 hours a day (with 1 to 2 bathing sessions per week, 8.3.2.1...
-
Page 51: Decommissioning/Dismantling/Disposal
9 Decommissioning/Dismantling/Disposal Required tools / resources • Screwdriver or cordless screwdriver • Open-end spanner or appropriately sized ratchet spanner • Use other tools, where needed If the hot tub is no longer required, it can be taken out of service, dismantled, and recycled in accordance with the requirements of the local waste disposal company. -
Page 52: Attachment 1 - Circuit Diagram
Attachment 1 - Circuit diagram *Circuit diagram without heating or antifreeze guard Instruction Manual: Hot Tub... -
Page 53: Attachment 2 - Eu Declaration Of Conformity
Attachment 2 - EU Declaration of Conformity Instruction Manual: Hot Tub... -
Page 54: Attachment 3 - Safety Data Sheet "Hot Tub Clean Care
Attachment 3 - Safety Data Sheet " Hot Tub Clean Care” Attachment 3 - Safety Data Sheet "Hot Tub Clean Care” Instruction Manual: Hot Tub...
Need help?
Do you have a question about the OPAL 180 and is the answer not in the manual?
Questions and answers