Table of Contents
Advertisement
Quick Links
User Manual V1.0
Copyright 2000 Publishing. All Rights Reserved.
This manual, software and firmware described in it are copyrighted by their respective owners
and protected under the laws of the Universal Copyright Convention. You may not reproduce,
transmit, transcribe, store in a retrieval system, or translate into any language, in any form or by
any means, electronic, mechanical, magnetic, optical, chemical, biological, molecular, manual,
or otherwise, any part of this publication without the express written permission of the publisher.
All products and trade names described within are mentioned for identification purpose only.
No affiliation with or endorsement of the manufacturer is made or implied. Product names and
brands appearing in this manual are registered trademarks of their respective companies.
The information published herein has been checked for accuracy as of publishing time. No
representation or warranties regarding the fitness of this document for any use are made or
implied by the publisher. We reserve the right to revise this document or make changes in the
specifications of the product described therein at any time without notice and without obligation
to notify any person of such revision or change.
Printed in Taiwan.
Advertisement
Table of Contents

Related Manuals for Fastfame 3SLAV2

Summary of Contents for Fastfame 3SLAV2
- Page 1 User Manual V1.0 Copyright 2000 Publishing. All Rights Reserved. This manual, software and firmware described in it are copyrighted by their respective owners and protected under the laws of the Universal Copyright Convention. You may not reproduce, transmit, transcribe, store in a retrieval system, or translate into any language, in any form or by any means, electronic, mechanical, magnetic, optical, chemical, biological, molecular, manual, or otherwise, any part of this publication without the express written permission of the publisher.
- Page 2 3SLAV2 User’s Manual Item Checklist Before you begin installing your motherboard, please make sure that the following materials have been shipped: This mainboard comes in a sturdy cardboard shipping carton, which should contain the following items: • The main board.
-
Page 3: Table Of Contents
3SLAV2 User’s Manual CONTENTS Introduction ............... 5 1-1 Introduction ..................5 1-2 Specifications ..................5 1-3 Block Diagram .................. 8 1-4 Main Board Layout with Default Setting ..........9 1-5 Static Electricity Precautions ............10 Installation Procedures ........... 11 2-1 Setting System Jumpers ..............11 2-2 System Memory (DIMM) .............. - Page 4 3SLAV2 User’s Manual 3-12 Password Setting ................48 3-13 Exit Selecting ................49 Software Driver Install ............. 50 4-1 UPDATED PRODUCT INFORMATION ..........50 4-2 Install Graphics Driver ..............53 4-3 Install Audio Driver ................56 4-4 ALC100 ALSRACK Application ............59 Anti-Virus software installation ........
-
Page 5: Introduction
3SLAV2 User’s Manual Introduction 1-1 Introduction The motherboard is a high-performance, low-cost motherboard which sup- ports the Intel PIII FC-PGA and Socket 370 microprocessor. System memory bank supports 3 DIMM socket. Memory up to 512MB 133MHZ SDRAM. On-board include 4X AGP, ATX power, Super I/O, 2 Ultra DMA33/66/100 EIDE interfaces, 4 USB ports, 1 4X AGP Expansion Slot,6 PCI Expansion slots, and 1 CNR Slot. - Page 6 3SLAV2 User’s Manual - Integrated 2D/3D graphics chip(GMCH). - Integrated 24-bit 230MHz RAMDAC. - Support 4MB max Display Cache at AIMM Card. - 2D graphics Up 1600x1200 in 8-bit Color at 85 Hz Refresh. - H/W Motion Compensation Assistance for S/W MPEG2 Decode.
- Page 7 3SLAV2 User’s Manual - Support Modem Ring Power On. - Supports Keyboard, and WOL (Wake On LAN). - CPU Work Clock auto detection by BIOS. Power Supply - On board 3V, 5V and 12V 20-pin ATX power connector. - Use switching regulator to support CPU core voltage.
-
Page 8: Block Diagram
3SLAV2 User’s Manual 1-3 Block Diagram... -
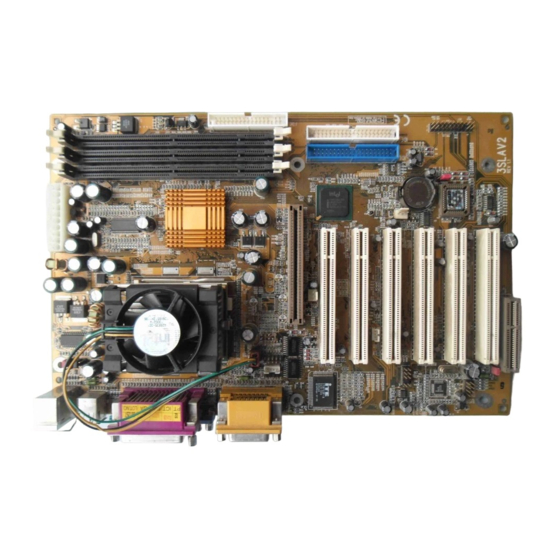
Page 9: Main Board Layout With Default Setting
3SLAV2 User’s Manual 1-4 Main Board Layout with Default Setting System default support PIII(100/133MHz FSB) and Celeron... -
Page 10: Static Electricity Precautions
3SLAV2 User’s Manual Static Electricity Precautions Static electricity can easily damage your motherboard. Observing a few basic precautions can help you safeguard against damage that could result in expensive repairs. Follow the measures below to protect your equipment from static discharge: Keep the motherboard and other system components in their antistatic packaging until you are ready to install them. -
Page 11: Installation Procedures
3SLAV2 User’s Manual Installation Procedures The mainboard has some user-adjustable jumpers on the board that allow you to configure your system to suit your requirements. This chapter con- tains information on the various jumper settings on your mainboard. To set up your computer, you must complete the following steps: 1. - Page 12 3SLAV2 User’s Manual Note: When you open the jumper, attach the plastic jumper cap to one of the pins so you won't lose it. Warning: Always completely disconnect the power cord from your board whenever you are working on it. Do not make connections while the power is on because sensitive electronic components can be damaged by the sud- den rush of power.
- Page 13 3SLAV2 User’s Manual Keyboard Power On Selection(JP2) The keyboard power on selection function. If your ATX power supply can supports 700mA 5V standby current (with keyboard require).you can use this function. States Disable [Default] Enable this function If your ATX power supply not support 700mA 5V standby current.
-
Page 14: System Memory (Dimm)
3SLAV2 User’s Manual 2-2 System Memory (DIMM) The motherboard supports up to 512MB 100/133MHz SDRAM. No hard- ware or BIOS setup is required after adding or removing the system memory. Note: 1. The motherboard uses only Dual Inline Memory Modules (DIMMs). Sock- ets are available for 3.3Volt (power level) Synchronous Dynamic Random... -
Page 15: Central Processing Unit (Cpu)
3SLAV2 User’s Manual 2-3 Central Processing Unit (CPU) The Motherboard provides a ZIF Socket 370 . The CPU that came with the motherboard should have a fan attached to it to prevent overheating. If this in not the case, then purchase a fan before you turn on your system. Be sure... -
Page 16: External Connectors
3SLAV2 User’s Manual 2-5 External Connectors 1.PS/2 Mouse Connector: The motherboard provides a mini-DIN mouse connector, which supports a PS/2 style mouse. 2.PS/2 Keyboard Connector: This connector is for a standard keyboard using a PS/2 plug (mini DIN). This connector will not allow standard AT (large DIN) keyboard plugs. You may use a DIN to mini DIN adapter on standard AT keyboards. - Page 17 3SLAV2 User’s Manual 4.Parallel Port Connector: Normally, the parallel port is used to connect the system to a printer. 5.Serial Port COM1 connector: The COM1 port is ready for a mouse or other serial devices. A second serial port is available using a serial port bracket connected from the motherboard to an expansion slot opening.
- Page 18 3SLAV2 User’s Manual 7.Floppy Disk Drive Connector(FDC) You can attach up to two floppy drives to the motherboard. After connecting the single end to the board, connect the two plugs on the other end to the floppy drives. The drive A: should be connected on the end and the drive B: in the middle.
- Page 19 3SLAV2 User’s Manual Secondary IDE Primary IDE Connectors Connectors Color : White Color : Blue 9.Wake-On-LAN(WOL)connectors(J2) The Wake-On-LAN connectors connect to a LAN card respectively with a Wake-On-LAN output. The connectors power up the system when a wakeup packet or signal is received through the LAN card.
- Page 20 3SLAV2 User’s Manual 10.CPU/Chassis Fan Connectors(FAN1 and FAN2 and FAN3) This motherboard provides CPU, Power, and Chassis fan connectors. Ori- entate the fan so that the heat sink fins allow airflow to go across the onboard heat sink(s) instead of the expansion slots. Depending on the fan manufacturer, the wiring and plug may be different.
- Page 21 3SLAV2 User’s Manual System Panel Connectors (J3) Refer to the following figure for item 11 to 15. 11.Power LED Lead This indicates the status of the system power is turned "ON' or "OFF" The LED will light when the system power is turned on and will go off when the system power is turned off.
- Page 22 3SLAV2 User’s Manual 16.ATX Power Connector: This connector connects to an ATX power supply. The plug from the power supply will only insert in one orientation because of the different hole sizes. Find the proper orientation and push down firmly making sure that the pins are aligned.
- Page 23 3SLAV2 User’s Manual 18.Universal Serial BUS (USB) PIN Header(USB2) There are two USB PIN Header on this motherboard for connecting USB devices. Universal Serial BUS (USB) PIN Header PIN FUNCTION PIN FUNCTION Caution: Pls. Compare each pin assignment of USB cable with that of USB PIN header listed above.
-
Page 24: Power Connection Procedures
3SLAV2 User’s Manual 2-6 Power Connection Procedures After all connections are made, close the system case cover. Be sure that all switches are OFF. Connect the power supply cord to the power supply located on the back of your system case according to your system user manual. -
Page 25: Award Bios Setup
3SLAV2 User’s Manual AWARD BIOS Setup 3-1 Introduction This manual discusses Award(tm) Setup program built into the ROM BIOS. The Setup program allows users to modify the basic system configuration. This special information is then stored in battery-backed RAM so that it retains the Setup information when the power is turned off. - Page 26 3SLAV2 User’s Manual PRESS F1 TO CONTINUE, DEL TO ENTER SETUP Using Setup In general, you use the arrow keys to highlight items, press <Enter> to select, use the PageUp and PageDown keys to change entries, press <F1> for help and press <Esc> to quit. The following table provides more detail about how to navigate in the Setup program using the keyboard.
-
Page 27: Main Menu
3SLAV2 User’s Manual In Case of Problems If, after making and saving system changes with Setup, you discover that your computer no longer is able to boot, the AwardBIOS(tm) supports an override to the CMOS settings which resets your system to its defaults. - Page 28 3SLAV2 User’s Manual Once you enter the AwardBIOS(tm) CMOS Setup Utility, the Main Menu will appear on the screen. The Main Menu allows you to select from several setup functions and two exit choices. Use the arrow keys to select among the items and press <Enter>...
-
Page 29: Standard Cmos Setup
3SLAV2 User’s Manual Load Optimized Defaults Use this menu to load the BIOS default values that are factory settings for optimal performance system operations. While Award has designed the custom BIOS to maximize performance, the factory has the right to change these defaults to meet their needs. - Page 30 3SLAV2 User’s Manual Main Menu Selections This table shows the selections that you can make on the Main Menu Options Item Description Month DD YYYY Date Set the system date. Note that the ‘Day’ automatically changes when you set the...
- Page 31 3SLAV2 User’s Manual IDE Adapters The IDE adapters control the hard disk drive. Use a separate sub menu to configure each hard disk drive. IDE Primary Master sub menu Use the legend keys to navigate through this menu and exit to the main menu.
-
Page 32: Advanced Bios Features
3SLAV2 User’s Manual The following options are selectable only if the ‘IDE Primary Master’ item is set to ‘Manual’ Set the number of cylinders for this Cylinder Min = 0 hard disk. Max = 65535 Set the number of read/write heads... - Page 33 3SLAV2 User’s Manual Enabled Activates automatically when the system boots up causing a warning message to appear when anything attempts to ac- cess the boot sector or hard disk partition table. Disabled No warning message will appear when anything attempts to access the boot sector or hard disk partition table.
- Page 34 3SLAV2 User’s Manual Boot Up NumLock Status Select power on state for NumLock. The choice: Enabled/Disabled. Typematic Rate Setting Key strokes repeat at rate determined by the keyboard controller. When enabled, the typematic rate and typematic delay can be selected.
-
Page 35: Advanced Chipset Features/Integrated Peripherals
3SLAV2 User’s Manual 3-5 Advanced Chipset Features/Integrated Peripherals This section allows you to configure the system basedon the specific fea- tures of the installed chipset. The chipset manages bus speeds and access to system memory resources, such as DRAM and the external cashe.It also coordinares communications between the conventional ISA bus and the PCI bus. - Page 36 3SLAV2 User’s Manual SDRAM Cycle Time Tras/Trc Select the number of SCLKs for an access cycle. The choice: 5/7, 6/8. SDRAM RAS-to-CAS Delay SDRAM RAS to CAS Delay is an important parameter that affects SDRAM performance. If the system fails to boot up, please set this item to 3.
- Page 37 3SLAV2 User’s Manual fication version 2.1. The choice: Enabled, Disabled. On-Chip Video Window Size Select the on-chip video window size for VGA drive use. The choice: 32MB, 64MB, Disabled. AGP Graphics Aperture Size (MB) Select the size of the Accelerated Graphics Port (AGP) aperture. The aper- ture is a portion of the PCI memory address range dedicated for graphics memory address space.
-
Page 38: Integraed Peripherals
3SLAV2 User’s Manual RAS# Timing This item controls RAS# (in Display Cache AIMM clocks). The choice: Fast, Slow. 3-6 Integraed Peripherals OnChip Primary/Secondary PCI IDE The integrated peripheral controller contains an IDE interface with support for two IDE channels. Select Enabled to activate ech channal separately. - Page 39 3SLAV2 User’s Manual USB Controller Select Enabled if your system contains a Universal Serial Bus (USB) con- troller and you have USB peripherals. The choice: Enabled, Disabled. USB Keyboard Support Select Enabled if your system contains a Universal Serial Bus (USB) con- troller and you have a USB Keyboard.
- Page 40 3SLAV2 User’s Manual Mouse Click: This function allows you wake up the system by clicking mouse button twice successively. The choice: Keyboard 98, Password, Hot KEY, Mouse Move, Mouse Click, Any KEY, BUTTON ONLY. KB Power ON Password You can specify 1-5 keys as a password.
- Page 41 3SLAV2 User’s Manual Normal -Sets serial port 2 to operate in normal mode. This is the default setting. The choice: Normal, SCR, lrDA, ASKIR. UR2 Duplex Mode This item is uaed to select UR2 Duplex Mode. The choice: Half, Full.
-
Page 42: Power Management Setup
3SLAV2 User’s Manual Midi Port Address This item is used to assign an address for the MIDI port. The choice: 330, 300, Disabled. Midi Port IRQ This item is used to assign an IRQ for the MIDI port. The choice: 10, 5. - Page 43 3SLAV2 User’s Manual 1. HDD Power Down 2. Doze Mode 3. Suspend Mode There are four selections for Power Management, three of which have fixed mode settings. Disable (default) No power management. Disables all four modes Min. Power Saving Minimum power management. Doze Mode = 1 hr.
- Page 44 3SLAV2 User’s Manual Suspend Mode When enabled and after the set time of system inactivity, all devices except the CPU will be shut off. The choice: Enabled, Disabled. HDD Power Down When enabled and after the set time of system inactivity, the hard disk drive will be powered down while all other devices remain active.
-
Page 45: Pnp/Pci Configuration Setup
3SLAV2 User’s Manual Time(hh: mm: ss)Alarm This item is displayed when you enable the Wake ON RTC Timer option. Here you can specify what time you want to wake up the system. The choice: hh:0-23, mm:0-59, ss:0-59. PM Events PM events are I/O events whose occurrence can prevent the system from entering a power saving mode or can awaken the system from such a mode. - Page 46 3SLAV2 User’s Manual Reset Configuration Data Normally, you leave this field Disabled. Select Enabled to reset Extended System Configuration Data (ESCD) when you exit Setup if you have in- stalled a new add-on and the system reconfiguration has caused such a serious conflict that the operating system cannot boot.
-
Page 47: Pc Health Status
3SLAV2 User’s Manual 3-9 PC Health Status The PC Health Status provides fan rotations, Voltages, and temperature of the system. Choice “PC Health Status” from the Main Menu and a screen with a list of items appears. 3-10 Frequency control... -
Page 48: Defaults Menu
3SLAV2 User’s Manual Auto Detect DIMM/PCI Clk This item allow you to Enable/Disable system auto detect DIMM/PCI clock. The choice: Enabled, Disabled. Spread Spectrum Modulated This item allows you to Enable/Disable the spread spectrum modulate. The choice: Enabled, Disabled. CPU Host/PCI Clock This item allows you to select the CPU,DIMM and PCI Frequency. -
Page 49: Password Setting
3SLAV2 User’s Manual 3-12 Password Setting Set supervisor/ user password You can set either supervisor or user password, or both of then. The differ- ences between are: supervisor password: can enter and change the options of the setup menus. user password: just can only enter but do not have the right to change the options of the setup menus. -
Page 50: Exit Selecting
3SLAV2 User’s Manual 3-13 Exit Selecting Save & Exit Setup Pressing <Enter> on this item asks for confirmation: Save to CMOS and EXIT (Y/N)? Y Pressing "Y" stores the selections made in the menus in CMOS - a spe- cial section of memory that stays on after you turn your system off. The next time you boot your computer, the BIOS configures your system ac- cording to the Setup selections stored in CMOS. -
Page 51: Software Driver Install
3SLAV2 User’s Manual Software Driver Install 4-1 UPDATED PRODUCT INFORMATION 1.Enter the INF subdirectory and double-click SETUP.EXE. 2.Click “Next” at the Welcome screen. - Page 52 3SLAV2 User’s Manual 3.Read the license agreement and click “Yes” to continue. 4.Read readme.txt information and click “NEXT” to continue...
- Page 53 3SLAV2 User’s Manual 5.The driver files will now be installed. When finished installing, choose the “Yes” to reboot option and click “Finish” to restart your computer. The driver should now be loaded.
-
Page 54: Install Graphics Driver
3SLAV2 User’s Manual 4-2 Install Graphics Driver 1.Enter the graphics subdirectory and double-click SETUP.EXE. 2.Click “Next” at the Welcome screen. - Page 55 3SLAV2 User’s Manual 3.Read the license agreement and click “Yes” to continue. 4.This screen indicates the directory where the End User Diagnostic Utility files will be stored. NOTE: the graphics driver is not installed here (it is installed in the appropriate Windows system directories), just the EUD utility files.
- Page 56 3SLAV2 User’s Manual 5.The driver files will now be installed. When finished installing, choose the “Yes” to reboot option and click “Finish” to restart your computer. The driver should now be loaded. To determine if the driver has been loaded correctly,...
-
Page 57: Install Audio Driver
3SLAV2 User’s Manual 4-3 Install Audio Driver 1.To remove an existing driver/application and install with the latest Driver/ application, please run SETUP.EXE file (inlcuded in the “ Win98WDM subdirectory”) ,double-click SETUP.EXE. 2.Choose Language and Click “Next” to continue. - Page 58 3SLAV2 User’s Manual 3.Click “Next” at the Welcome screen. 4.In selecting a setup type, please choose “Remove and Install Software..” and click on” Next ”. When asked with “ Do you want to install the bundled application?” Select “Yes, I do.” to install ALSRACK Player or “No, I don’t.
- Page 59 3SLAV2 User’s Manual...
-
Page 60: Alc100 Alsrack Application
3SLAV2 User’s Manual 4-4 ALC100 ALSRACK Application 1. Structure and components: The ALSRACK consists of a MIXER control panel, MIDI panel, WAVE panel, and CD panel. 1.1 To enable or disable a panel: Clicking the mouse button on the MIDI, WAVE, or CD in MIXER control panel will cause the corresponding panel to disappear, another click will cause the corresponding panel to re-appear. - Page 61 3SLAV2 User’s Manual 2. MIDI panel 2.1 To open or close a MIDI file: Click the button of the MIDI sign on the MIDI panel, choose OPEN to open a MIDI file, or choose CLOSE to close a file. 2.2 Auto repeat and show information: Click the button of the MIDI sign on MIDI panel.
- Page 62 3SLAV2 User’s Manual 3.3 Record a wave file: Push the button REC.INPUT to select the input media (Line in, MIDI,Audio CD, or MIC), then push the the button OPEN on TAPE II and select NEW to create a new wave file. The TAPEII indicator will be red to show it is waiting to record.
-
Page 63: Anti-Virus Software Installation
3SLAV2 User’s Manual Anti-Virus software installation 5-1 Anti-Virus software installation Put CD title driver into CD ROM, then choose "Anti-Virus software" on the main menu, follow each instruction on the screen as the followings. - Page 64 3SLAV2 User’s Manual...
Need help?
Do you have a question about the 3SLAV2 and is the answer not in the manual?
Questions and answers