
Summary of Contents for CORNING AXYGEN I-4010
- Page 1 Axygen Microtube ® Shaker A Corning Brand Instruction Manual Catalog Numbers: I-4010 I-4011 I-4012...
-
Page 2: Table Of Contents
Table of Contents 1.0 Safety Information ............. 1 2.0 Design Environments . -
Page 3: Safety Information
Do not use damaged components. Safe operation as described in this manual is applicable with the accessories provided by Corning. Accessories must be securely attached to the device. The instrument can only be disconnected from the main power supply by ... -
Page 4: Design Environments
Please keep original packaging. Please contact the manufacturer/ supplier for technical support. CAUTION: If there is any apparent damage to the system, please do not plug it into the power line. Contact your local Corning support team. 3.1 Package Contents Description Qty/Cs Axygen®... -
Page 5: Accessories (Sold Separately)
3.2 Accessories (sold separately) Speed Well Dimensions Block Cat. No. Description (rpm) (diameter x depth) I-4010-A Heating block, holds 1,500 8.1 x 26 mm 0.5 mL tubes (24) I-4010-B Heating block, cone 1,500 10.9 x 30.8 mm bottom, holds 1.5 mL tubes (24) I-4010-C Heating block, round... -
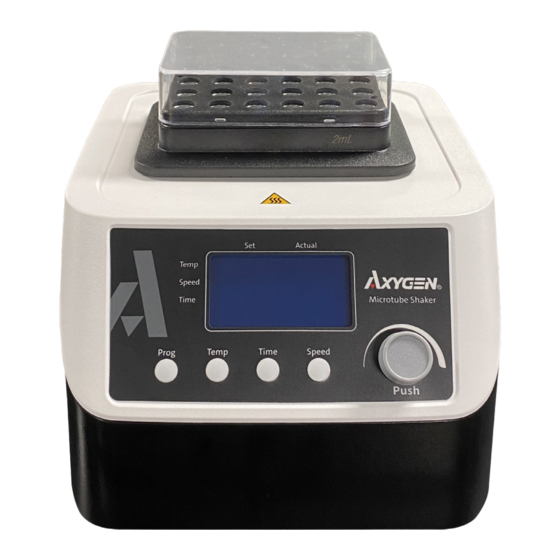
Page 6: Instrument Overview
4.0 Instrument Overview 4.1 Control Block Main unit LCD screen Adjustable knob Function button Vent holes RS232 interface Power switch Power interface Figure 2. Axygen® Microtube shaker overview. Block Interchangeable magnetic attachment; ensure vessel type matches block type. LCD screen Display to set experiment parameters. -
Page 7: Display
4.1 Display Displays the setting experiment parameters. Actual Displays the actual parameters (ramp up/cool down). Prog Program button, used for programming. Temp Temperature will flash when selected. Time Time will flash when selected. During Timed mode, the time will countdown. In continuous operation mode, time will run for the duration of operation (Figure 5). -
Page 8: Start And Stop
5.2 Start and Stop Start: Complete the parameter input, push the knob to begin the protocol. Run indicates the experiment is in progress. Pause: Press the knob once to pause at any time during a Run. In the Actual value column Pause will be displayed during a desired temporary pause in the experiment. -
Page 9: Multiple Step Work Without Saving
5.3.2 Multiple Step Work Without Saving The program set in the single step is the first step by default. Press the Prog function button to generate the second step. The last line in the Set column now shows 1-2. NOTE: Before setting the second step, there is one step by default. -
Page 10: Program With Saving Mode
Complete N number of steps Then, press the knob to start work. Prog shows the program and step number. Refer to the figure above, 2-2 refers to the total number of steps and the current step of the run. NOTE: Before the Time is set, the step will not take effect. -
Page 11: Temperature Calibration
5.4 Temperature Calibration In order to ensure the temperature control accuracy, based on the temperature calibration function, it is recommended to calibrate the temperature whenever the heating block is changed. The device adopts the three-point temperature calibration method at 10°C, 50°C, and 90°C. The linear calibration of the three temperature points ensures the accuracy of the three temperature points of the system within ±0.5°C. -
Page 12: Restore The Factory Settings
Stop working, and power Off. If these operations above are normal, the device is ready to operate. If not, the device may be damaged during transportation, please contact Corning Life Sciences for technical support. 7.0 Troubleshooting Problem Solution Instruments will Check whether the power line is unplugged. - Page 13 – Before using other cleaning solutions than those listed above please check compatibility with Corning Life Sciences prior to use. For safety, wear the proper protective gloves during cleaning of the instrument. NOTE: If you require maintenance service, the instrument must be cleaned in advance to ...
-
Page 14: Limited Warranty
IMPLIED WARRANTIES OF MERCHANTABILITY OR OF FITNESS FOR A PARTICULAR PURPOSE. Corning’s sole obligation shall be to repair or replace, at its option, any product or part thereof that proves defective in material or workmanship within the warranty period, provided the purchaser notifies Corning of any such defect. - Page 15 Brazil Taiwan t 55 (11) 3089-7400 t 886 2-2716-0338 Mexico t (52-81) 8158-8400 For a listing of trademarks, visit www.corning.com/clstrademarks. All other trademarks are the property of their respective owners. © 2022 Corning Incorporated. All rights reserved. 9/22 CLS-AN-696DOC REV2...
Need help?
Do you have a question about the AXYGEN I-4010 and is the answer not in the manual?
Questions and answers