Table of Contents
Advertisement
Advertisement
Table of Contents

Summary of Contents for ANYSUN Aukfa 7D1
- Page 1 SEWER INSPECTION CAMERA With DISTANCE COUNTER User Manual...
- Page 2 User Introduction Aukfa 7D1 Inspection camera is a professional grade sewer inspection push camera. Firstly, our sewer drains and pipe cameras give operators a full, clear picture of the problem with industry leading camera probes. Our complete system includes a large 7” LCD screen with distance counter. Secondly, our system includes a DVR that requires one touch to record.
-
Page 3: Table Of Contents
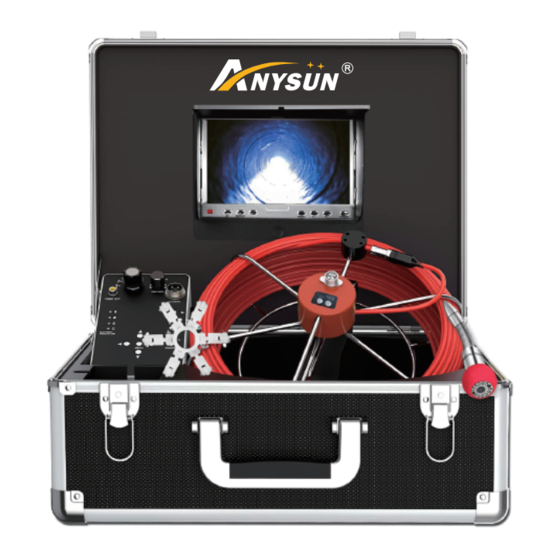
Contents 1:Product List 2:Product Specifications 3:Know Your Tool (1)Product connection diagram (2)IP68 Waterproof Camera (3)30m/100FT Cable (4)7 inch color monitor (5)Control Box(Include 8GB SD Card) (6)12V 4500 lithium battery (7)Remote Control (8)Connect Line (9)Universal centering skid (10)Charging head (11)Red Camera Protective Cover 4:How to use (1) How to use the counter function (2) How to use the DVR function... -
Page 4: 1:Product List
1:Product List Universal skid Power adapter 2:Product Specifications ITEM PARAMETER TempeOperating rature -10°~50° Operating Humidity -20°~70° General Storage Temperature PARAMETER Power Adapter Input: 110V AC~240V AC Output: 12.6V 4500mA Sensor 1/3” Sony CCD TV-Line 1000 TV-Line View Angle 92° Self-Leveling Built-in Camera Size 23mm Ø(0.9inch) -
Page 5: 3:Know Your Tool
3:Know Your Tool (1)Product connection diagram (2) IP68 Waterproof Camera The camera diameter measures 23mm Ø and has LED lights built-in and a guide spring to allow flexibly when pushing along the attended direction. -
Page 6: 3)30M/100Ft Cable
(3) 30m/100FT Cable (4)7 inch color monitor... -
Page 7: 5)Control Box(Include 8Gb Sd Card)
Item Description Power Indicator SOFT, SHARP, LIGHT, STANDARD MIRROR 90 degree, 180 degree, 270 degree, 360 degree Aspect Ratio 16:9, 4:3 MENU BRIGHT,CONTRAST,COLOR,TINT,MODE,TCON, LANGUAGE,RULER LINR,Adjust these functions Down POWER Turn ON/OFF Monitor (5)Control Box(Include 8GB SD Card) -
Page 8: 6)12V 4500 Lithium Battery
Item Name Description CHARGE Set to charge when charging your unit. Power off ON/BATT Power on ON/AUX When we don’t use lithium batteries and place the charging head on the side of the control box for power-on use, please adjust to this position VIDEO OUT Use AV cable to transmit video (AV cable Don’t included) LED BRIGHT... -
Page 9: 7)Remote Control
(7) Remote ontrol (Please take off the insulating sheet before use.) Mute Sound switch Power Screen on/off button Adjustment key - Reduce Adjustment key + Menu BRIGHT,CONTRAST,COLOR,TINT,MODE, TCON,LANGUAGE,RULER LINR, Adjust these functions Mode Switch 90 degree, 180 degree, 270 degree, 360 degree image rotation Time Screen sleep time setting, 0-240 selection... -
Page 10: 8)Connect Line
(8)Connect Line It is a wire used to connect the control box and 30M coil. (Connect Line) (Connect Control Box) (9)Universal centering skid It is installed on the camera to fix and protect the camera. (centering skid centering skid ’s use) )... -
Page 11: 4:How To Use
4:How to use (1)How to use the counter function. (2)How to use the DVR function Press the “ON/OFF” button to turn on the DVR function, hold the “ON/OF” button down for more than 5 seconds to shut off the DVR function. Step 1: Press the MENU button to enter the setup menu, and then press the MENU key to “confirm”. - Page 12 2.Prerecord >>>>>>> 3.Movie 5s Movie 10s EXIT 1.Motion Detection >>>>>>> 2.Range >>>>>>> 3.1/2 1/16 EXIT 2.Timeslot >>>>>>> 3.1s EXIT 2.Sensitivity >>>>>>> 3.Low Middle Hige EXIT 1.Advanced Setting>>>>>>> 2.Photo Quality >>>>>>> 3.High Standard EXIT 2.Movie Size >>>>>>> 3.QVGA EXIT 2.File Overwrite >>>>>>> 3.ON EXIT 2.TV Output >>>>>>>...
- Page 13 (3) How to record and save recordings Step 1: Turn on DVR by pressing “ON/OFF” on the control unit.. Step 2:Press“MENU”on the control unit,select manual capture > Master CH >Movie Step 3: Press the start recording button ( ) to start recording, and then press the recording button again to automatically save the video.
- Page 14 (4) How to take and save pictures. Step 1: Turn on power supply by pressing “ON/BATT” Step 2: Press MENU and set to “Photo 1 or Photo 3” Step 3: Press the start photo button ( ) to start taking photos and automatically save them to the SD card.
- Page 15 (5) How to charge your device Charging method 1: Use the charging head to directly charge the 12V lithium battery (when fully charged, the charging head indicator turns from red to green, and it can be used for 6-9 hours). Charging method 2: Step 1: Set the switch on the control box to "ON/AUX".
-
Page 16: 5: Precautions For Product Use
(8) How to delete videos and pictures Turn on the power (ON/BATT, and turn on the DVR function (ON/OFF) of the control box at the same time, press the "MODE" button on the control box to view pictures or videos, and then press the "MENU" button to delete pictures or videos. (9) How to zoom in and out of pictures Turn on the power (ON/BATT, turn on the DVR function of the control box (ON/OFF) at the same time, press ZOOM-, ZOOM+ to zoom in and out of the image. -
Page 17: 7: Blue Screen's Slove Method
7:Blue screen’s Solve Method Method 1: 1. Checking whether all parts are in well connected, and tighten the camera head. 2. Please gently unscrew the camera head( pic1 ) , and then use clean non- dust and dry cloth to clear the part to avoid dust, ash and dirt( pic2 ). After cleaning, pls connect other parts well and turn on the control box switch, then screw into the camera head. -
Page 18: 8: Frequently Asked Questions
8: Frequently Asked Questions Question Answer How to achieve the change of focal length? After starting the video recording function, the focal length can be changed through the ZOOM-,ZOOM+ beginning of the con- trol box. The light on the camera does not light up 1:The control box has the button of "LED BRIGHT", you can adjust the brightness of the camera light. - Page 19 Product Warranty Card Name: Purchase date: Contact number: postal code: Address: Purchasing Date: Country: Purchase Order ID: If have any question, please email us at: support@anysuntech.com...
Need help?
Do you have a question about the Aukfa 7D1 and is the answer not in the manual?
Questions and answers