Advertisement
Introduction
C330 is a smart mobile wifi-camera which utilizes a built-in rechargeable battery.
- The C330 is in low power when in sleep mode and recording when in active mode. It is in sleep mode by default but will switch to active mode and record when "woken up".
- The C330 can be manually "woken up" with one-click by a mobile phone anywhere.
- The C330 can be automatically "woken up" if it detects movement within its field of vision. In this case the camera will start to record automatically and the user will be alerted.
- Infrared LED lights provide clear visuals at night or low light situations as well.
- The Camera supports 2-way audio.
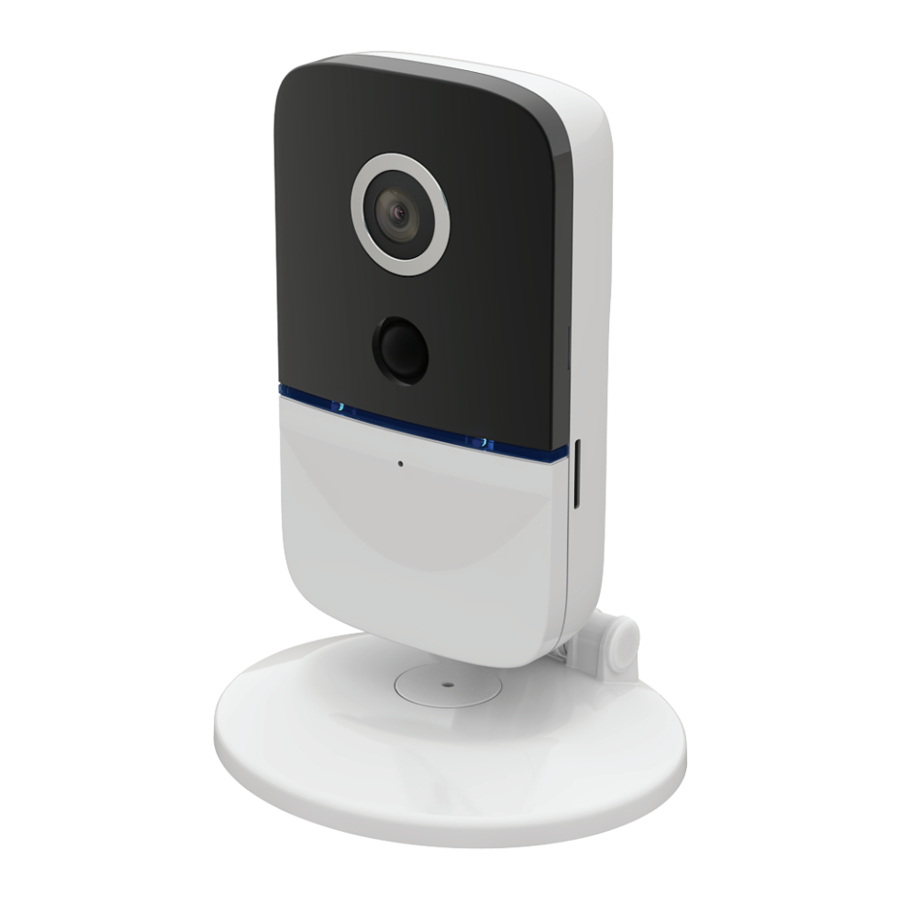
Exterior diagram

| Code | Name |
| ① | Lens |
| ② | PIR |
| ③ | WiFi status indicator |
| ④ | Charging status indicator |
| ⑤ | Microphone |
| ⑥ | Speaker |
| ⑦ | Power switch |
| ⑧ | WiFi reset button |
| ⑨ | TF card slot |
| ⑩ | USB charge socket |
Indicator light status
| Indicator light status | Status | Solution |
| Power Indicator Yellow light On | Charging | |
| Yellow light comes on and goes out | Charge complete | |
| WiFi indicator Blue light blinks | Waiting for connecting | |
| WiFi indicator Red light blinks | Connecting to WiFi | If it blinks over 1 minute and still can't connect success, please reset device and check the router's WiFi |
| WiFi indicator off | Normal working or power off |
Installation Instructions
Install mobile client software
- Equipment power-on
Before use, please connect the enclosed USB charging cable to the matching DC5V / 1A mobile phone charger to charge the equipment. For first time charge, it should be charged at least six hours. The equipment can be powered on once it finishes charging. - Install mobile client software
![]()
![play.google.com]()
![www.apple.com]()


- APP name: Doby
- Search "Doby" in the Apple store of Google
Play store and download from the store
OR - Scan the QR code todownloa the app.
- Register and log in
Register and Login: Open the app and press [Sign Up] to register a new account number. Choose [Sign In] if you have an existing account. - Add camera
- After a successful registration and login, enter [Home]
- Press on the [+] in the lower right hand corner.
- Then select [Camera]


- Startup Camera


- Check whether the camera is in reset status (WiFi indicator light will blink blue).
- If it not in reset status, hold the WiFi key for approximately 5 seconds until the WiFi indicator light blinks blue.
- Tap [Yes] to enter into the WiFi configuration page.
- Add camera
- Android System
- Go to [Nearby Equipment] page
- Select the CID of the camera to add the device
- Enter [Setting WiFi] page
- Select the wireless network you want to add the camera on
- Enter the network password and hit [Next]
- Android System
 WiFi Reconfigure
When the password is wrong, or your network changes, you can reconfigure WiFi as shown below:
Please turn on the camera and wait for the WiFi status indicator light on, then press the WiFi reset button for 3-5 seconds untill the WiFi status indicator blue light is blinking and add camera by APP again (see Fig.1.4.2).

Notice:XXX is the name of your router or WiFi.
- IOS system – add equipment
IPhone: Enter "Setting" -> "WLAN", select "DOG-******" (Password: 11111111) Then go back to the Doby, and click on "Next".


View Live video
- On the [Home] page, select the intended device's number Press the play button "
![]() " to enter enter the live video feed.
" to enter enter the live video feed.

- Menu bar


![]() Camera: Capture a screenshot of the live video feed and save it to the smartphone album.
Camera: Capture a screenshot of the live video feed and save it to the smartphone album.![]() Audio: Turn on audio to receive sound from the camera's location.
Audio: Turn on audio to receive sound from the camera's location.![]() Turn on Microphone to speak to the camera.
Turn on Microphone to speak to the camera.![]() Full screen: View the live video feed in landscape mode.
Full screen: View the live video feed in landscape mode.![]() Protection: After selecting "motion detection" function, when cameras is triggered, the alarm system will catch picture and send message to your app. Protection Mode includes: motion detection(on/off), sensitivity(PIR sensitivity, select low, middle, or high).
Protection: After selecting "motion detection" function, when cameras is triggered, the alarm system will catch picture and send message to your app. Protection Mode includes: motion detection(on/off), sensitivity(PIR sensitivity, select low, middle, or high).![]() Playback: to view the video saved in SD card.
Playback: to view the video saved in SD card.![]() Share: Share video with friends and relatives who have registered an account with Doby. After entering their account and then adding them to share the video, then they can also view the video.(C330 does not support viewing by multiple users at the same time. Only one user can view at any moment)
Share: Share video with friends and relatives who have registered an account with Doby. After entering their account and then adding them to share the video, then they can also view the video.(C330 does not support viewing by multiple users at the same time. Only one user can view at any moment)
 Audio: Turn on audio to receive sound from the camera's location.
 Turn on Microphone to speak to the camera.
 Full screen: View the live video feed in landscape mode.
 Protection: After selecting "motion detection" function, when cameras is triggered, the alarm system will catch picture and send message to your app. Protection Mode includes: motion detection(on/off), sensitivity(PIR sensitivity, select low, middle, or high).
 Playback: to view the video saved in SD card.
 Share: Share video with friends and relatives who have registered an account with Doby. After entering their account and then adding them to share the video, then they can also view the video.(C330 does not support viewing by multiple users at the same time. Only one user can view at any moment)
- Setting: View device information and adjust settings


- Device Name]: Rename your camera
- [Location]: Select between Home or Office
- [Device Info]: View general, network, and memory usage information
- [WiFi]: Select your network WiFi
- [Video Recording]: Disable or enable video recording for 24 hours or motion detection
- [Micro SD Card]: Check on the status of the SD card
- [Video Direction]: Flip the video viewing direction
- [Time Zone]: Select the time zone according to the camera's location
- [Device Indicator Light]: ON/OFF
- [Device Indicator Light]: ON/OFF
- PIR detection


- If an object moves within 5 meters in front of the camera, motion detection will be triggered.
- Alarm message will be sent through push notification on the client app.
- Screenshot / live video feed / playback video will be sent.
WiFi Reconfigure
When your network changes, you can recofigure WiFi as shown below:
- Please turn on the camera and wait for the WiFi indicator light comes on
- Then press the reset key and hold for 3-5 seconds untill the WiFi indicator flickering blue light comes on.
- Add equipment by APP again(see Fig.1.4.2).
Installation Illustration
- Before installing the camera, please confirm steady WiFi signals at the location of camera installation (at least two grids of WiFi signals). If the signal is not strong enough, you may install a WiFi repeater to extend the WiFi coverage.

- Avoid areas with moving objects that may disturb the camera.
- The bracket interface is standard 1/4'' which can be replaced easily. It's not appropriate to install the equipment next to air conditioner, windows, or other places where the temperature fluctuates drastically.
- Notes:
PIR sensor is a high-sensitivity detector which is used for infrared detection of object motion. However, motion detection can be triggered by the change of background lighting change, passing by vehicles or the blowing leaves.
![caution]() If the camera detects false alarm frequently,please use "PIR shield sheet" to reduce motion detection area. If this does not resolve the issue, you have option to turn off the motion detection function by selecting "security" option in Notice APP under Protection menu.
If the camera detects false alarm frequently,please use "PIR shield sheet" to reduce motion detection area. If this does not resolve the issue, you have option to turn off the motion detection function by selecting "security" option in Notice APP under Protection menu.

Product dimensions

(Dimension: mm)
Accessories

| Code | ① | ② | ③ ③ |
| Name | USB charging cablex1 | Operation instruction of the product×1 | Sticker×1 |
The sticker is applies to the wall mount. Put the sticker to bottom of camera's bracket, and then stick the camera on the wall.
Technical parameters
| Items | Specifications |
| Product model | Battery Mobile WiFi Camera |
| Lens | 2.1mm/110° |
| Video | H.264 encoding |
| Audio frequency | √ |
| WiFi | Support IEE802.11b/g/n protocol(2.4GHz) |
| Infrared LEDs | √ |
| PIR motion detection | PIR range ≈ 15 Feet (5 Meters) |
| Cycle time | If there is no operation within 30 seconds after last trigger, camera enter the sleep state |
| Charging source | Mini USB interface 5V 1A |
| Dimensions | 4.7 X 3.3 X 2.9 inch (84X74X118.7mm) |
| Expandable storage space | Maximum support 32GB Micro SD card |
| Weight | 0.3 lb (153g |
| Battery and standby | 1500mAh, can be waked up or triggered (1 minute per time) more than 10-20 times daily. The battery can be on standby for more than 1 month. |
Common problems and solutions
- What do I do when I get error message while adding camera?
There are several causes leading to equipment adding failure:- Time-out error during adding camera on the App.
Solution: If the WiFi status indicator blinks red over one minute, please press the reset button for 3-5 seconds untill the WiFi status indicator becomes blinking blue, then confirm if the router signal is strong enough and input correct router password to re-add the equipment. - On some Android phones, App prompts a message "Please input the default password, 11111111"
Solution: The failure is caused by connection abnormal connection between mobile phone and camera hot spot.
Please access to WiFi setup interface of your mobile phone to connect to the camera hot point name is DOG-***. Then enter the password: 11111111) manually and then return to app to add the camera.
If this does not work, please turn off the mobile phone WiFi and turn it back on again. Repeat the above manual connection method to add the camera.
- Time-out error during adding camera on the App.
- How to access the recorded video on micro SD card built-in inside the camera?
The videos stored in the camera can be searched and playback using "Doby" app installed on your mobile phone.
Solotech Inc
support@solocameras.com

Documents / Resources
References
Download manual
Here you can download full pdf version of manual, it may contain additional safety instructions, warranty information, FCC rules, etc.
Advertisement
Need help?
Do you have a question about the Solo C330 and is the answer not in the manual?
Questions and answers