
Summary of Contents for Master Water Conditioning MWC-EM Series
- Page 1 Installation and Operation Manual MWC-EM Series Ultraviolet Sterilizers MWC-EM7 / MWC-EM10 / MWC-EM20 2022 VERSION...
-
Page 2: Table Of Contents
Table of Contents Page Topic Description Model # Model Number Caution Looking at UV Light Shipping Description UV Packaging Piping Layout Piping Layout Specification Table Unit Specifications Pre-Treatment Pre-treatment Discussed Water Quality Table Unit Location Unit Set Up MWC-EM Pressure Vessel Pressure Vessel Installation UV Sensor Sensor Installation... -
Page 3: Model
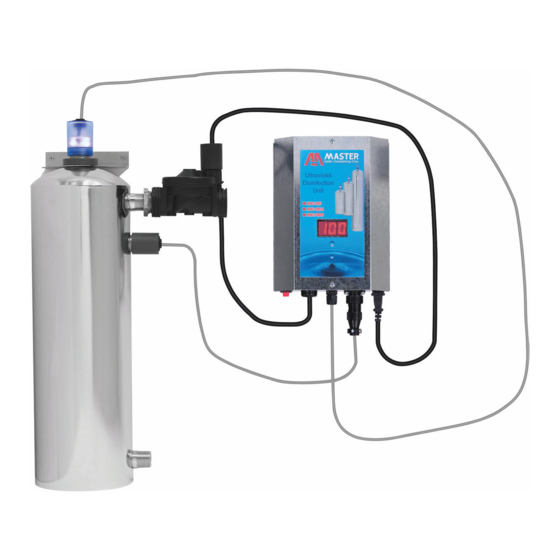
Installation and Operating Instructions for MWC-EM Series Ultraviolet Sterilizers Model #: _______ MWC-EM7 7 gpm UV- ¾” _______ MWC-EM10 10 gpm UV -¾” _______ MWC-EM20 20 gpm UV -1” CAUTION: NEVER LOOK DIRECTLY AT THE ULTRAVIOLET LIGHT WITH THE NAKED EYE. View through a piece of ordinary glass or optical glasses. -
Page 4: Pre-Treatment
Pre-Treatment: A complete water test is recommended to determine if pre-treatment equipment is required before installation of the UV unit. Water must meet criteria below: Contaminant Maximum Allowable Level Chloride 250 ppm Color None Hardness 8 gpg Iron 0.3 ppm Manganese 0.05 ppm Range between 6 and 8.5... - Page 5 MWC-EM Solenoid and 304 Electro Polished SS Vessel Installation: 1. The ultraviolet unit is designed to be installed in a vertical position. The unit is supplied with (2) brackets to support the unit. NOTE: The upper bracket has a grounding lug attached to it 2.
-
Page 6: Uv Sensor
UV Sensor Installation: 1. First, unwrap the sensor carefully. Being very careful not to drop or break the sensor eyepiece. 2. Wipe the sensor eyepiece with household alcohol to remove dirt, oil and fingerprints. 3. Before inserting the UV sensor into the vessel check the o’ring this is on the quartz eyepiece. - Page 7 Electrical Requirements: Always follow all local electrical codes when installing our water treatment equipment. 1. Provide an 115v/60Hz properly grounded dedicated electrical outlet. (It’s very important that the polarity be correct) Avoid using outlets that are switch controlled. 2. Maximum amperage required is 5 amps. 3.
- Page 8 MASTER Water Conditioning Corp. MWC-SERIES GROUNDING INSTRUCTIONS IMPORTANT All MWC-Series UV systems must be properly grounded. The vessel must be grounded to the MWC-Power Supply to make a complete ground. MWC-SERIES Grounding Lug Installation Front View of Bracket Grounding Lug Top View of Bracket Insert stripped green ground wire into ground and hand tighten with screw driver.
-
Page 9: Quartz And O'ring
Quartz and O’ring Installation: 1. Wipe the quartz sleeve with household alcohol to remove dirt, oil and fingerprints. 2. Carefully place the quartz sleeve into the top opening of the vessel. 3. Lubricate the o'ring with silicone (which is supplied) then place the o’ring over the top of the quartz sleeve. - Page 10 Filling the UV Unit with Water: NOTE: Plug the 1” normally closed solenoid into a dedicated electrical supply. This is only during the filling and disinfection of the piping! 1. Open the inlet ball valve about 25% to fill the UV vessel slowly. 2.
-
Page 11: Final Check
Final Check: 1. Open outlet ball valve on UV unit. 2. Make sure the MWC-EM UV Unit is plugged into a surge protector (not provided) then a dedicated electrical outlet with power 24 hours per day. 3. Check all piping for leaks, repair if necessary. 4. - Page 12 MWC-EM UV INTENSITY ADJUSTMENT: 1. Once the unit has been in operation it maybe necessary to reset the UV meter to 100%. NOTE: All MWC-EM units are tested and calibrated at the factory. 2. The MWC-EM meter is very sensitive to the water quality and room temperature! 3.
-
Page 13: Annual Maintenance
7. Remove clear gland nut and O-ring from quartz sleeve. 8. Clean quartz sleeve with household alcohol. If stained, replace. (Reference Quartz Installation) 9. Follow with germicidal lamp installation Remove the UV meter eye and clean with household alcohol and reinstall. MWC-EM SERIES... - Page 14 TROUBLESHOOTING Symptom: No flow of water no Alarm and Gland Nut not glowing Cause Solution Electric Supply Check electrical outlet and breaker box for power. Replace fuse in Meter Power Supply Symptom: No flow of water no Alarm and Gland Nut glowing and meter is reading 100% blue...
- Page 15 Ultraviolet Lamp which is warranted for 90 days and a UV Meter Eyepiece Assembly which is warranted for one year from date of purchase against defects in materials and workmanship. Except, as specifically set forth in this paragraph, Master Water Conditioning Corporation makes no other warranties, express or implied.
- Page 16 MWC-EM UV INTENSITY ADJUSTMENT: 1. Once the unit has been in operation it maybe necessary to reset the UV meter to 100%. NOTE: All MWC-EM units are tested and calibrated at the factory. 2. The MWC-EM meter is very sensitive to the water quality and room temperature! 3.
-
Page 17: Figure 1
UV Sensor Installation: 1. First, unwrap the sensor carefully. Being very careful not to drop or break the sensor eyepiece. 2. Wipe the sensor eyepiece with household alcohol to remove dirt, oil and fingerprints. 3. Before inserting the UV sensor into the vessel check the o’ring this is on the quartz eyepiece. - Page 18 MWC-EM FACTS SHEET IMPORTANT GROUNDING INSTRUCTIONS All MWC-SERIES UV Systems must be grounded! The green 14# copper wire coming out of the power supply must be grounded to the UV Vessel! Attach the copper wire to the grounding lug to the upper mounting bracket and tighten the screw.
- Page 19 6. Allow the water to stand for at least (4) hours to kill the bacteria residual in the piping system. ** No water should be used during disinfection. ** Before consumption of water, an EPA Lab Test is suggested. MWC-EM SERIES TROUBLESHOOTING Symptom: No flow of water no Alarm and Gland Nut not glowing Cause...
Need help?
Do you have a question about the MWC-EM Series and is the answer not in the manual?
Questions and answers