Table of Contents
Advertisement
Quick Links
Advertisement
Table of Contents

Subscribe to Our Youtube Channel
Summary of Contents for OSS EWS1
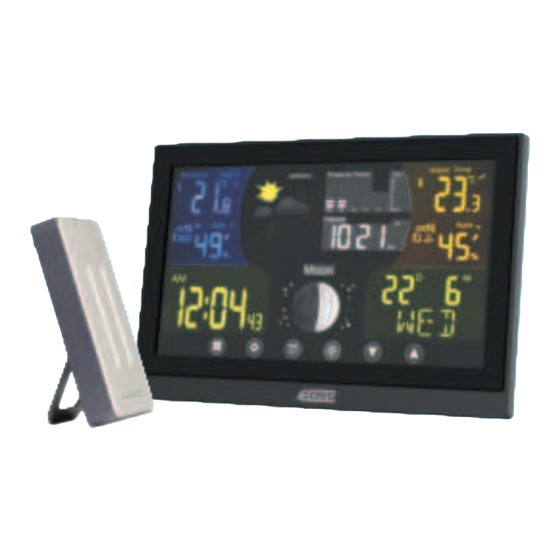
- Page 1 WIRELESS WEATHER STATION USER MANUAL...
-
Page 2: Table Of Contents
Table of Contents Introduction Product Overview Product Features Monitor Information Sensor Information Getting Started Manual Settings Switching Channel and Connecting Additional Sensors Displaying Data from Multiple Sensors Setting Time, Date and Time Zone Alarm Settings Alarm Activation/Deactivation/Snooze Setting Altitude and Atmospheric Pressure Setting Temperature Limits for Max/Min Temps Temperature, Humidity and Pressure Trends Moon Phases... -
Page 3: Introduction
Introduction Thank you for purchasing the EOSS EWS1 Wireless Weather Station. Please ensure that you have read the product manual and instructions in full, prior to installation and use. Failure to do so may result in product failure/damage or incorrect operation and therefore impact the product performance. -
Page 4: Monitor Information
Monitor Information 2 3 4 5 6 9 1011 1213 26 25... - Page 5 Monitor Information cont... 1 – Snooze/light button 2 – Sensor no. 1/2/3 3 – Data from outdoor sensor 4 – Cycling through data from connected sensors 5 – Outdoor temperature trend 6 – Outdoor humidity trend 7 – Weather forecast 8 –...
-
Page 6: Sensor Information
Monitor information cont... 28 – Outdoor humidity 29 – Signal reception from sensor 30 – Outdoor temperature alert 31 – Sensor batteries low 32 – Outdoor temperature 33 – DC jack power input 34 – Battery compartment 35 – Stand 36 –... -
Page 7: Getting Started
8. If the low battery icon is displayed, replace batteries in the sensor or weather station. Radio Controlled Clock (EWS1) cont... Manual Settings All changes in values are made using buttons After setting the desired value and not pressing any other buttons, the set values will automatically save and the display will switch to the main screen. -
Page 8: Switching Channel And Connecting Additional Sensors
Switching Channel and Connecting Additional Sensors Switching Channel and Connecting Additional Sensors 1. Press and hold the channel button until you hear a beep sound. The signal reception symbol will appear and start pulsing, searching to pair with the wireless sensor. 2. -
Page 9: Setting Time, Date And Time Zone
Setting Time, Date and Time Zone 1. Short press the button 2. Press the button for 3 seconds and use the buttons to set the following values: Year, Date format, Month, Day, 12/24 H Time format, Hour, Minute, Second. 3. Confirm the set value by pressing the button;... -
Page 10: Setting Altitude And Atmospheric Pressure
2 1 0 Setting Altitude and Atmospheric Pressure The station shows atmospheric pressure in hPa or in Hg and keeps a history of pressure readings for the last 12 hours. To achieve a more accurate calculation of pressure values, it is advised to manually set the altitude for the place where the weather station is being used. - Page 11 2 1 1 Setting Temperature Limits for Max/Min Temps cont... While on the main screen, repeatedly press the button to switch to sensor 1, 2 or 3 and proceed for each sensor as follows. 1. Short press the button four times. 2.
-
Page 12: Temperature, Humidity And Pressure Trends
2 1 2 Temperature, Humidity and Pressure Trends Falling Constant Rising Moon Phases 1. New moon; 2. Waxing crescent; 3. First quarter; 4. Waxing gibbous; 5. Full moon; 6. Waning gibbous; 7. Last quarter; 8. Waning crescent Note: In the period between 18:00 and 06:00, the moon icon will be surrounded by stars. -
Page 13: Station Display Backlight
2 1 3 Station Display Backlight When powered only by 3× 1.5 V AAA batteries: Display backlighting is off. Pressing the Snooze/Light button will turn the display backlight on for 5 seconds, then it turns off again. When the station is only powered by batteries, permanent backlighting of the display cannot be activated! Note: The inserted batteries serve as backup for the... -
Page 14: Weather Forecast
2 1 4 Weather Forecast The station forecasts weather on the basis of changes in atmospheric pressure for the next 12–24 hours for an area within the range of 15–20 km. The accuracy of weather forecast is 70–75 %. The forecast icon is displayed in field no. -
Page 15: Safety Information & Warnings
2 1 5 Safety Information & Warnings • Read the manual carefully before using this product. • Do not expose the product to direct sunlight, extreme cold and moisture, and sudden changes in temperature as these may compromise detection accuracy. •... -
Page 16: Technical Specifications
Contact local authorities for information about collection points. Technical Specifications • Clock controlled by EWS1 radio signal • Time format: 12/24 H • Displayed units of temperature: °C/°F • Barometric pressure measurement range: 800 hPa to 1,100 hPa •... -
Page 17: Technical Assistance
2 1 7 Technical Assistance If you need assistance setting up or using your EOSS product now or in the future, call EOSS Support. Australia TEL: 03 – 8587 8898 FAX: 03 – 8587 8866 Mon-Fri 9am – 5pm AEST This manual is considered correct at time of printing but is subject to change.
Need help?
Do you have a question about the EWS1 and is the answer not in the manual?
Questions and answers