Logitech Driving Force G920 User Manual
Hide thumbs
Also See for Driving Force G920:
- User manual (35 pages) ,
- User manual (36 pages) ,
- Manual (56 pages)
Advertisement
Quick Links
Advertisement

Related Manuals for Logitech Driving Force G920


Summary of Contents for Logitech Driving Force G920
- Page 1 Logitech® G920 Driving Force™ Racing Wheel User Guide...
- Page 2 Logitech® G920 Driving Force™ Contents English Česká verze Deutsch Slovenčina Français Українська Italiano Eesti Español Latviski Português Lietuvių Nederlands Български Svenska Hrvatski Dansk Srpski Norsk Slovenščina Suomi Română Türkçe Ελληνικά العربية По-русски Po polsku עברית Magyar www.logitech.com/support/g920...
-
Page 3: What's In The Box
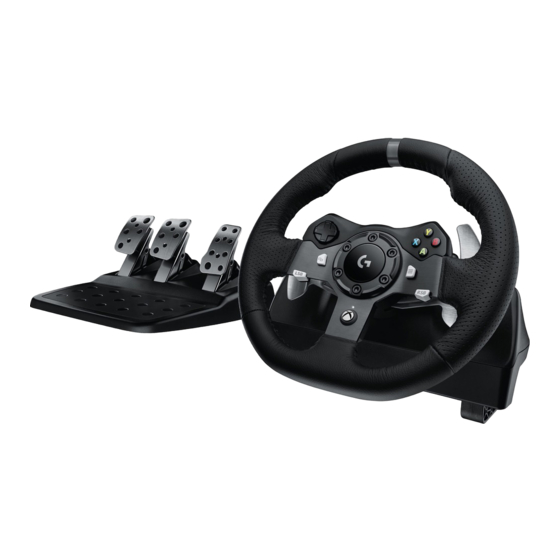
Logitech® G920 Driving Force™ What’s in the box G920 Driving Force ™ Racing Wheel G920 Driving Force ™ Volant de Course www.logitech.com/support/g920 620-006532.002 1. Racing wheel 2. Pedal unit 3. Power adapter 4. User documentation 3 English... -
Page 4: Installation
Logitech® G920 Driving Force™ Installation Attach power adapter and USB cables as shown. Every time your Racing Wheel connects with your system, it will rotate fully to each side and then to the center to calibrate. Your wheel will be ready once this calibration is completed. -
Page 5: Mounting Clamps
Logitech® G920 Driving Force™ Mounting clamps G920 Driving Force Racing Wheel is equipped with a built in clamping system for mounting to a table. Push down and rotate clamp knobs to lock or unlock. Rotate clamp knobs to tighten or loosen clamps. - Page 6 Logitech® G920 Driving Force™ Buttons 1. Left bumper 5. Right bumper 2. Directional pad 6. A, B, X, Y buttons 3. View button 7. Menu button 4. Left stick button 8. Right stick button 9. Xbox button 6 English...
- Page 7 Logitech® G920 Driving Force™ Connections and mount points 1. Mounting clamps 2. Cable management cleat 3. Optional shifter connection (DB-9 male) 4. USB cable 5. Pedal unit connection (DB-9 female) 6. Power connection 7. Bolt mounting points (uses M6X1 bolts)
- Page 8 Logitech® G920 Driving Force™ Force feedback Your Racing Wheel contains dual motors that will provide force feedback with supported games and systems. Note: Your Racing Wheel has an overheat protection circuit safeguard to protect it under high-temperature operating conditions. In rare instances, force feedback features may shut down during use while controls continue to operate.
- Page 9 Logitech® G920 Driving Force™ Pedal unit 1. Clutch pedal 2. Brake pedal 3. Throttle pedal 4. Textured heel rest 5. Bolt mounting points (uses M6X1 bolts) 6. Patented carpet grip system 7. Carpet grip release clip Push towards rear or pedal unit to release 8.
- Page 10 Logitech® G920 Driving Force™ TouchSense Technology TouchSense Technology licensed from Immersion Corporation and protected by one or more of the following United States Patents listed at http://www.immersion.com/haptics-technology/patent-marking/index.html 10 English...
- Page 11 Logitech® G920 Driving Force™ Inhalt G920 Driving Force ™ Racing Wheel G920 Driving Force ™ Volant de Course www.logitech.com/support/g920 620-006532.002 1. Rennlenkrad 2. Pedaleinheit 3. Netzteil 4. Bedienungsanleitung 11 Deutsch...
- Page 12 Logitech® G920 Driving Force™ Installation Bringen Sie Netzteil und USB-Kabel wie dargestellt an. Immer wenn Ihr Rennlenkrad eine Verbindung zu Ihrem System herstellt, dreht es sich zur Kalibrierung einmal vollständig auf jede Seite und dann zur Mitte. Ihr Lenkrad ist einsatzbereit, sobald diese Kalibrierung abgeschlossen ist.
- Page 13 Logitech® G920 Driving Force™ Befestigungsklammern Das Driving Force-Rennlenkrad G920 verfügt über eine Klemmvorrichtung zur Tischmontage. Drücken Sie zum Sperren oder Entsperren die Klemmknöpfe nach unten und drehen Sie sie. Drehen Sie die Klemmknöpfe zum Festziehen oder zum Lockern der Klemmen.
- Page 14 Logitech® G920 Driving Force™ Tasten 1. Linker Bumper 5. Rechter Bumper 2. D-Pad 6. Tasten A, B, X, Y 3. Ansicht-Taste 7. Menü-Taste 4. Linke Stick-Taste 8. Rechte Stick-Taste 9. Xbox-Tasten 14 Deutsch...
- Page 15 Logitech® G920 Driving Force™ Verbindungen und Befestigungspunkte 1. Befestigungsklammern 2. Kabelführungsklemme 3. Optionale Schalthebelverbindung (DB-9-Stecker) 4. USB-Kabel 5. Pedaleinheitsverbindung (DB-9-Buchse) 6. Stromanschluss 7. Befestigungspunkte (für M6X1-Schrauben) Optimale Kabelführung USB- und Pedalkabel (1, 2) sollten über interne Kanäle geleitet werden. Netz- und optionale Schaltkabel (3, 4) sollten über externe Kanäle geleitet...
- Page 16 Logitech® G920 Driving Force™ Force Feedback Ihr Rennlenkrad enthält Doppelmotoren, die Force Feedback für unterstützte Spiele und Systeme bereitstellen. Hinweis: Ihr Rennlenkrad ist mit einer Sicherheitskreisschaltung zum Schutz vor Überhitzung bei Betriebsbedingungen unter hoher Temperatur ausgestattet. In seltenen Fällen kommt es während der Nutzung zu einem Ausfall der Force Feedback-Funktionen, während die Steuerung weiterhin funktioniert.
- Page 17 Logitech® G920 Driving Force™ Pedaleinheit 1. Kupplungspedal 2. Bremspedal 3. Gaspedal 4. Strukturierte Fußablage 5. Befestigungspunkte (für M6X1- Schrauben) 6. Patentiertes Antirutschsystem 7. Antirutsch-Rastfeder Zum Lösen Richtung Rückseite oder Pedaleinheit drücken 8. Änderungsmöglichkeit der Pedalposition (2,5 mm Sechskantschlüssel erforderlich) 17 Deutsch...
- Page 18 Logitech® G920 Driving Force™ TouchSense Technology TouchSense Technology in Lizenz von Immersion Corporation und geschützt durch mindestens eines der United States Patents unter http://www.immersion.com/haptics-technology/patent-marking/index.html 18 Deutsch...
-
Page 19: Contenu Du Coffret
Logitech® G920 Driving Force™ Contenu du coffret G920 Driving Force ™ Racing Wheel G920 Driving Force ™ Volant de Course www.logitech.com/support/g920 620-006532.002 1. Volant de course 2. Pédale 3. Adaptateur secteur 4. Documentation utilisateur 19 Français... - Page 20 Logitech® G920 Driving Force™ Installation Installez l'adaptateur secteur et les câbles USB comme indiqué. À chaque fois que votre volant de course se connecte à votre système, il tourne entièrement de chaque côté puis se repositionne au centre, pour le calibrage.
Need help?
Do you have a question about the Driving Force G920 and is the answer not in the manual?
Questions and answers