Table of Contents
Advertisement
Quick Links
Advertisement
Table of Contents

Summary of Contents for Union Audio Orbit.6
- Page 2 Obit.6User Guide Issue 1 Copyright © 2022 Union Audio Limited. All rights reserved To the best of our endeavors, we believe the information contained in this user guide to be true and accurate but we do not assume responsibility for inaccuracies or omissions, and reserve the right to make any changes deemed necessary.
-
Page 3: Warranty
The defective unit is to be returned to the place of purchase, an authorised Union Audio distributor or agent with proof of purchase. Please discuss this with the distributor or the agent before shipping. Units returned should be packed in the original carton to avoid transit damage. -
Page 4: Safety Instructions
Safety Instructions Please read and retain these instructions • Only use the product for the purposes it is intended and heed all warnings. • WARNING - To prevent the risk of fire or electric shock do not use this mixer near water, or in locations where it is likely to be exposed to rain or moisture. - Page 5 Safety Instructions • Do not remove any covers, either on the mixer or the power supply. • Install only in accordance with the manufacturer’s instructions. • The power supply must have a good safety ground connection. Do not tamper with or remove the safety ground in the power cord. •...
-
Page 6: Table Of Contents
Europa Power Supply Safety Instructions 4 - 5 Connecting the PSU to the mixer Index Care of the Mixer About Orbit.6 Mixer Dimensions Why Discrete circuitry? Europa Dimensions Front and Rear Line Drawing Service Record and Notes Input Channel Controls... -
Page 7: About Orbit.6
About Orbit.6 The Obit.6 is an esoteric six-channel rack mounted rotary mixer, craftsmen engineered for the discerning audio- phile DJ and vinyl lover. A fully discrete internal signal path, from Input to Mix -Out, with per-channel thermionic valve stages, Obit.6 presents a remarkable and distinctive listening experience. Sweet clear highs, warm forward mids, and extended, driving low end, Obit.6 breathes life into even modest setups while maximising the poten-... -
Page 8: Why Discrete Circuitry
The heart of Orbit.6 is our own discrete op-amp, designed and manufactured inhouse. In terms of complexity it is halfway between the two extremes, but offers a similar measured performance to a commercial IC when used in typical audio applications. -
Page 10: Input Channel Controls
Input Channel Controls Obit.6 has a total of six Input Channels, each with valve preamp stages and dual stereo inputs. Channels 1- 4 feature both Line and Phono (RIAA) Inputs, Channel 5 has dual Line Inputs (Line A and Line B), and Channel 6 accommodates Line A/Mic and Line B inputs. The Mic Input Select switch is located on the rear panel and overrides the Line A input source. - Page 11 Input Channel Controls continued Cue – The Cue button illuminates red when active, and routes the pre-fader channel signal to the headphone monitor for auditioning. The button has a toggle function and will turn on/ off with each press. Each channel cue is independent and will not be overridden when pressing other channel cue buttons.
-
Page 12: Microphone Input
Microphone Input Mic Select – Channel Six can be routed to the microphone input (located on the rear panel) by switching the front panel toggle switch to “Line A/Mic” and by pressing the “Ch Six Line A to Mic” button on the rear panel. The Microphone input is designed to work with any good quality dynamic microphone, such as the Shure SM58. -
Page 13: Master Section
Master Section The Master sections sums the audio from the six Channels and controls the output signal level feeding the main sound system. This section features a Master Output Level control, a three-Band Isolator EQ and a pair of Analogue VU Meters for monitoring the left and right mix buss signal levels. Additional signal processing can be applied by making use of the Master Insert sockets located on the rear panel. -
Page 14: Booth And Headphones
12 o’clock position. Booth EQ – A two-band shelving EQ offering +/-6dB boost/cut at 100Hz and 5kHz. Phones Level– Adjusts the level of the headphone output. The Orbit.6 is fitted with a powerful high-quality headphone amplifier optimised for use with headphones having an impedance between 33ohms to 170ohms. -
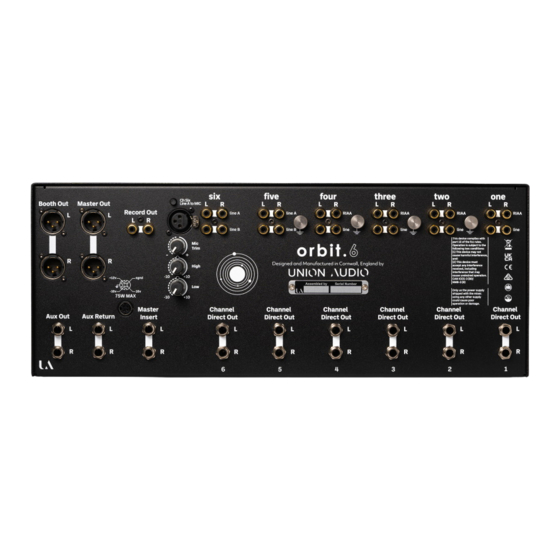
Page 15: Rear Panel Input Connections
Rear Panel Input Connections Channels 1-4 – The top row of RCA (Phono) connectors are designed for use with turntable magnetic cartridges and incorporate RIAA (Record Industry Association of America) equalisation. Do not connect line-level sources to these inputs as it could cause damage to the sensitive circuitry. -
Page 16: Mixer Output Connections
Mixer Output Connections Orbit 6’s Master and Booth Output XLR connectors are located on the left-hand side of the rear panel. There is also a pair of Mix Insert patch points for connection to external NOTE Both the Master and audio processors (compressors, limiters, graphic EQ etc). -
Page 17: Record And Auxiliary Connections
Record and Auxiliary Record Out – The Record Output is via an RCA connector with a nominal level of 316mV, -10dBV (-8dBu) and is compatible with most 2-track recorders. The Record output is taken post Insert and will be affected by the Isolator EQ but not by the Master Level control. Auxiliary Out –... -
Page 18: Application Diagram
Application Diagram... -
Page 19: Block Diagram
Block Diagram... -
Page 20: Technical Specification
Specifications Distortion plus Noise (THD+N) un-weighted Dimensions 0dBu, 20Hz to 20kHz, Line In to Mix Out +4dBu 0.008% Mixer Frequency Response Front Panel 482.5mm x 176mm (4U 19” Rack Mount) Line in to Mix Out +/-1dB 10Hz to 120kHz Depth 170mm (6 “) 7/10... -
Page 21: Notes On Cable Types
Cable Types For best performance always use high-quality audio cables and interconnects. Proprietary Power Supply DC Cable supplied with the Mixer. Do not use any other type Unbalanced TR Cable Balanced TRS Cable Insert (Send + Return) Cable Tip = Send (Connect to External Processor Input) Ring = Return Connect to External Processor Output) Sleeve = Common Ground RCA Phono Cable... -
Page 22: Europa Power Supply
Europa Power Supply Orbit.6 is powered by the external Hybrid Linear power supply unit (PSU) “Europa”. Each Europa PSU is factory configured for the specific mains voltage for the location where it is used, and is available in three versions; 100VAC (JAPAN ONLY), 115VAC, and 230VAC. -
Page 23: Connecting The Psu To The Mixer
Europa, push fully in and tighten the locking ring. Line up the pins on the Kycon plug with the socket on the rear panel of the Orbit.6, the flat face of the outer sleeve should be facing left, then push the connector fully in until it locks. -
Page 24: Care Of The Mixer
Clean off the spill with a damp cloth, and dry thoroughly before powering back on. If afterwards the mixer fails to function properly or is excessively noisy, contact Union Audio technical support, or an appointed service agent to have the unit inspected at the earliest opportunity. -
Page 25: Mixer Dimensions
Mixer Dimensions... -
Page 26: Europa Dimensions
Europa PSU Dimensions... -
Page 27: Service Record And Notes
Service Record and Notes Service Date Carried out by Signature Service Date Carried out by Signature Service Date Carried out by Signature Service Date Carried out by Signature Notes...
Need help?
Do you have a question about the Orbit.6 and is the answer not in the manual?
Questions and answers