Table of Contents
Advertisement
Quick Links
RAPID BAROSTAT BAG PUMP
Mui Scientific
145 Traders Blvd. E., Unit #34
Mississauga, Ontario
Canada L4Z 3L3
Tel: (905) 890-5525
Toll Free: (800) 303-6611
Fax: (905) 890-3523
Email: mail@muiscientific.com
Website:
www.muiscientific.com
CAUTION: Federal Law (U.S.) restricts the sale of this device to, or by the order of a physician.
USER MANUAL
P1 – RBB – 1
REF
Mui Scientific
EC REP
Advena Ltd.
Tower Business Centre, 2
Tower Street, Swatar, BKR 4013,
Malta
Manual P5-K-104, Revised March 1, 2021
nd
Floor
Advertisement
Table of Contents

Summary of Contents for Mui Scientific Rapid Barostat Bag
- Page 1 RAPID BAROSTAT BAG PUMP USER MANUAL P1 – RBB – 1 Mui Scientific Mui Scientific EC REP 145 Traders Blvd. E., Unit #34 Mississauga, Ontario Advena Ltd. Canada L4Z 3L3 Tower Business Centre, 2 Floor Tel: (905) 890-5525 Tower Street, Swatar, BKR 4013,...
- Page 2 THIS PAGE IS INTENTIONALLY LEFT BLANK.
-
Page 3: Table Of Contents
TABLE OF CONTENTS Before Using the Pump Introduction Safety Information Operating Requirements Electrical Requirements General Specifications Wireless Interference Prevention Applicable Standards and Warning Symbols Warning Statements and Warning Symbols Getting Started RBB Pump Components Using the Power Adaptor Remote Control Battery Powering On the RBB Pump Pairing the RBB Remote Control First Time Setup... - Page 4 THIS PAGE IS INTENTIONALLY LEFT BLANK.
-
Page 5: Before Using The Pump
RAPID BAROSTAT BAG PUMP BEFORE USING THE PUMP Mui Scientific... -
Page 6: Introduction
*M. Sauter, H. Heinrich, M. Fox, B. Misselwitz, M. Halama, W. Schwizer, M. Fried, H. Fruefauf. (2014). Validation of High- Resolution Anorectal Manometry and Rapid Barostat Bag measurements of rectal function. In M. Simren, G. Mawe, J. Galligan (Eds.). Neurogastroenterology & Motility (vol. 26, pp. 685-695) - Page 7 INTRODUCTION INTRODUCTION a) Intended Use The RBB Pump and Catheter are used together for the inflation of a barostat balloon to measure rectal capacity, as well as rectal volume at points of sensation, urge, and discomfort, to determine hypersensitivity, hyposensitivity, or normal rectal sensations.
- Page 8 The RBB pump and catheter must not be altered or modified in any way. Mui Scientific is not liable for personal injury and damage to property if original Mui Scientific parts are not being used. Instructions should always be followed as stipulated in the RBB Pump's Operating Manual.
-
Page 9: Safety Information
Do not disassemble the RBB Pump under any circumstances. Contact Mui Scientific for any technical support. RBB Pump should only be used by trained operators and Mui Scientific is not responsible about the consequences initialed by untrained personnel. - Page 10 In such a case, it is the responsibility of the pump operator to back up any patient data. Mui Scientific is not responsible for maintaining data integrity during pump servicing, and will not copy, back up, or intentionally manipulate any...
-
Page 11: Electrical Requirements
SAFETY INFORMATION Electrical Requirements: Input: 100 – 240 VAC, 50/60 Hz, 1.0 – 0.5 A Output: 5 V 5.0 A, 25 W MAX. North American Type A Power Cord Included General Specifications: Overall Pump Dimensions (including charging station): Height: 28 cm (10 ¾”) Width: 27 cm (10 ¾”) Depth: 14 cm (5 ½”) Weight: 2.27 kg (5 lbs) -
Page 12: Applicable Standards And Warning Symbols
SAFETY INFORMATION Applicable Standards: Standard/Document Name Description Council Directive concerning medical 93/42/EEC devices as amended by Directive 2007/47/EC EN 1041:2008 Information supplied by the manufacturer of medical devices Medical Devices – Quality Management Systems – EN ISO 13485:2016 Requirements for Regulatory Purposes Medical Devices –... -
Page 13: Warning Statements And Warning Symbols
SAFETY INFORMATION Warning Statements and Warning Symbols: WARNING: PLEASE FOLLOW THESE SYMBOLS AND INSTRUCTIONS CAREFULLY TO REDUCE RISK OF FIRE OR EQUIPMENT FAILURE TYPE BF APPLIED Equipment not suitable for use in the presence of a flammable anaesthetic mixture. ... -
Page 14: Getting Started
RAPID BAROSTAT BAG PUMP GETTING STARTED Mui Scientific... -
Page 15: Rbb Pump Components
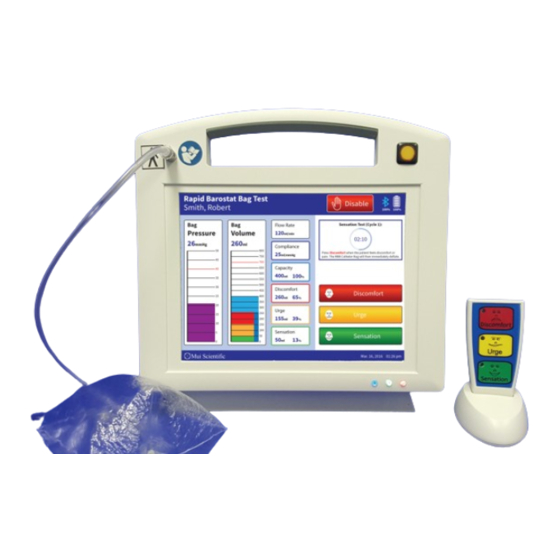
RBB PUMP COMPONENTS RBB Pump package includes: RBB Pump and Charging Dock Carrying Case Verification Bag RBB Remote Control and Dock Demo Tube Power Adaptor and Power Cord, Class II RBB Pump and Charging Dock – Front View: Metal Luer Disable Button Touch-enabled Display Window... - Page 16 RBB PUMP COMPONENTS RBB Pump and Charging Dock – Back Left View: USB Mini Type B Connector Air Vent Charging Dock RBB Pump and Charging Dock – Back Right View: Adaptor Jack Power Button Air Vent USB Type A Connector...
- Page 17 RBB PUMP COMPONENTS Power Adaptor and Power Cord, Class II: North American Type A Power Cord (Exchangeable for other countries) AC/DC Medical Adaptor Power Adaptor Plug RBB Remote Control and Dock: LED Indicators Tactile Buttons Remote Control Dock...
- Page 18 RBB PUMP COMPONENTS Verification Bag: Demo Tube: Stop Cap Carrying Case: Mui Scientific...
-
Page 19: Using The Power Adaptor
USING THE POWER ADAPTOR Connecting the Power Adaptor: Charging LED Power LED Indicator Indicator Charging Fully Charged Adaptor Jack Adaptor Plug 1) Insert Adaptor Plug into the Adaptor Jack on the bottom right side of the Charging Dock as illustrated. 2) Plug the Power Adaptor into any standard wall electrical outlet. -
Page 20: Remote Control Battery
REMOTE CONTROL BATTERY INSTALLATION Installing Remote Control Batteries: Front Piece Back Screw Battery Holder 1) Unscrew the Back Screw on the back of the RBB Remote Control Case. 2) Separate the Front Piece of the RBB Remote Control Case. 3) Unscrew the Battery Holder inside the case. 4) Insert 2 AAA Batteries into the battery compartment. -
Page 21: Powering On The Rbb Pump
POWERING ON THE RBB PUMP Powering On the RBB Pump: Push and Hold for 3 seconds Power Button 1) Push and Hold the Power Button on the right side of the Pump for 3 seconds. This will start the RBB Pump’s Boot Up Sequence. 2) Once the Boot Up Sequence is complete, the RBB Splash Screen will appear. - Page 22 POWERING ON THE RBB PUMP Navigating the Main Menu: ○ ○ ○ ○ ○ ○ 1. Title - shows which operating screen is being displayed 2. Bluetooth Icon - shows connection to Remote Control, and its battery level 3. Battery Icon - shows battery level of the pump 4.
-
Page 23: Pairing The Rbb Remote Control
PAIRING THE RBB REMOTE CONTROL Pairing the Remote Control: 1) Hold the Remote Control within a meter of the RBB Pump and ensure that the RBB Pump has been turned on. 2) Press and Hold on the GREEN Sensation Button for 1 second. This will wake the Remote Control from its SLEEP Mode and it will automatically search to pair with the RBB Pump. - Page 24 PAIRING THE RBB REMOTE CONTROL Testing the Remote Control: To check if the Remote Control is operating correctly, select the GREEN Bluetooth icon. A popup screen containing Bluetooth information is displayed on screen. Users can then press the 3 different coloured buttons on the Remote Control and check if the corresponding coloured squares beneath the GREEN Bluetooth icon are flickering in response.
-
Page 25: First Time Setup
FIRST TIME SETUP Setting Up Password Protection: To ensure security protection of their RBB Pump, users are encouraged to create a systems password. The following steps show how to create a systems password. 1) In the Main Menu screen, select the “Settings” button. 2) Select the “System Settings”... - Page 26 FIRST TIME SETUP 3) Select the “Enable Password” Button. 4) Enter the desired Password in both fields. 5) Once the Systems Password is created, users can return to “System Settings” to change or remove the password. To recover forgotten password, go to page 59 “Resetting Password” for more information.
-
Page 27: Default Pump Settings
FIRST TIME SETUP Default Pump Settings: To perform a standard RBB Test, users must verify if the settings in the pump are set to the default values. 1) To verify/change the settings, select the “Settings” button in the Main Menu Screen, and then select the “Pump Settings” tab. ... -
Page 28: Uploading Hospital Logo
FIRST TIME SETUP Uploading Hospital Logo: The RBB Pump gives users the ability to upload their own Hospital Logo such that it will appear on the RBB Splash Screen and the RBB Test Report. 1) Users must first save an image file of their hospital logo into a USB Mass Storage Device. - Page 29 FIRST TIME SETUP 4) In the Pump Settings Screen, select the “Upload Hospital Logo” Box 5) A popup will appear that shows the images stored inside the USB device. Select the correct hospital logo image file. 6) The pump then automatically uploads the logo into its system. The USB Mass Storage Device may then be unplugged from the pump.
-
Page 30: Setting The Time And Date
FIRST TIME SETUP Setting the Time and Date: 1) In the Device Settings Screen, select the “Time, Date & Language” tab. 2) Change the Time and Date by scrolling through the “Set Time” and “Set Date” dials. Users can also set their preferred Time and Date Formats. 3) Select desired language from the “Language”... -
Page 31: Changing Keyboard Language
FIRST TIME SETUP Changing Keyboard Language: 1) To change the keyboard’s language, select a typeable field, such as the “Last Name” field below, to bring out the keyboard. Push and hold the “Globe” or “Spacebar” icon on the keyboard to bring out the keyboard’s language selection list. -
Page 32: Operating Instructions
RAPID BAROSTAT BAG PUMP OPERATING INSTRUCTIONS Mui Scientific... -
Page 33: Patient Information
PATIENT INFORMATION Adding a New Patient Profile: Before performing any test, users must first select or create a patient profile. 1) Select the “Add New Patient” button in the Main Menu Screen (see pg. 15). The Add New Patient Screen will appear. Fill in the fields accordingly and then select the bottom “Save”... -
Page 34: Editing Patient Information
PATIENT INFORMATION 3) Once the Patient profile has been created, it will appear on the Main Menu Screen’s Patient List. John Smith Appears in the Patient List Editing Patient Information: 1) Select the patient from Main Menu to access the Patient Profile Screen. 2) The patient’s information can be edited by selecting the “Edit Patient Info”... -
Page 35: Before Performing A Test
BEFORE PERFORMING A TEST BEFORE PERFORMING A TEST Connecting the RBB Catheter: Metal Luer RBB Catheter’s Luer Lock Luer End 1) Securely attach the RBB Catheter’s Luer End into the pump’s Metal Luer. 2) Tightly twist the Luer Lock onto the Metal Luer. Toggling the Disable Button: Disable Button Disable Button... -
Page 36: Connecting The Rbb Catheter
BEFORE PERFORMING A TEST WARNING: PLEASE FOLLOW THESE INSTRUCTIONS CAREFULLY TO PREVENT POTENTIAL HARM TO PATIENTS Do not use RBB Catheter if damaged or expired. Do not reuse RBB Catheter. Remove the RBB Catheter from the patient immediately if the patient is displaying a negative reaction or significant discomfort. -
Page 37: Performing An Rbb Test
PERFORMING AN RBB TEST PERFORMING A RBB TEST To perform an RBB Test, users must first navigate to the Patient Profile Screen. In this example, we will use John Smith who was added previously (see pg. 24). Starting a New Test: 1) Select the “Start New Test”... -
Page 38: Performing A Capacity Test
PERFORMING AN RBB TEST Users must first ensure the RBB Catheter is securely connected to the pump. Then, they can begin the Capacity Test as described below. Performing a Capacity Test: 1) Select the “Empty Bag” button. The pump will start removing residual air. 2) The pump will automatically stop once the bag is sufficiently deflated. - Page 39 PERFORMING AN RBB TEST PERFORMING AN RBB TEST 3) Select the “Start Capacity Test” button to begin performing the Capacity Test. 4) The test will automatically run until Rectal Capacity is calculated. Users can select the on-screen “Disable” or “Discomfort” button at any time to stop the test.
- Page 40 PERFORMING AN RBB TEST 5) Once the Rectal Capacity has been reached, the pump will automatically start to deflate the Barostat Bag until all air is removed from the bag. NOTE: When the Barostat Bag reaches desired pressure (40mmHg as default), the bag will continue to inflate for 5 more seconds while simultaneously monitoring the pressure within.
- Page 41 PERFORMING AN RBB TEST 6) When the air has been removed from the Barostat Bag, the pump will automatically ready itself for the Sensation Test. The values for Rectal Capacity, Pressure and Compliance are stored into the pump. If the value for Rectal Compliance is not calculated using the desired slope of the graph, users have the ability to change it in the Test Report after the Sensation Test is complete (see pg.
-
Page 42: Performing A Sensation Test
PERFORMING AN RBB TEST Performing a Sensation Test: 1) Select the “Start Sensation Test” button to begin performing the Sensation Test. 2) The pump will begin inflating the Barostat Bag again. However, users must now provide input to the pump for the 3 sensitivity stages: and Discomfort. - Page 43 PERFORMING AN RBB TEST 3) After selecting Sensation, the pump will register and display the volume at which Sensation is reached. The pump also displays the volume as a percentage of the Rectal Capacity. Select the “Urge” button to proceed to Urge sensitivity stage.
- Page 44 PERFORMING AN RBB TEST PERFORMING AN RBB TEST 4) Finally, select the “Discomfort” button to indicate for the Discomfort sensitivity stage. This will complete 1 study cycle of the Sensation Test. 5) Once the Sensation Test is complete, the pump will automatically deflate the Barostat Bag.
-
Page 45: Navigating A Test Report
NAVIGATING A TEST REPORT 6) When all air is expelled from the Barostat Bag, the RBB Test will conclude. Users can choose to start a new sensation test by selecting the “Start New Cycle” button or exit back to the Patient Profile Screen by selecting the “End Study”... - Page 46 NAVIGATING A TEST REPORT 2) The report contains the patient’s information and all test data collected during the RBB Test. Users can scroll down to view other report options. For patients who have completed multiple cycles on the Sensation Test, the RBB pump allows users to hide any Sensation Test cycles deemed non- applicable.
-
Page 47: Hiding Sensation Cycles
NAVIGATING A TEST REPORT Hiding Sensation Cycles: 1) Scroll to the bottom of the Test Report Screen and select the “Edit Report” button. The RBB Report will enter “Edit Mode” 2) A check box will appear beside each cycle. Uncheck the boxes to hide their respective sensation cycle. - Page 48 NAVIGATING A TEST REPORT 3) Once unchecked, all data within that sensation cycle will be removed from the report. The data will not be plotted onto the Sensation Graph and it will not appear in the exported test report. Users can check the box again if they wish to view that sensation cycle again.
-
Page 49: Changing The Compliance Value
NAVIGATING A TEST REPORT The RBB Pump can automatically approximate a Compliance Value using the slope of the Compliance Graph. However, the chosen values used to calculate this approximation can be unsuitable at times. Users can change the Compliance Value manually. Changing the Compliance Value: 1) Ensure the pump is in Edit Mode, and then select the Compliance Graph on the right of the Test Report Screen. - Page 50 NAVIGATING A TEST REPORT 2) Drag finger on the screen to find the appropriate slope for calculating the Compliance Value. 3) Once the appropriate slope for calculating Compliance Value is chosen, select the “Save” button to save the changes.
-
Page 51: Editing Fields
NAVIGATING A TEST REPORT The RBB pump allows users to add, change or edit Procedure, Indications, Summary and Comments fields to every test report. Editing Fields: 1) Ensure the RBB Report is in Edit Mode, and then select the any of the 4 different field boxes (“Comments”... -
Page 52: Exporting Files
EXPORTING FILES The RBB Pump allows users to export the test reports and raw data stored in the pump to a USB Mass Storage Device or to a computer. Test reports are exported in .pdf format for ease of printing, whereas raw data is exported in .csv format that can be read by data processing software (e.g. - Page 53 EXPORTING FILES 3) There are 3 options that are displayed in this popup screen: Exclude Graphs and Tables - Exports only the first page of the report into .pdf format; does not include graphs and table. Exclude Personal Info. from Report - Does not display personal information on pdf report.
-
Page 54: Exporting A Test Report To A Computer
EXPORTING FILES Exporting a Test Report to a Computer: 1) To export a Test Report to a computer, the user must first create the report and store it into the pump. Simply export the report in the “Export Files” popup window without a USB device connected to generate the test report and store it into the pump. - Page 55 EXPORTING FILES 3) Once the pump is connected to a computer, the computer will recognize the pump as a USB device, AW-SoM A20. Users can navigate the internal folders of the pump on the computer. 4) All patient test reports exported will be stored in a folder called “MUI_EXPORTS”...
-
Page 56: Exporting Multiple Test Reports
EXPORTING FILES EXPORTING FILES Exporting a Multiple Test Reports: 1) Navigate to the patient’s profile screen (John Smith in the example). Select “File Options” Button. 2) Select the desired test reports using the check box on the top right corner of each test. -
Page 57: Export Multiple Patients' Test Reports
EXPORTING FILES Exporting Multiple Patients’ Test Reports: 1) Navigate to the Patient Files Screen by selecting “Patient Files” in the Main Menu. Users can search, sort and filter the patients through the Options Panel. 2) Scroll to the bottom of the Options Panel and select the “+” next to “Show File Options”. -
Page 58: Taking Screenshots
TAKING SCREENSHOTS Taking Screenshots: 1) Push and Hold the Power Button on the right side of the pump until a Power Off popup window appears on screen. Power Button Push and Hold 2) Select the “Take Screen Shot” button. A screenshot is taken in within a second, and it is then stored into the pump. - Page 59 TAKING SCREENSHOTS 3) Plug the pump to a computer using a USB Mini Cable. The computer will detect the pump as a USB device and users can access the internal folders of the pump. 4) All screenshots taken are stored in a folder called “Screenshots”. The location of the folder is: AW-SoM A20\Internal storage\Pictures\Screenshots.
-
Page 60: Erasing Data And Default Setting
ERASING DATA AND RESTORING DEFAULT The RBB Pump allows users to erase all existing data that is stored inside the pump. This data includes patient information, physician entries, test reports and raw data. Deleting Entries in Dropdown Menus: 1) Select any Dropdown Menu field in the RBB Pump (below example shows “Operator”... - Page 61 ERASING DATA AND RESTORING DEFAULT Erasing Data in the RBB Pump: 1) Select the “Settings” from the Main Menu, and then select the “System Options” tab. 2) The users can then select from 2 different options: Clear all Patient Data - erase all patient information, test reports and raw data collected ...
-
Page 62: Service And Maintenance
RAPID BAROSTAT BAG PUMP SERVICE & MAINTENANCE Mui Scientific... -
Page 63: Care And Maintenance
CARE AND MAINTENANCE The RBB Pump is a battery-operated touch screen portable device. Please follow these instructions to ensure the device’s accuracy and longevity. 1. Do not subject the device to impacts or shocks, such as dropping the unit or storing it near strong vibrations. 2. -
Page 64: Volume Verification
VOLUME VERIFICATION The RBB Pump uses highly sensitive airflow and pressure sensors that may degrade over time. This can cause inaccurate measurements by the pump. If users suspect the pump is not producing accurate results, they can perform a Volume Verification Test to determine if the pump’s results are accurate. In addition, the Volume Verification Test should be performed every 3 months. - Page 65 VOLUME VERIFICATION 3) To perform a Volume Verification Test, users will need to use the included Verification Bag. The Verification Bag has its capacity indicated on a label. Stop Cap 4) Attach the open port of the Verification Bag securely onto the RBB pump’s Metal Luer.
- Page 66 VOLUME VERIFICATION 5) Create a dummy patient for the Volume Verification Test. Navigate to the dummy patient’s profile and select “Start New Test”. Ensure that all values are set to default (shown below), and then select “Start Test”. 6) Perform the usual steps taken to perform a RBB Test. The Volume Verification Test will only utilize the Capacity Test portion of the RBB Test.
- Page 67 VOLUME VERIFICATION 7) Once Capacity Test is completed, compare the displayed capacity value on the RBB Pump to the capacity value indicated on the Verification Bag’s label. If the capacity values are within ± 2.5 % of each other, then the pump is performing correctly.
-
Page 68: Resetting Password
Device Un-Lock screen to recover access to their RBB Pump. 1) Select “Forgot password?” option in the Device Un-Lock screen. 2) Contact Mui Scientific using the number shown on screen to begin the recovery process. Please provide Mui Scientific with the Unlock Code... -
Page 69: Updating Software
UPDATING SOFTWARE Mui Scientific will occasionally release new software updates for the RBB Pump that will require installation by the users. These updates are highly recommended to be installed to the pumps as they often contain new features, upgrades and bug fixes for the RBB Pump. Users can also contact Mui Scientific for more information on the latest software version. - Page 70 4) Once the update is complete, the update screen will show that all update tasks are completed. The pump will automatically restart and proceed back to the splash screen. The USB device can then be removed safely. 5) Contact Mui Scientific after successfully completing your update.
-
Page 71: Troubleshooting
TROUBLESHOOTING All troubleshooting activities to be conducted by pump operators can be accomplished via the touchscreen. There are NO user-serviceable parts within the pump, and therefore users should NOT attempt to disassemble the unit housing. If the pump requires servicing beyond the user capabilities, contact the manufacturer. - Page 72 TROUBLESHOOTING 3) Check the seams of the catheter’s bag and ensure that the bag is sealed shut at the seams. 4) If the bag does not inflate during an RBB test, ensure that the catheter has been inserted correctly into the patient’s rectum, and that no bag is visible from the outside.
- Page 73 TROUBLESHOOTING Errors in Volume and/or Pressure readings 1. The following warning screen will appear whenever an error has occurred in Volume and/or Pressure sensor. 2. Restarting the pump will automatically recalibrate the sensors. 3. Rerun any tests performed if the error occurred during a test. 4.
-
Page 74: Replacement Parts
REPLACEMENT PARTS Description Part # Charging Dock P5-RBB-B RBB Remote Control and Base P5-RBB-C Power Adaptor P5-D-113 Power Cord, Class II P5-D-114 Demo Tube P5-K-102 Verification Bag P5-K-103 RBB Catheter S7-BR-1018... - Page 75 THIS PAGE IS INTENTIONALLY LEFT BLANK...
-
Page 76: Appendices
RAPID BAROSTAT BAG PUMP APPENDICES Mui Scientific... - Page 77 Appendix A...
- Page 78 Appendix B...
- Page 79 Appendix C...
- Page 80 Appendix D...
- Page 81 THIS PAGE IS INTENTIONALLY LEFT BLANK.
Need help?
Do you have a question about the Rapid Barostat Bag and is the answer not in the manual?
Questions and answers