Table of Contents
Advertisement
Advertisement
Table of Contents

Summary of Contents for NUEVOPAK X-Fill Pro XFP-0-U
- Page 1 User’s Guide – X-Fill Pro Original Instructions...
- Page 3 X-Fill Pro (XFP-0) Model : XFP-0-U / XFP-0-E Serial No : Accessories : Please attach the business card of your Nuevop a k Representative here EN-E-045-R1...
-
Page 4: Table Of Contents
X-Fill Pro (XFP-0) Table of Contents 1.0 About This Guide ..................4 2.0 Safety ......................5 2.1 Important Safety Instructions (Save These Instructions) ............5 2.2 Compliance ..........................9 3.0 Overview ....................12 3.1 System Description ........................12 3.2 Sequence of Operation......................13 3.3 Electrical Power Requirements .................... - Page 5 X-Fill Pro (XFP-0) 7.0 Troubleshooting ..................36 7.1 No Power to the System ......................36 7.2 Problems with Making Paper Void Fill Material ..............37 8.0 Customer Service ..................38 8.1 Who to Contact ........................38 8.2 Using Technical Support ......................38 EN-E-045-R1...
-
Page 6: About This Guide
A Machine is defined as the X-Fill Pro which is manufactured by Nuevopak. An Operator is defined as those individuals who have been trained by a Nuevopak representative and are authorized to operate the system as outlined in this guide, the User’s Guide—X-Fill Pro. -
Page 7: Safety
In the event of a breakdown or if operation of the system differs from the descriptions in this guide, turn the system OFF and disconnect and lockout the main power until the unit can be inspected by a Nuevopak representative or qualified service personnel that have been trained by a Nuevopak representative. - Page 8 X-Fill Pro be used only in connection with accessories supplied by Nuevopak. We can assume no responsibility when other materials are used in the X-Fill Pro and we reserve the right to refuse to service any X-Fill Pro if non-X-Fill Pro paper or parts have been used.
- Page 9 WARNING! Do not open the covers except where instructed in the 6.0 Maintenance section of this guide. The guards and access covers should be removed only by an authorized Nuevopak representative or qualified service personnel that have been trained by a Nuevopak representative.
- Page 10 X-Fill Pro (XFP-0) 2.1 Important Safety Instructions (cont.) Warning! Warning! CUT! Keep hands away Gear Entrapment Keep hands away Electrical Cabinet Warning! Do Not Open E-Stop Button Safety Devices Figure 2-1 EN-E-045-R1...
-
Page 11: Compliance
Product Description: X-Fill Pro Paper Void Fill System Model Number: XFP-0-E, XFP-0-U Authorized on behalf of Nuevopak Company Limited (NK Co Ltd.) Applicable Harmonized Standards: EN 60204-1:2006+A1:2009+AC:2010Safety of machinery - Electrical equipment of machines - Part 1: General requirements EN ISO 13849-1:2015 Safety of machinery - Safety-related parts of control systems - Part 1:... - Page 12 X-Fill Pro (XFP-0) 2.2 Compliance(cont.) This equipment has tested and found to comply with the limits for a Class A digital device, pursuant to Part 15 of the FCC Rules. These limits are designed to provide reasonable protection against harmful interference when the equipment is operated in a commercial environment.
- Page 13 Responsible for marking this declaration is the: □ Manufacturer Authorized representative established within the EU Manufacture’s Name Nuevopak Company Limited (NK Co. Ltd.) Manufacturer’s Address: : Unit 306, 3/FL, Yen Sheng Centre, 64 Hoi Yuen Road, Kwun Tong, Kowloon, Hong Kong. Authorized Rep’s Name Petrus Cheng Authorized Rep’s Address...
-
Page 14: Overview
X-Fill Pro (XFP-0) Overview 3.1 System Description The X-Fill Pro Paper Void Fill System creates on-demand protective Void Fill material from a pack of fanfolded kraft paper. The X-Fill Pro paper Void Fill material can be dispensed in four (4) dispense modes: ... -
Page 15: Sequence Of Operation
X-Fill Pro (XFP-0) 3.2 Sequence of Operation Free Mode Output Dispenses a continuous stream of paper Void Fill material using the Foot Switch or start button. 1. The operator presses and holds the foot switch (not shown) and the drive motor is activated. -
Page 16: Electrical Power Requirements
Electrical Power Requirements Table 3-2 3.4 Paper Types Note: The use of non-Nuevopak materials will cause material production problems, may damage the equipment, and will reduce the quality of packaging protection. WARNING! The paper supplies are heavy – see the weights below. -
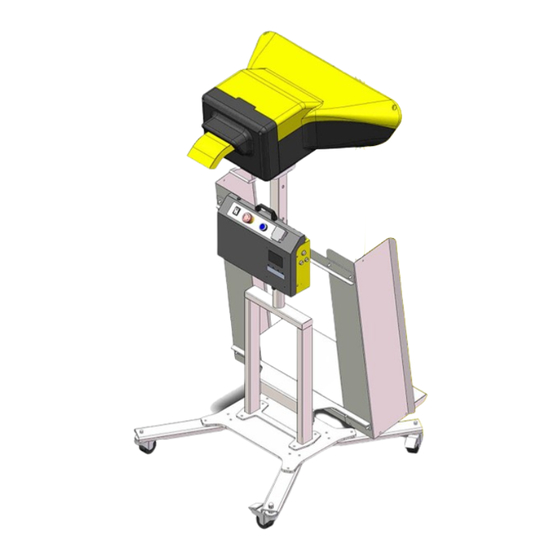
Page 17: System Components
X-Fill Pro (XFP-0) 3.5 System Components 1. ON/OFF Power Switch This switch controls incoming power to the system. It is located on the left side of the controller. 2. Emergency Stop Switch This switch when pushed, disables the drive assemblies. It is located on the top of the controller. - Page 18 X-Fill Pro (XFP-0) 3.5 System Components (cont.) 9. Angle Shelter Set the head angle by angle shelter under the machine. The use method of the Angle Shelter – see Figure 3-4. ① ② ③ ③ ④ Figure 3-4 EN-E-045-R1...
- Page 19 X-Fill Pro (XFP-0) 3.5 System Components (cont.) Component Locations Figure 3-5 EN-E-045-R1...
-
Page 20: Set-Up
X-Fill Pro (XFP-0) Set-up Be sure to review your packaging application needs with your distributor or Nuevopak representative to determine the most effective X-Fill Pro System solution. 72~87”/ 182~220cm 22”/55cm 37”/93cm 40”/100cm 37”/95cm System Set-up Figure 4-1 EN-E-045-R1... -
Page 21: System Set-Up - Floor Stand For X-Fill Pro
X-Fill Pro (XFP-0) 4.1 System Set-up – Floor Stand for X-Fill Pro 1. Uncreate the system with the help of your distributor or Nuevopak representative. 2. Setup the Floor Stand for X-Fill Pro: Tools required: Hex key. Install the Floor Stand for X-Fill Pro: WARNING! The floor stand is heavy and weights 50 lbs. - Page 22 X-Fill Pro (XFP-0) 4.1 System Set-up – Floor Stand for X-Fill Pro (cont.) Step 3: Place the second vertical part and the angle shelter on the designated location. Install the Floor Stand – Step 3 Figure 4-4 Step 4: Loose the two pre-install screws, adjust the angle shelter to the position you want. Re-install the two mounting screws.
- Page 23 X-Fill Pro (XFP-0) 4.1 System Set-up – Floor Stand for X-Fill Pro (cont.) Step 5: Loose the four pre-install screws and install the first cross bar by the four screws. Install the Floor Stand – Step 5 Figure 4-6 Step 6: Loose the four pre-install screws and install the second cross bar by the four screws.
- Page 24 X-Fill Pro (XFP-0) 4.1 System Set-up – Floor Stand for X-Fill Pro (cont.) Step 6: Loose the pre-install Butterfly nuts, install the left and the right side of the tray to the Floor Stand. Install the Floor Stand – Step 6 Figure 4-7 Step 7: Install the base to the designed location and tighten the Butterfly nusts.
-
Page 25: System Set-Up - Head Assembly And Controller Of X-Fill Pro
X-Fill Pro (XFP-0) 4.2 System Set-up – Head Assembly and Controller of X-Fill Pro 1. Install the Head Assembly and Controller of X-Fill Pro. Tools required: Hex key. Step 1: Install the Head Assembly: WARNING! The Head Assembly are heavy and weight 69 lbs. / 32kg. Disassemble the pre-installed screw from the Head Assembly, then placed the Head on the angel shelter and tight up by screws - see Figure 4-9. - Page 26 X-Fill Pro (XFP-0) 4.2 System Set-up –Head Assembly and Controller of X-Fill Pro (cont.) Step 2:Install the Controller: WARNING! The Controlleris heavy and weight 22 lbs. / 10kg. Place the Controller on the designed location.– see Figure 4-10. Then connect the four cables of the Controller with the Head Assembly –...
-
Page 27: Transport, Handling, And Storage
X-Fill Pro (XFP-0) 4.3 Transport, Handling, and Storage Transporting the X-Fill Pro Paper Void Fill System System components must be transported in their original packaging. Respect the handling symbols on the outside of the packaging. Handling the X-Fill Pro Paper Void Fill System ... -
Page 28: Operation
X-Fill Pro (XFP-0) Operation 5.1 Loading the Paper Pack Before operating the system, read and thoroughly understand section 2.1 Important Safety Instrctions. 1. Place the fanfold paper bundle on the sysetm. Put the paper pack on the paper bracket. WARNING! The paper supply is heavy –... -
Page 29: System Controls
X-Fill Pro (XFP-0) 5.2 System Controls 1. ON / OFF Power Switch This button controls power to the system. 2. Emergency Stop Button (E-Stop) (2) This red button when pushed disables the drive and cut functions. Note: To reste the E-Stop, twist and release it and then press the reset button. 3. - Page 30 X-Fill Pro (XFP-0) 5.2 System Controls (cont.) System Controls Figure 5-2 Start-up Only Menu Tree Figure 5-3 EN-E-045-R1...
-
Page 31: Free Mode Output
X-Fill Pro (XFP-0) 5.3 Free Mode Output Free Mode produces a contimuous stream of paper packaging material using the foot switch or the start key. 1. Cycle the Output Mode Selection button until Mode: Free appears. 2. Press and hold the foot switch for the paper to flow. Note: The X-Fill Pro System is for intermittent use and should not be run continuously for more than 1 minute. -
Page 32: Preset Mode Output
X-Fill Pro (XFP-0) 5.5 Preset Mode Output Preset Mode produces a programmed length of paper packaging material using the foot switch. 1. Cycle the Output Mode Selection button until Mode: Preset appears. 2. Using the “+” and “-” keys, adjust the length in feet / meters on the display. ... -
Page 33: Runtime Warning
PROBLEM SOLUTION Cut No Reset: Press the Reset Key to reset the Cutter. Contact your authorized distributor or Nuevopak representative. E01: Check whether the cables of the Cutter failure. controller with the Head Assembly are connected. ... -
Page 34: Maintenance
No components are loose. All controls and indicators function properly. Yearly / 300 Packs of Contact Schedule an on-site inspection. Call your Nuevopak Fanfold Paper Representative to inspect the system. (Nuevopak Rep.) Preventive Maintenance Schedule Table 6-1 EN-E-045-R1... -
Page 35: Cleaning Dust From The System
X-Fill Pro (XFP-0) 6.2 Cleaning Dust from the System WARNING! Use protective eye wear when performing maintenance procedures. WARNING! Sharp Knife – Be aware of the knife function and location inside the system, accessible when the rear cover is open. Machine status: ... - Page 36 X-Fill Pro (XFP-0) 6.2 Cleaning Dust from the System (cont.) Cleaning Dust from the System Figure 6-2 EN-E-045-R1...
-
Page 37: Replacing The Power Fuse
X-Fill Pro (XFP-0) 6.3 Replacing the Power Fuse WARNING! Use protective eye wear when performing maintenance procedures. Tools required: Screwdriver 1. Turn the X-Fill Pro System ON/OFF power switch to the OFF position and unplug the power cord. WARNING! Failure to turn the system OFF and unplug the VAC power cord can result in injury. -
Page 38: Troubleshooting
Replace power inlet fuse – see 6.3 4. System fuse has blown. Replacing the Power Fuse. Contact your authorized distributor or Nuevopak representative. 5. Power extention cord in Do not use an extension cord. use. 6. Electrical or mechanical Contact your authorized distributor failure. -
Page 39: Problems With Making Paper Void Fill Material
5. Electrical or mechanical Contact your authorized distributor failure. or Nuevopak representative. 7.2.2 The paper 1. When using Adjust the output lengthe and programmed length verify new length by dispensing length is not as material –... -
Page 40: Customer Service
8.1 Who to Contact To Our Customers: This X-Fill Pro Paper Void Fill System has been manufactured for Nuevopak Co. Ltd. and has been thoroughly tested. If any problems occur while operating this equipment and you desire a phone consultation, call the appropriate number below. - Page 41 X-Fill Pro (XFP-0) Unit 306, 3/FL, Yen Sheng Centre, 64 Hoi Yuen Road, Kwun Tong, Kowloon, Hong Kong. Tel: (852) 3105 0012 www.nuevopak.com EN-E-045-R1...
Need help?
Do you have a question about the X-Fill Pro XFP-0-U and is the answer not in the manual?
Questions and answers
Machine will not reset. Error message on screen just says 'Reset!' with V07.2E underneath it. I've tried disconnecting power, recycling e-stop, disconnecting foot pedal, all of which do not reset the machine.
The error message 'Reset! V07.2E' on the NUEVOPAK XFP-0-U machine indicates that the system requires a reset, likely due to a previous emergency stop or power cycle.
To resolve it:
1. Twist and release the red E-Stop button if it was pressed.
2. Press the blue Reset button to initialize the system.
This will clear the error and allow normal operation.
This answer is automatically generated