Advertisement
1415 South Cherry Avenue, Tucson AZ 85713 – (520) 624-7000 –
www.jmcorp.com audio@jmcorp.com
Installation Manual
#XXRK-400SPSB-VHL
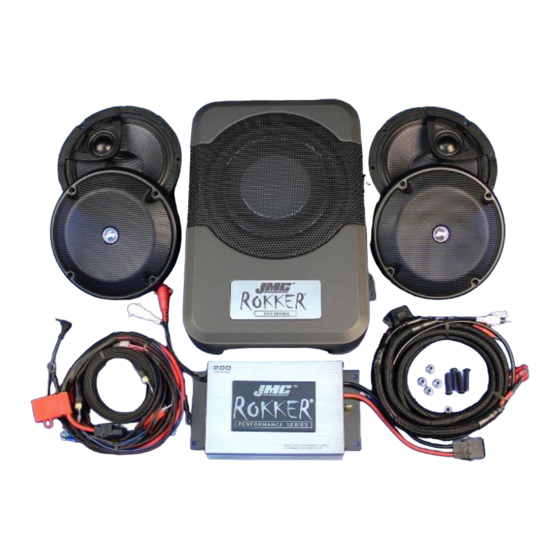
JMC ROKKER® Series 400w RMS Audio KIT for Vanderhall Roadster
Overview
This complete custom speaker/amp installation kit has been designed for the
Vanderhall Carmel & Venice 3-wheel Roadster.
ROKKER speakers are spec'd at 2 ohms impedance and 200 watts maximum input
(130w RMS - 91db sensitivity), these speakers provide excellent on-highway
performance.
Speaker drivers feature lightweight waterproof woven-fiber cones with super-rigid
metal basket and a high-density lite-weight Neodymium magnet structure with
integral high-output PEI tweeters.
Mounting hole pattern and spade electrical connections are exactly the same as the
factory specification, this is a total plug-and-play no-modification solution complete
with easy to follow installation instructions.
The ROKKER 2-channel 200w amplifier kit has been designed for use in the
Vanderhall Roadster.
Advertisement
Table of Contents

Related Manuals for J&M Corporation JMC ROKKER XXRK-400SPSB-VHL

Summary of Contents for J&M Corporation JMC ROKKER XXRK-400SPSB-VHL
- Page 1 1415 South Cherry Avenue, Tucson AZ 85713 – (520) 624-7000 – www.jmcorp.com audio@jmcorp.com Installation Manual #XXRK-400SPSB-VHL JMC ROKKER® Series 400w RMS Audio KIT for Vanderhall Roadster Overview This complete custom speaker/amp installation kit has been designed for the Vanderhall Carmel & Venice 3-wheel Roadster. ROKKER speakers are spec'd at 2 ohms impedance and 200 watts maximum input (130w RMS - 91db sensitivity), these speakers provide excellent on-highway performance.
- Page 2 This is a full range class D amplifier and is spec’d at 100watts RMS per channel X2 channels, (200w total) driven continuous into a 2 ohm load @ 14.4vdc. Amplifier mounts into the same location as the stock amp and connects to the on- board Bluetooth powered audio controller.
- Page 3 Step6: Now bring the ROKKER amplifier back out from under the dash and use as a template on top of the cowl (red/black power plug pointing forward) to locate and mark the extra mounting hole, that will secure the new amplifier. Drill this one new hole using a 3/16” drill bit. Step7: Route the new amplifier wiring harness from under the dash, up thru the large grommet hole, routing the speaker wires down thru to their left and right-side locations, red power wire to the accessory power wire connection block (as shown below) black ground wire to the...
- Page 4 Step8: Now locate the 6” blue wire section with plug (that you cut off of the stock amplifier wiring harness) strip back the very end of the wire and crimp into the blue butt connector on the new ROKKER amplifier wiring harness. Then plug the black connector on the end of the blue wire, back into the corresponding wire harness location.
- Page 5 Step13: Turn on the acc ignition, link by Bluetooth a music source to the audio system controller and verify that both speakers and the amplifier are functioning properly. Step14A-Carmel: Route the braided ground strap from the front master grounding post, back under the left side body, to the rear grounding post, located next to but outside of the battery and secure.
- Page 6 Step18: Connect the main subwoofer ground wire to the left side body rear grounding post, (Right side on Venice) located next to but outside of the battery and secure. Step19A-Carmel: Slide the subwoofer into its left mounting position and hold in place as you mark/punch the location for the 4 mounting holes in the rear firewall.
- Page 7 Step20: As you slide the subwoofer back into position, plug the wiring harness plug into the side of the subwoofer and then plug in the 2 RCAs at the same time. Step21: Now position the subwoofer in its final mounting location and secure using the M5X1.5”...
- Page 8 WARRANTY AND REPAIR INFORMATION TWO YEAR LIMITED WARRANTY In order to facilitate the servicing of this warranty, the Warranty Registration Form should be filled out and returned within 10 days of the date of purchase. However, return of the Warranty Registration Form is not a precondition of this warranty, and this Warranty will be observed by J&M CORPORATION whether or not the Warranty Registration Form is returned, on the condition that other satisfactory evidence of the date of the original purchase is provided to J&M CORPORATION.
Need help?
Do you have a question about the JMC ROKKER XXRK-400SPSB-VHL and is the answer not in the manual?
Questions and answers