Advertisement
Quick Links
Advertisement

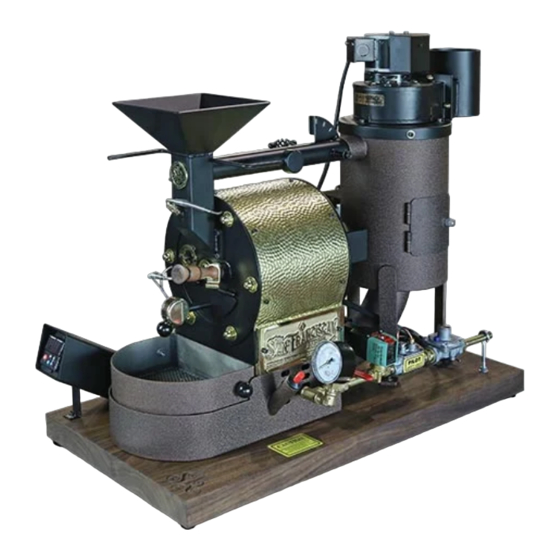
Summary of Contents for San Franciscan Roaster SF1-LB
- Page 1 THE SAN FRANCISCAN MODEL SF1-LB COFFEE ROASTER...
-
Page 2: Data Sheet
THE SAN FRANCISCAN MODEL SF 1 LB. (GAS MODEL) DATA SHEET 3 lbs. Maximum Hourly Capacity 100 lbs. Weight 17"w x 32"l x 27"h Counter Space 4 " diameter pipe Hot Air Exhaust (50 CFM) 110 Volts 1 PH. Voltage 2 Amps. - Page 3 CAUTIONS: Post in a prominent location the instructions to be followed if user smells gas. Obtain information from local gas supplier. —FOR YOUR SAFETY— DO NOT STORE OR USE GASOLINE OR OTHER FLAMMABLE VAPORS OR LIQUIDS IN THE VICINITY OF THIS OR ANY OTHER APPLIANCE. “Intended for other than household use.”...
- Page 4 INSTRUCTIONS FOR OPERATING THE SAN FRANCISCAN ONE POUND SAMPLE ROASTER READ THOROUGHLY BEFORE ATTEMPTING TO OPERATE Step 1: • Switch roaster on • Drum rotates • Exhaust-Cooling fan on Step 2: • Let run 90 seconds to air out system. Green light will come on. Push/Pull Cooling Knob...
- Page 5 Step 4: • Turn gas about 1/4 to 1/2 on • Warm up machine about 15 min. then shut gas off not to exceed 400 degrees Step 5: • Put green coffee in hopper 1/4 to 1 pound • Pull cooling tray vent knob to lessen air flow through drum while charging green beans •...
-
Page 6: Maintenance
MAINTENANCE • Vacuum the inside of the chaff cyclone daily. • Once a month, apply one squirt of grease on back bearing using a grease gun and hi-temp grease bought at your local hardware store. • Once a month remove cover (using an allen key) where indicated by "remove to clean"... -
Page 7: Limited Warranty
LIMITED WARRANTY The San Franciscan Roaster Co. warrants this product for one year from date of purchase. We will repair without charge any defects due to faulty material or workmanship. Please return the complete unit, transportation prepaid, to our location. The repaired unit will be returned freight collect to you. This warranty does not apply to non-factory accessories or damage caused where repairs have been made or attempted by others. - Page 8 A GENERAL TIME & TEMPERATURE CHART FOR THE UNTRAINED COFFEE ROASTER • Warm roaster slowly from 0 to 20 minutes • Charge coffee in at 350 degrees • The temperature will drop to approximately 275 degrees. We will call that 0 minutes.
- Page 9 A GENERAL TIME & TEMPERATURE CHART FOR THE UNTRAINED COFFEE ROASTER for ROASTERS BEGINNING WITH SERIAL NUMBER 20001 All temperatures are from the bean probe readout (RED DIGITS). • Warm roaster for at least 20 minutes according to instructions on page 3. •...
- Page 10 THE SAN FRANCISCAN MODEL SF1-LB CLEANING GUIDE...
- Page 11 SF1 Roaster Cleaning Guide WARNING: BE SURE GAS IS TURNED OFF AND ELECTRICAL IS UNPLUGGED BEFORE CLEANING YOUR ROASTER!!!!! FAILURE TO DO SO MAY RESULT IN SERIOUS INJURY, PROPERTY DAMAGE, AND EVEN DEATH!!!! Unplugging the Roaster is Very Important! Be Sure Gas Valve on Roaster is Turned Off its Very Important!!
- Page 12 Turn off Propane to the Roaster its Very Important!! Turn off the Natural Gas to the Roaster its Very Important!!
- Page 13 Time to clean your Roaster! Wipe inside and around face plate, clean with a wash cloth, soap, and water. Remove cooling tray and wipe clean on the top and bottom with soap and water.
- Page 14 Wipe clean under the cooling tray with soap and water. Pull handle forward and clean where the flap comes down. Arrow is pointing to flap. Remove side door by taking off the two black cap screws with a 5/32 Allen wrench.
- Page 15 Once Door is removed wipe down the inside with soap and water be sure NOT to get too wet inside. Wipe completely dry when finished and place the door back on the roaster using the 5/32 Allen wrench to put back the 2 black cap screws. Be careful to not get the air and bean probes caught in the door.
- Page 16 Next step is to remove the fan from the top of your chaff cyclone. Remove the 3 black cap screws with a 3/16 Allen wrench. Be careful that the fan doesn’t fall off the roaster. One of the black cap screws removed from the bottom of the fan.
- Page 17 When setting the roaster fan down be sure it’s on an even flat surface. Check to see if fan needs to be wiped down, if so lightly use a damp wash cloth. Be careful of your fingers. Clean the inside of the hot air exhaust vent with a vacuum or a wet wash cloth use soap and water.
- Page 18 Using a 3/16 Allen wrench remove the 3 black cap screws and washers. (Picture is shown with fan removed) Top of chaff cyclone with no black cap screws, and washers are all taken off. Lid is ready to be removed.
- Page 19 Remove black lid by lifting up if you can lift up with both hands. You can wipe down all of the lid and around the inside with soap and water. Vacuum inside both cylinders inside the chaff cyclone, or wipe them down with soap and water.
- Page 20 Put black lid back on and make sure the pieces look like this in order to put it correctly back on the chaff cyclone. The arrow is pointing to show the inside of the lid to be matched up with the feed hopper pipe.
- Page 21 When putting back on the black cap screws remember the brass washers. Use a 3/16 Allen wrench to put all 3 black cap screws and washers back on. Take your fan that goes back on your black lid and before letting it go on the top of the black lid make sure it’s evenly on the lid so it won’t fall off.
- Page 22 Be sure all 3 holes are matching and then loosely screw black cap screws in using a 3/16 Allen wrench. Once all 3 are loosely in the holes tighten them before moving on to next step. Go to the front or face of the roaster there are 4 black cap screws for the feed hopper use a 5/32 Allen wrench to remove them.
- Page 23 Feed hopper pipe should now be unattached clean the inside of the pipe (arrow is pointing to the pipe) with soap and water and also the inside of the chaff cyclone (arrow pointing). Clean inside of feed hopper before replacing back on the front of the roaster. Clean with a wash cloth using soap and water.
- Page 24 Then replace feed hopper back on the front of the face plate of the roaster using a 5/32 Allen wrench. Be sure feed hopper pipe is in with the chaff cyclone. End of feed hopper pipe should fit snuggly into the chaff cyclone.
- Page 25 Under the chaff cyclone of the roaster is an elbow and hose. If this is kept clean even though it doesn’t seem to get too dirty it will make sure your roaster doesn’t get blocked up. Remove hose with a 13mm wrench, pliers, or a crescent wrench. Wipe down the inside of both the hose and elbow.
- Page 26 Using a crescent wrench or pliers turn elbow to the left should be on there tight in order to clean elbow. Clean the end of the elbow and the hole from where the elbow came from. Just wipe down with a wash cloth and soap and water. Put part of your cleaning wash cloth inside the hole where you just removed the elbow from and turn clock wise to clean inside it.
- Page 27 After cleaning, place elbow back in the hole using the crescent wrench or pliers by turning the elbow to the right. Elbow should be tight and facing the hose. Threads on elbow will not be completely inside the roaster.
- Page 28 Tighten the nut as tight and you can with your fingers and then lightly tighten with the crescent wrench, pliers, or 13mm wrench. Thread should almost fit completely on the elbow. Remove black cover where the motor is with a 3/16 Allen wrench only the top two black cap screws, and grease the gears with any kind of high temp bearing grease (arrows pointing to gears and bearing).
Need help?
Do you have a question about the SF1-LB and is the answer not in the manual?
Questions and answers