
Related Manuals for GARUDA ROBOTICS MyDroneFleets

Summary of Contents for GARUDA ROBOTICS MyDroneFleets
- Page 1 UAV Hardware Tracker User’s Manual Model: GRT-001 Version: Manual version: 1.10 Manual revision: 2022-06-03...
-
Page 2: Table Of Contents
Identifying Parts and Controls Warranty Support Setting Up the Tracker Step 1: Initial Hardware Setup Step 2: Initial Software Setup Setting up MyDroneFleets Setting up FlyItSafe Step 3: Attaching the Velcro Strip Step 4: Mounting the Tracker Operating the Tracker Charging the Tracker... -
Page 3: About This Manual
UAV Hardware Tracker | User’s Manual About This Manual Thank you for purchasing a MyDroneFleets UAV Hardware Tracker. This user’s manual contains the information you need to set up, operate and maintain your tracker. For your safety, please read this manual before operating the tracker. -
Page 4: About Your Tracker
UAV Hardware Tracker | User’s Manual About Your Tracker Congratulations on your purchase of a MyDroneFleets UAV Hardware Tracker! Once the Tracker has been mounted on your UAV, you will be able to transmit and monitor its location via a 4G cellular network. -
Page 5: Compliance
Depending on where you purchased and use your tracker, you may need to comply with one or more specific usage conditions described in the following table: Note: Garuda Robotics makes a reasonable effort to ensure the information contained in this section is up to date at the time of publishing. The user of the UAV Hardware Tracker bears final responsibility for ensuring compliance with all... -
Page 6: Package Contents
USB charging cable (Only included in selected packages) Additional tracker mounts may be purchased from Garuda Robotics. Additional velcro strips, USB cables and other accessories may be purchased from Garuda Robotics or a suitable electronics store. GARUDA ROBOTICS PAGE 6 / 36... -
Page 7: Tracker Specifications
9 g (0.32 oz) Weight with velcro strip 12 g (0.42 oz) Material High-strength thermoplastic polyester AS PART OF A POLICY OF CONTINUOUS IMPROVEMENT, WE RESERVE THE RIGHT TO ALTER DESIGN AND SPECIFICATIONS WITHOUT NOTICE. GARUDA ROBOTICS PAGE 7 / 36... -
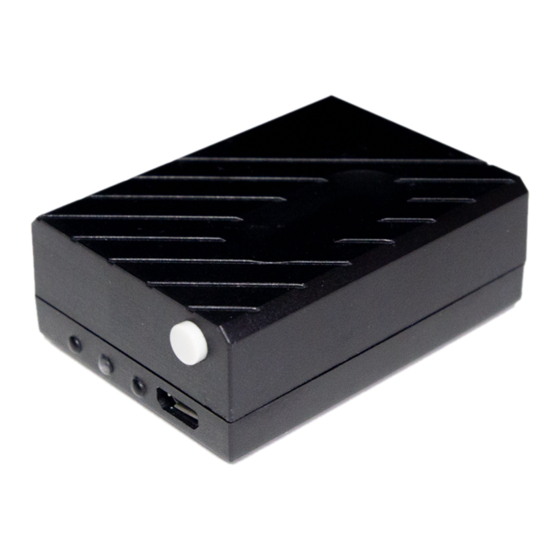
Page 8: Identifying Parts And Controls
Lights up orange to indicate tracker status through a combination of short and long flashes. Tamper-proof label Indicates if the tracker has been opened. Labels are single use and can only be replaced at an Authorised Service Centre. GARUDA ROBOTICS PAGE 8 / 36... - Page 9 Globally unique hardware address of the onboard 4G LTE Equipment Identity communications module. (IMEI) Regulator logo (only Trackers issued through a UAV-regulating authority bear present in some the official logo of said entity. versions) GARUDA ROBOTICS PAGE 9 / 36...
-
Page 10: Warranty
If your battery needs to be replaced due to normal wear and tear, the cost of parts and labour are not covered by the warranty. Support For all technical support matters, please contact support@garuda.io. GARUDA ROBOTICS PAGE 10 / 36... -
Page 11: Setting Up The Tracker
For Retail Trackers, please follow the following steps for initial hardware setup. For CFMS Trackers, initial hardware setup will be done on-site during tracker collection by Garuda Robotics in front of you. Initial Hardware Setup Take the tracker outdoors to a location where it has an unobstructed view of the sky (to receive GNSS signals) and a good 4G network signal. -
Page 12: Step 2: Initial Software Setup
Step 2: Initial Software Setup The software application(s) you use to manage your tracker will depend on where you purchased it. For Retail Trackers, please continue to section: Setting up MyDroneFleets For CFMS Trackers, please continue to section: Setting up FlyItSafe Setting up MyDroneFleets Visit https://track.mydronefleets.com... -
Page 13: Setting Up Flyitsafe
(for individuals). Please request for your company’s administrator to issue you a CorpPass account, and assign you to the CFMS service. Note: You must already have CFMS access in CorpPass before you collect your Tracker. GARUDA ROBOTICS PAGE 13 / 36... - Page 14 Your tracker should be powered on and located near your mobile device for this step. From the home screen of the application, click on the Start Flight button. You will be directed to the Start Flight Checklist screen. GARUDA ROBOTICS PAGE 14 / 36...
-
Page 15: Step 3: Attaching The Velcro Strip
Velcro strips are required to be replaced after 800 times of usage. Velcro strips, once removed from its mounted surface, should not be reused. GARUDA ROBOTICS PAGE 15 / 36... - Page 16 5) You should avoid mounting the tracker on removable parts such as batteries. 6) You should avoid mounting the tracker directly over critical radio-frequency transmitting and / or receiving components GARUDA ROBOTICS PAGE 16 / 36...
-
Page 17: Step 4: Mounting The Tracker
The mount should remain securely fastened to the UAV. Suggested mounting points for a number of popular UAV models can be found in the Appendix of this document. Step 4: Mounting the Tracker GARUDA ROBOTICS PAGE 17 / 36... - Page 18 Apply pressure to the right face of the tracker. The mount is designed to flex slightly under pressure, allowing the tracker to slide in. Notice that the convex registration hump on the inside of the mount loop will mate with the concave GARUDA ROBOTICS PAGE 18 / 36...
- Page 19 UAV. Do not hold the tracker as a way to carry your UAV as this might dislodge the velcro strips. Your tracker is now securely inserted in the mount and ready for flight. GARUDA ROBOTICS PAGE 19 / 36...
- Page 20 UAV Hardware Tracker | User’s Manual Trackers mounted on UAVs See Appendix for more suggestions on how to mount the tracker GARUDA ROBOTICS PAGE 20 / 36...
-
Page 21: Operating The Tracker
When the battery is fully charged, the charging indicator will light up solid blue. The charging circuit will stop charging the battery. A full charge of an empty tracker battery should take around 60 minutes. GARUDA ROBOTICS PAGE 21 / 36... -
Page 22: In The Field
2 Turn on the tracker and wait for the power indicator to come on. 3 Verify that the tracker is broadcasting its location on the MyDroneFleets app. If it is not broadcasting, check the status indicator light to determine if there is a problem with the tracker. - Page 23 UAV Hardware Tracker | User’s Manual 7 For Retail Trackers To playback your previous flight, click on Playback, and click on the Play button of the previous flight. You can then play and pause the flight. GARUDA ROBOTICS PAGE 23 / 36...
-
Page 24: Flight Operations (Caas)
3 Launch the FlyItSafe mobile application. From the home screen of the application, click on the Start Flight button. You will be directed to the Start Flight Checklist screen. GARUDA ROBOTICS PAGE 24 / 36... - Page 25 Step 5. 7 Click on Start Flight. Turn on the UAV and proceed with your flight. Ensure that you limit your flight to the Area of Operations described in your Activity Permit. GARUDA ROBOTICS PAGE 25 / 36...
-
Page 26: Monitoring Battery Status
It is the responsibility of the UAV operator to ensure that the tracker battery has sufficient charge at all times to complete the required UAV missions while complying with local UAV regulations. GARUDA ROBOTICS PAGE 26 / 36... -
Page 27: Care And Maintenance
Do not expose the tracker to environments that contain fine metallic particles or any other substances that may lead to electric short circuits. Do not expose the tracker to corrosive environments. Keep the tracker away from heat sources, combustible gases, and liquids. GARUDA ROBOTICS PAGE 27 / 36... -
Page 28: Charging And Power
Always charge the tracker in a ventilated area. Do not place the tracker under pillows, blankets, fabrics, or other flammable materials while charging. If you will not be using the tracker for an extended period, the battery should be discharged to approximately 50% charge before storage. GARUDA ROBOTICS PAGE 28 / 36... -
Page 29: Frequently Asked Questions
WGS84 and your local geoid. CFMS Trackers What happens when I fly An incident report will be triggered within CFMS to CAAS outside the Area of and other stakeholders. Operations applied for and stated in my Activity Permit? GARUDA ROBOTICS PAGE 29 / 36... -
Page 30: Troubleshooting
If left alone, Tracker will auto c) Server not available restart to try to resolve the issue after 1 min At extremely low power, you might also see the power indicator light turn solid green. GARUDA ROBOTICS PAGE 30 / 36... - Page 31 Renew your operator permit followed by 1 (CFMS Trackers only) with CAAS long blink . . _ . . _ a) Security tokens no longer valid (e.g. when operator permit expires) b) Tracker is officially decommissioned GARUDA ROBOTICS PAGE 31 / 36...
-
Page 32: Appendix
UAV Hardware Tracker | User’s Manual Appendix GARUDA ROBOTICS PAGE 32 / 36... -
Page 33: Suggested Mounting For Common Uavs
The DJI Mavic Mini is unable to carry the tracker. DJI Mavic Air Series Adhesive DJI Mavic Pro Series Adhesive DJI Phantom Series Adhesive DJI Phantom 2 Series DJI Phantom 3 Series DJI Phantom 4 Series (non RTK) GARUDA ROBOTICS PAGE 33 / 36... - Page 34 UAV Hardware Tracker | User’s Manual DJI Phantom 4 RTK Adhesive Mount on top of RTK antenna DJI Spark Adhesive Garuda Robotics M4X Adhesive and velcro Garuda Robotics M400 Adhesive GARUDA ROBOTICS PAGE 34 / 36...
- Page 35 UAV Hardware Tracker | User’s Manual Garuda Robotics Cerana X4-21 Adhesive Garuda Robotics Cerana X8-28 Adhesive GARUDA ROBOTICS PAGE 35 / 36...
-
Page 36: Acceptable Use Policy For Cfms Ua Trackers
You are to ensure that the CFMS Tracker and the associated mounting is adequately secured to the UA before the conduct of each flight. Loss of a tracker must be reported by emailing CAAS_CFMS_Helpdesk@caas.gov.sg support@garuda.io immediately. GARUDA ROBOTICS PAGE 36 / 36...
Need help?
Do you have a question about the MyDroneFleets and is the answer not in the manual?
Questions and answers