Table of Contents
Advertisement
Advertisement
Table of Contents

Subscribe to Our Youtube Channel
Summary of Contents for GAME ELF 412 in 1
- Page 1 ELF 412 in 1 Arcade Game Board Manual...
-
Page 2: Table Of Contents
Contents Paragraph Page Connector Layout Operation Instructions 2.6/7 Returning to Game List System Settings Configuration 1. Exit 2. JAMMA I/O Test 3. MY Cabinet Type = Upright 4. MY Cabinet Type = Cocktail (Default) 5. Show Serial Number 6. Service (Sub Menu) 3.6.1 6.1 Display 3.6.2... -
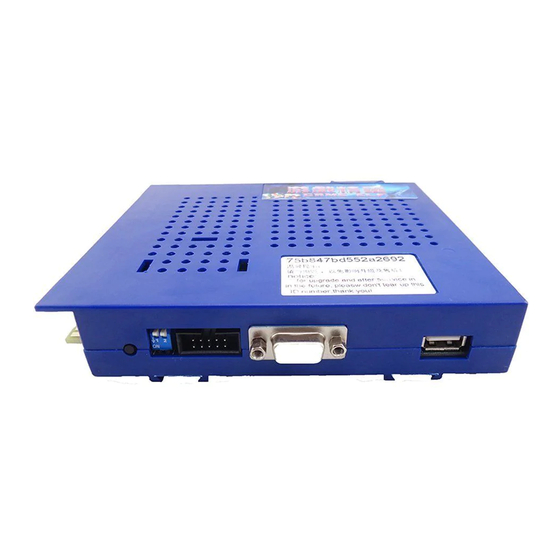
Page 3: Connector Layout
1. CONNECTOR LAYOUT. Figure 1 :: Game board Layout CAUTION: The function of JAMMA connector power and J2 power is same; do not use them BOTH together as that WILL destroy the game board. Please connect the trackball 1P (A) and 2P (B) to J6 connector as shown. -
Page 4: Operation Instructions
2. OPERATION INSTRUCTION. Connect the game board and switch on the machine power, after the logo of the “GAME ELF” appears, the machine will enter game list menu (about 20s-40s). Figure 2 :: Game Menu Layout Note:: Press 1P-C for Help 1. -
Page 5: System Settings Configuration
Press 1P- START button to enter game. If Coin recycling is set to“No”, after entering the game, all coins the player inserts will be added into the game automatically. If Coin recycling is set to“Yes”, Press 1P START button for 3~5seconds to pop up menu, and select “continue” to insert coins. All games on Cocktail mode and some games on Upright mode need 2 coins (or more coins) and press 2P-START button first to enable 2 players mode. -
Page 6: Exit
Otherwise please perform again. 3.5 Show Serial Number This serial number is only marked number, we suggest that our customers note this number and be convenient for getting service in the future. Elf 412 in 1 Serial .................... -
Page 8: Service (Sub Menu)
3.6 SERVICE (sub Menu) On the System Setting Menu, select item “6. Service” and press 1P-START to enter the Service Menu. Figure 4 :: Service Menu NOTE:: The Dark Blue text is very difficult to read Moving 1P joystick up or down to choose item, then 1P-C to modify item. SW1 switch on game board adjust Display Mode. -
Page 9: System Mode
3.6.2 System Mode In order to edit the “Game list/ Game difficulty/ Lives setting/ Game configuration” it is necessary to enter the “Config/Edit Mode”. If you don’t need to adjust these items, please set to “Game Mode (Normal play mode)” for normal operation. -
Page 10: Free Play
3.7 Free play: 1. Free play (ON): Play all games for free. 2. Free play (OFF): Disable for free play. 3.8 Show coins counter 1.Show the number of coins in the current mode of operation (The function is invalid for Free play mode and home mode). -
Page 11: Edit Game List (Para 3.6 Edit Select)
EDIT GAME LIST Service Settings Menu (per Figure 4), set System Mode to Config/Edit mode, then save and quit the system setting. Enter the Game edit interface. In the Config/Edit mode, press TEST or S1 button on the Game List Menu to enter the menu below. - Page 12 The item “*” means to show game list, no“*” means to hide game list. Select game list by moving 1P joystick (up or down to choose game, left or right to view game menu) and press 1P-A to decide to show or hide the selected game.
-
Page 13: Single Game Setting (Para 3.6 Edit Select)
5. SINGLE GAME SETTING AND OPERATION. Please refer to “Edit game list” as above, and enter the edit Game List menu. Moving 1P joystick up or down to select game, press 1P-D button to set. If it shows “SET” in front of game title you selected, that means the setting is successful. Enter Service Menu, set the Game mode to Single mode, 1. -
Page 14: Game Configuration Settings
7. 1P-F button: set All games to easy. Notice: when some games’ difficulty show as “x(x)” or lives show as “x”, it means this game has no difficulty and no lives to adjust, or it means this game doesn’t support to adjust game difficulty and lives. -
Page 15: Test Or S1 Button Function
Select “Return to main menu” to quit the setting menu after setting (as Figure 11), and select “Exit game” to back game list (as figure 2). Restart the game, then new settings are valid. Please go on to set other games if you need. If not, set System mode to “Normal play”... - Page 16 10. JAMMA WIRING JAMMA Connector Wire MAP Component Side --Player One Solder Side – Player Two Assignment Assignment //// +12V +12V //// //// //// //// JMA 9 JMB 9 Speaker + Speaker -- JMA 11 JMB 11 Video Red Video Green Video Blue Video Sync.
- Page 17 Switch Locations 1. Illuminated Push Button. 8Way Joystick Lamp off, 4 way Joystick Lamp on. 1. Joystick Player 1. Up, Down, Left, Right 2. 1P-A First right of the joystick. (Player 1 Switch A). 3. 1P-B Middle of three. (Player 1 Switch B). 4.
- Page 18 SPECIAL NOTE SOFTWARE COPYRIGHT This computer hardware equipment is provided without software. Customers may obtain software by their own methods (from the software provider or download software from related web sites). We do not supply software for this hardware. oo00ooo...
Need help?
Do you have a question about the 412 in 1 and is the answer not in the manual?
Questions and answers