Table of Contents
Advertisement
Quick Links
Advertisement
Table of Contents

Summary of Contents for ETMPACK TX4
- Page 1 Intelligent InkjetPrinter Instructions...
- Page 2 WARNING AND NOTE: 1. Do not plug or take out ink cartridge when machine is in printing; Do not set parameters when machine is in printing; When machine is in printing, any operation will damage core board. 2. If machine finishes working, take out cartridges at once and cap it well. 3.
-
Page 3: Table Of Contents
9. Multi-nozzles combination printing examples.......................16 Dear customers: Thank for your trust for our TX4 intelligent inkjet printer. For better to use this machine, please read this instruction carefully, as it will help you learn convenient and correct operation about this... -
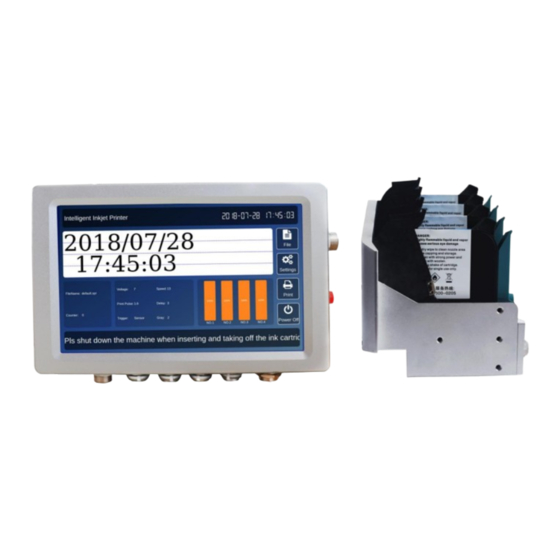
Page 4: Diagram
1. Diagram Controller and print nozzle 1. USB interface 2. RS232 3. Power adapter interface 4. Power button 5. Interface for connecting sensor 6. Interface for connecting print nozzle 7. Interface for connecting external encoder... -
Page 5: Parameters
2. Parameters Model Nozzle TIJ 2.5 Thermal foaming nozzle Operating system Linux Quad core 1.4Hz 600 maximum Screen size 7 inch Language English, Chinese, Turkish, Arabic, Korean, Italian, Shape features Aluminum alloy Dimension Controller: 185 * 125 * 34mm, Print nozzle: 138*100 *136 mm Net weight Controller: 0.58 KG, Print nozzle:1.5KG Printing height... -
Page 6: Main Ui
3. Main UI File: Edit, load and delete files Settings: Printing settings, System Settings, Maintenance, Administer. Print: Click Print, it will turn red to start printing, and click again it will turn to white to stop printing. Power: Click Power to shut down machine, notice to press power button on the right side Note: ①Please follow the steps to shut down machine:... -
Page 7: File Manage
4. File manage 4.1 Edit file 4.1.1 Input Text Click Text to input text, number or symbol → Click content to input text → Finish → adjust font and size as needed→ adjust position → Save/ SaveAs → input file name → OK. 4.1.2 Input Time Click Time (windows will pop up system time)→... -
Page 8: Input Counter/ Serial Number
4.1.3 Input Counter/ serial number Click Cnt, set type and size as need. One file could contain two different counters. Could set counter parameters in settings. 4.1.4 Input logo/ image Insert USB disk with picture →File → Edit File → Image → Load → U Disk → choose the picture →... -
Page 9: Input Bar Code
①Please copy picture to machine storage first, then repeat loading from localstorage. ②Any pictures should be saved as monochrome BMP in computer before save in file. ③Edit file contains picture (machine can’t print picture directly.) 4.1.5 Input bar code Click barcode →Edit (choose barcode type and input code number) → Finish → Save or SaveAs 4.1.6 Input QR code... -
Page 10: Load File
Click QR code →Edit (input code content) → Finish → Save or Save As Note: the size of could be adjusted through Scale, resolution could be adjusted through Level. M7 could print QR code from data base by USB disk. 4.2 Load File ①Delete File: Delete File from local list. -
Page 11: Settings
5. Settings 5.1 Print Settings 5.1.1 Styles Trigger: ①Sensor: connect sensor through interface to trigger printing. ②Automatic: no need any trigger condition, it will print automatically if use this mode. Print Direct: the direction of printing Speed: When use online printing, adjust speed to fit conveyor speed. (if connect encoder, then don’t need adjust this value). -
Page 12: Nozzle Offset
Nozzle1-Nozzle4: direction of printing. Normal, X Reverse, Y Reverse and XY Reverse. DPI: There are five types of DPI could choose. 5.1.2 Nozzle Offset Offset is the value to adjust multi-nozzles combination printing. If multi-lines printing couldn’t keep consistent in the vertical direction, need adjust offset of the two nozzles. 5.1.3 Nozzle setting ①Ink Type :... -
Page 13: Counter Setting
parameters according to different ink type. When tick Auto Selected, it could adjust parameters automatically; ②Nozzle select : according to printing content, could choose printing nozzles as need. There are four nozzles to select; ③Flash Spray Settings: When machine starts or stops working, could open this in case of ink blocking. -
Page 14: System Settings
5.3 System Settings ①Language: Choose system language in menu, it will reboot automatically after changing language. ②Date Time: current time of system ③Backlight: adjust backlight of screen ④WiFi: could connect wifi to upgrade machine system ⑤ Calibrate: when machine screen touch is not accurate, use a mouse to insert USB interface, and click Calibration to correct screen touching. -
Page 15: Administer
5.4 Administer Could check OEM ID, software version, hardware number, ink type, remaining, voltage, print pulse, ink ID and ink expire date. -
Page 16: Parameters Of Different Ink Type
6.Parameters of Different Ink Type Ink type Print pulse(μs) Voltage(V) JW11 10.5 JS10 JS12 JS21 JS30 / JS31 JS41 JS50 / JS51 JS50 / JS61 JS70 / JS71 UV10 / UV20 * The actual value is subject to the lab... -
Page 17: Packing List
7. Packing List... -
Page 18: Editing Info Examples
8.Editing Info Examples ①Click File → Edit → Time → Type( choose yyyy/mm/dd, there are many time types to select). Then choose font, adjust size and position; ②Click Time → Type( hh:mm:ss), system will become to system time. Adjust font and size and position. -
Page 19: Multi-Nozzles Combination Printing Examples
9.Multi-nozzles combination printing examples Make Nozzle1 and Nozzle 2 combination print as example. Could use the similar method to adjust Nozzle 3 and Nozzle 4. Normal Printing Example1: The first line comes out earlier than the second line. Figure 1 When multi-nozzles combination printing shows effect as Figure1, the first line comes out earlier than the second line. - Page 20 Example2: The first line comes out later than the second line. Figure 2 When multi-nozzles combination printing shows effect as Figure2, the first line comes out later than the second line. Ways of how to adjust it to normal effect: 1.
- Page 21 Example4: Two lines have coincident part in combination printing Figure 4 When multi-nozzles combination printing shows effect as Figure4: Two lines have coincident part. Ways of how to adjust it to normal effect: 1. Stop printing and keep conveyor speed and printer speed unchanged. 2.
Need help?
Do you have a question about the TX4 and is the answer not in the manual?
Questions and answers