
Summary of Contents for Coolingstyle Technology CS-MRC-Q420AC01
- Page 1 User manual Applicable product model: CS-MRC-Q420AC01 CS-MRC-Q420AC02 CS-MRC-Q580AC01 CS-MRC-Q580AC02 Shenzhen Coolingstyle Technology Co., Ltd.
-
Page 2: Table Of Contents
Contents 1. APPEARANCE ....................2 2. BASIC PARAMETERS ..................3 3. OPERATION INSTRUCTIONS ................4 3.1 I ........................... 4 NSTALLATION 3.2 D ........................5 ISPLAY ETTING 3.3 D ) ..................8 ATA INTERFACE DESCRIPTION OPTIONAL 3.4 F ................. 8 AULT CODE AND OUTPUT PORT DESCRIPTION 4. -
Page 3: Appearance
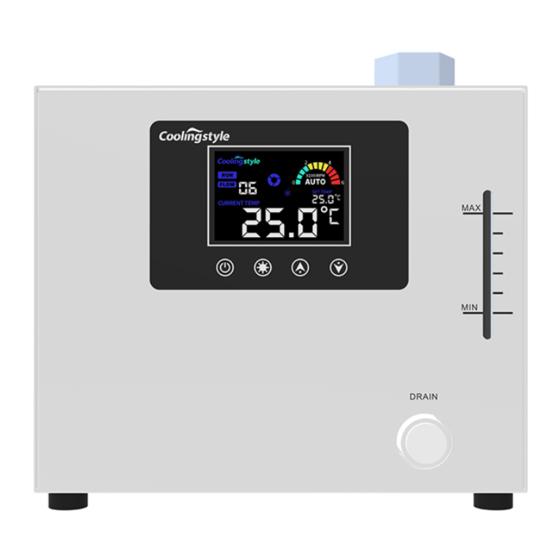
1. Appearance... -
Page 4: Basic Parameters
Basic parameters Model CS-MRC-Q420AC01 CS-MRC-Q580AC01 CS-MRC-Q580AC01 CS-MRC-Q580AC02 Rated Voltage / Frequency / 220V/50Hz/1Φ Phase Rated Power 250W 260W 280W 300W Maximum Power 320W 330W 350W 370W 580W Nominal Cooling Capacity 420W Temperature Range 10~35℃ Temp Accuracy ± 0.1℃ Refrigerant R134a... -
Page 5: Operation Instructions
3. Operation instructions 3.1 Installation Please follow the steps when the chiller is used for the first time: 1. Open the package and check if the machine is in good condition and the accessories are complete. 2. Open the cap and add water. Add pure water or other clean antifreeze until it is above the minimum liquid level. -
Page 6: Display Setting
3.2 Display Setting The display screen is divided into a display area and an operation area, as shown in the figure above. Display area includes: RUN, STOP, ERROR, CHILLING, HEATING. Etc. Working indication: when lit, it means the chiller is on (the AUTO indicator in the upper right corner lights up at the same time, indicating that the water temperature is under automatic control);... - Page 7 (For products without flow monitoring function, this mark will not light up). This area displays 2 types of contents: a) During normal operation, the real-time flow will be displayed; for example: "06" means the flow is 6.0~6.9L/min, press the "up" key to display one decimal place. b) In the fault state, the fault code is displayed.
- Page 8 follows: On/Off button: Press to turn on/off the chiller. Setting button: click to enter the setting interface. The real-time flow area shows: “F0”, and each time pressing the set button, this area will cycle to display “F0”, “F1”, “F2”, “F3” these 4 codes. "F0" means that the target temperature can be set at this state;...
-
Page 9: Data Interface Description(Optional)
There are 2 functions of this button: a) In the setting interface, click this button, the set value (F0-F3) will decrease, and the value will decrease continuously when pressed for a long time. b) In the state of E5 or E6 failure (see section 3.4), click this button, the buzzer alarm will be turned off for 10 minutes (the fault code displayed on the screen will not be eliminated, only the sound will be turned off). - Page 10 Error code Failure description Buzzer Signal pin 1, 2 Signal pin 1, 3 Normal Disconnection Connection Temperature sensor Alarm repeating Connection Disconnection failure Temperature sensor 2 times alarm Connection Disconnection failure repeating Insufficient liquid 3 times alarm Connection Disconnection level in water tank repeating Flashing The flow is lower than the...
-
Page 11: Precautions
4. Precautions Please ensure that the working voltage of the machine is stable, the power frequency is matched, the rated voltage of the machine is 220-240V, and the frequency is 50HZ. Make sure that the power outlet is in good contact and that the ground wire is reliably grounded. - Page 12 Replace the circulating water every 45 days (to be drained in the shutdown state). Touch display is made of glass, do not press hardly to prevent the display from shattering. When shutting down, please turn off the chiller by the button first, then cut off the power after the pump stops.
-
Page 13: Simple Troubleshooting
Simple Troubleshooting Fault Reason Troubleshooting Check the power connector, whether the Power contact is not power cord plug is plugged in and in good good contact. Turn on the chiller but the power is not connected Glass fuse tube is Replace the fuse inside the power blown connector on the back of the machine... - Page 14 The set temperature is too high when the It shows over-low temperature power is turned on, alarm (E6 error code is and the water The system will adjust automatically displayed) temperature in the water tank is too low. The water temperature is much Condensed water condensation is lower than the...
-
Page 15: Daily Maintenance
6. Daily Maintenance 1. Clean the air inlet filter regularly, once a month is recommended; 2. Regularly replace the circulating water, once every 45 days is recommended. The drain port is a quick-connect female connector. Open the cap of the filler and connect the standard male connector to the drain port to perform drainage operation. - Page 16 Shenzhen Coolingstyle Technology Co., Ltd. BLDG H, Gangzhilong Technology Center, Longhua Area, Shenzhen, Guangdong, China. Tel: +86 29952987 Website: www.coolingstyle.com Email: info@coolingstyle.com...
Need help?
Do you have a question about the CS-MRC-Q420AC01 and is the answer not in the manual?
Questions and answers
How to reduce chiller temperarure