Table of Contents
Advertisement
Quick Links
Advertisement
Table of Contents
Troubleshooting

Summary of Contents for EuroCaravaning VANTourer 2021
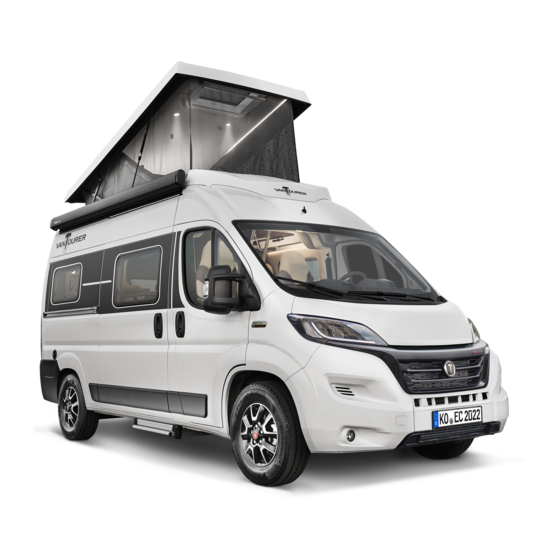
- Page 1 MANUAL From model year 2021 www.vantourer.de...
- Page 2 This Operating Manual is only valid in so far as the motorhome/caravan corresponds to the technology and specifications described within. For this reason, the EuroCaravaning GmbH & CO KG cannot accept any claims made on the basis of this operating manual.
-
Page 3: Table Of Contents
TABLE OF CONTENTS Table of contents Foreword ................. . 10 Introduction . - Page 4 TABLE OF CONTENTS Before setting off ................24 Using the vehicle for the first time .
- Page 5 TABLE OF CONTENTS Driver's and passenger door ............... . 45 7.3.1 Opening/closing the driver’s door/passenger door from the outside .
- Page 6 TABLE OF CONTENTS Gas supply ................. 73 Notes on gas supply .
- Page 7 TABLE OF CONTENTS Heating, hot water & air con ..............92 12.1 Truma Combi D .
- Page 8 TABLE OF CONTENTS 18.6 Cleaning and care of roof lights and roof windows ..........116 18.7 Cleaning and care of the awning .
- Page 9 TABLE OF CONTENTS Information & tips ............... . . 142 22.1 Emergency accessories to be carried by motorhomes (Germany) .
-
Page 10: Foreword
FOrEwOrd Foreword NOTE! This operating manual is only valid for the VANTourer model. Introduction ‹ Congratulations on your new VANTourer vehicle. Your "holiday home on wheels" has been designed and manu- factured to give you the maximum possible enjoyment. ‹ Please read through this Operating Manual carefully before using the vehicle for the first time to ensure you get the very best out of your vehicle. -
Page 11: Vehicle Data
FOrEwOrd Vehicle data The following vehicle specifications are particularly important when making enquiries or ordering spare parts: Model: For this reason, please enter the Type: model, type, year of manufacture and the chassis number of your VANTourer motorhome/caravan Year of manufacture: in the fields shown opposite. -
Page 12: Safety Instructions
SAFETy iNSTruCTiONS Safety instructions This section contains safety instructions that must be followed when using the vehicle. List/explanation of utilised safety markings DANGER! This safety symbol appears when operating procedures must be observed in full to prevent “RISK OF PERSONAL INJURY”. CAUTION! This safety symbol appears whenever operating procedures must be fully observed to prevent the “RISK OF PROPERTY DAMAGE”. -
Page 13: Safety Regulations For Participation In Road Traffic
SAFETy iNSTruCTiONS Safety regulations for participation in road traffic ‹ The vehicle must be officially registered. ‹ The driver must have an appropriate driving license. In Germany, the maximum speed permitted for vehicles is: up to 3.5 t total weight Within built-up areas... above 3.5 t total weight up to 3.5 t total weight Outside built-up areas... -
Page 14: General Safety Instructions
SAFETy iNSTruCTiONS ‹ Before beginning the journey, check that the vehicle doors, all doors inside the vehicle, the cabinet doors, drawers and flaps as well as all windows and roof lights are closed. ‹ The refrigerator door must be completely closed and locked with the door latch. ‹... -
Page 15: Safety Instructions For Fitting Rear Carrier Systems
SAFETy iNSTruCTiONS ‹ Be aware of the headroom of the vehicle doors. ‹ Close all doors and windows when leaving the vehicle. Safety instructions for fitting rear carrier systems For safety reasons, only have rear carrier systems (e.g. bike racks) fitted by authorised specialist workshops. Your local VANTourer- dealer will be happy to direct you to a specialist workshop in your area. - Page 16 SAFETy iNSTruCTiONS DANGER! ) To avoid damage to persons and/or property, always ensure any additional gas-operated appliances installed at a later point in time are equipped for an operating pressure of 30 millibar [mbar]. ) Do not use gas-operated appliances with varying connection pressures. ) No additional gas-operated appliances must be connected under any circumstances.
-
Page 17: Safety Instructions For The Electrical System
SAFETy iNSTruCTiONS ) Only use pressure regulators with a safety valve! Other regulators are not permitted! Carefully connect the regulator to the gas cylinder by hand (do not use spanners, pliers or similar). The screw fitting on the gas regulator has a left- hand thread. -
Page 18: Emergency Power Generator
SAFETy iNSTruCTiONS 2.8.2 Emergency power generator CAUTION! ) Prevent damage to the electronics by avoiding voltage fluctuations when operating the emergency power generator! ) Pay attention to the device manufacturer's specifications when using an emergency power generator! Fire safety 2.9.1 Prevention of fire hazards ) All repairs and modifications to the electrical or LPG systems and equipment must be carried out by trained personnel! ) Never leave any children inside the vehicle alone or unattended. -
Page 19: In Case Of Fire
SAFETy iNSTruCTiONS 2.9.3 In case of fire ) Evacuate all vehicle occupants! ) Switch off the electrical power supply and disconnect from the mains! ) Immediately close the gas cylinder stop valve! ) Fight the fire if this is possible without risk! ) Sound the alarm and call the fire service! ) Be aware of the location and use of emergency exits! ) Keep emergency exits clear! -
Page 20: Environmental Notes
SAFETy iNSTruCTiONS 2.12 Environmental notes ) Collect all operating fluids (e.g. lubricants, spent oil and detergents) in suitable containers and dispose of properly! ) Never dispose of waste water of any kind or domestic refuse in the gutter or in the countryside. ) Only empty the waste water tank and the toilet cassette at specially designated disposal facilities. -
Page 21: Safety Instructions For Using The Beds
SAFETy iNSTruCTiONS 2.14 Safety instructions for using the beds DANGER! Do not exceed the maximum load for the beds to rule out any risk of the bed collapsing! See on the right for a list of all beds and their maximum loads. Type of bed Max. -
Page 22: Description & Equipment
dESCriPTiON & EquiPmENT Description & equipment Base vehicle A FIAT Ducato chassis is used as the base vehicle for the VANTourer motorhome. NOTE! For further information on the base vehicle, please refer to the separate operating manual provided by the manufacturer of the base vehicle. Gas locker ‹... -
Page 23: Kitchen Range
dESCriPTiON & EquiPmENT Kitchen range ‹ The kitchen range is fitted with a cooker, a sink and a refrigerator. Apart from that, the kitchen range provides plenty of space to put down and store things as well as storage compartments above the kitchen range. ‹... -
Page 24: Before Setting Off
BEFOrE SETTiNg OFF Before setting off Using the vehicle for the first time DANGER! Read all safety instructions in this Operating Manual carefully before using the vehicle! CAUTION! ) The first time you use the vehicle, check the wheel bolts/wheel nuts are still tight after driving about 50 km and re-tighten if necessary. -
Page 25: Loading The Vehicle
BEFOrE SETTiNg OFF Loading the vehicle DANGER! Risk of accident and damage to the vehicle Loading the vehicle incorrectly will have a negative impact on the driving characteristics of the vehicle and may cause accidents or damage to the vehicle. ) Do not exceed the permissible maximum laden mass and the permissible axle load as indicated in the registration certificate (vehicle documents) when loading the vehicle. -
Page 26: Loading The Bike Rack (Optional Accessory)
BEFOrE SETTiNg OFF ) The maximum permissible roof load is 75 kg. ) The roof bars (optional accessory) may only be used to carry roof loads, such as surfboards, inflatable boats or light canoes! ) Transverse bars can be attached to the roof bars (optional accessory). The maximum load of the transverse bars is 50 kg. -
Page 27: Gps Tracker (Optional Accessory)
VANTourer dealer. GPS tracker (optional accessory) Your vehicle is equipped with a GPS tracker. Despite the installation of the GPS tracker, EuroCaravaning GmbH & CO KG cannot be held liable in case of loss or theft of the vehicle. NOTE! Charge the internal battery of the GPS tracker every 2 months by switching on the 12-volt power supply... -
Page 28: Tyres
BEFOrE SETTiNg OFF Tyres DANGER! ) Damaged tyres are a hazard and must be attended to immediately! There is a possibility of losing control of the vehicle if a tyre blows. ) When the vehicle is fully laden, tyres may burst if not inflated to the correct pressure. You may lose control of the vehicle as a result! ) Always check tyre pressures with cold tyres. -
Page 29: Snow Chains
BEFOrE SETTiNg OFF Snow chains If you have any questions about snow chains, please contact an authorised dealer or the rim manufacturer. NOTE! You will find further information on snow chains in the separate Operating Manual supplied by the manu- facturer of the base vehicle. -
Page 30: Seat Heating (Optional Accessory)
BEFOrE SETTiNg OFF Vehicle seat: Backrest adjustment Turn the handwheel (Fig. 1, item 4) backwards or forwards to adjust the backrest backwards or forwards. Vehicle seat: Armrest adjustment To move up the armrest, swivel up with light pressure. Use rotary unit (Fig. 1, item 3) to set the armrest height. NOTE! You will find further information in the separate Operating Manual supplied by the manufacturer of the base vehicle. -
Page 31: Operating The Seat Heating
BEFOrE SETTiNg OFF NOTE! ) Modification or decommissioning of the seat heating may only be carried out by a specialist workshop. ) It is not possible to remove the seat heating whilst maintaining its functionality. 4.9.1 Operating the seat heating The seat heating switch is located on the dashboard to the left and right of the ventilation grilles. -
Page 32: Child Seat
BEFOrE SETTiNg OFF 4.10 Child seat 4.10.1 Universal child seat DANGER! Risk of injury If the child seat is not correctly fastened to the passenger seat, there is an increased risk of injury for the child. ) Deactivate the passenger air bag! ) Move the passenger seat backward as far as possible! ) Adjust the passenger seat as high as possible! Group... -
Page 33: Isofix Child Seat
BEFOrE SETTiNg OFF 4.10.2 ISOFIX child seat CAUTION! Damage to the child seat or vehicle seat When installing or removing a child seat equipped with Top Tether, the vehicle seat may be damaged. ) Follow the instructions in the operating manual provided by the manufacturer of the child seat. ) Use child seats equipped with Top Tether only on seats that have retaining eyelets. -
Page 34: Electrically Operated Entrance Step - Entrance Door (Optional Accessory)
BEFOrE SETTiNg OFF 4.11 Electrically operated entrance step – entrance door (optional accessory) DANGER! Danger of accident and injury If the main switch on the on-board control is switched off, the electrically operated entrance step will not work and will remain in the final position. There is thus a risk of falling when leaving the vehicle through the entrance door or the sliding door. -
Page 35: Vehicle Check Before Setting Off
BEFOrE SETTiNg OFF 4.14 Vehicle check before setting off Perform an inspection of the vehicle (see section “23.1 Checklist before setting off”) each time before setting off. DANGER! Risk of injury or damage to the vehicle Payload that is not securely tied down and unlocked drawers, flaps and covers may cause injury or damage the vehicle in the event of sudden braking. -
Page 36: During The Journey
duriNg ThE jOurNEy During the journey Driving your vehicle DANGER! ) Carrying persons in the living area of the vehicle while moving is principally allowed according to German traffic regulations. However, these persons must be seated on the designated seats. ) Persons sitting in the living area of the vehicle and facing forward, the driver and the person sitting on the passenger seat in front must wear their 3-point seat belts during the journey. -
Page 37: Refuelling The Vehicle
duriNg ThE jOurNEy Refuelling the vehicle DANGER! Risk of explosion when refuelling the vehicle Fuel is highly flammable and can cause severe burns and other injuries. ) Switch off all gas-operated built-in appliances. ) Keep away from fire and open light. ) Smoking is prohibited. -
Page 38: Refuelling Diesel Fuel
duriNg ThE jOurNEy 5.2.1 Refuelling diesel fuel The tank filler neck for diesel fuel is located behind the fuel filler door (Fig. 4, item 3) next to the driver's door. Opening the tank filler neck Push in the fuel filler door (Fig. 4, item 3) and swing the door open. -
Page 39: Filling Up Adblue
duriNg ThE jOurNEy 5.2.2 Filling up AdBlue® DANGER! Risk of chemical burns from AdBlue® AdBlue® is an irritant and a corrosive liquid that can cause injury if it touches the skin, eyes or respiratory organs. ) Observe the instructions when using AdBlue®. If used according to instructions, it is unlikely that a user will come into contact with AdBlue®. -
Page 40: After The Journey
AFTEr ThE jOurNEy After the journey Parking brake DANGER! When parking the motorhome, apply the parking brake by pulling it up as far as it will go, especially on inclines. Pitching the vehicle Apply the parking brake as far as it will go. Align the vehicle in the direction of travel (e.g. -
Page 41: General Notes On The Awning
AFTEr ThE jOurNEy 6.3.1 General notes on the awning The following points should be remembered when using the canvas blind: ) Do not place the canvas blind on the weather side. ) Do not pull the canvas of the blind too tightly, but only just straighten it. ) Keep oil and grease away from the canvas fabric. - Page 42 AFTEr ThE jOurNEy Set the awning crank handle to the required length and fit it into the awning mechanism. Extend the awning by about 1 metre by turning the handle anticlockwise. Open out both awning support legs and adjust to the correct length. Now extend the awning fully while adjusting the support legs so that they are always at right angles to the ground.
-
Page 43: Living
LiviNg Living Ventilating the vehicle DANGER! Risk of suffocation If the vehicle does not have a continuous exchange of air with the surrounding air, there is an acute danger to life due to an increased carbon monoxide concentration in the breathing air. ) Never cover or obstruct the built-in safety ventilation openings (forced ventilation) in the roof lights (Fig. -
Page 44: Central Locking
LiviNg Central locking The driver and passenger doors as well as all entrance doors can be locked and unlocked centrally using a remote control in the ignition key. CAUTION! Risk of injury when the metal insert springs out! ) Only press the unlock knob of the ignition key when the key is far enough away from the body, especially from the eyes and objects that can be damaged. -
Page 45: Driver's And Passenger Door
LiviNg Driver's and passenger door 7.3.1 Opening/closing the driver’s door/passenger door from the outside Opening Insert the key in the door lock and turn anticlockwise, position “A”. The key jumps back to its initial position. Remove the key. Pull the door handle and open the door. Closing Close the door gently, insert the key in the door lock and, with slight pressure against the door, turn clock-... -
Page 46: Sliding Door
LiviNg Sliding door 7.4.1 Opening/closing the sliding door from outside Opening Unlock the door lock with the remote control. Pull the door handle and slide the door open until it locks in the end position. Closing Pull the door handle and release the door from the end position lock, then slide the door closed. -
Page 47: Flyscreen Blind, Sliding Door
LiviNg 7.4.3 Flyscreen blind, sliding door CAUTION! Damage to the flyscreen door The flyscreen door can be damaged by the handle of the sliding door. ) Open the mosquito protection blind completely before closing the sliding door. Fig. 12 Flyscreen blind, sliding door 109-0006-08EN - 21/09... -
Page 48: Opening/Closing The Two-Part Rear Door
LiviNg Opening/closing the two-part rear door DANGER! Risk of injury For vehicles that come equipped with a bike rack, there is a risk of injury when opening and closing the rear doors. ) Open and close the rear doors carefully. CAUTION! Damage to the vehicle There is a risk of damaging the rear door windows when opening and closing the rear doors. -
Page 49: Opening/Closing The First Door Leaf From Inside
LiviNg 7.5.2 Opening/closing the first door leaf from inside Opening Pull on the door handle and open the door. Closing Pull the door closed with the door handle. Fig. 14 Opening/closing first wing of two-wing rear door from inside 7.5.3 Opening/closing the second door leaf Opening Pull the handle to position “A”... -
Page 50: Midi-Heki
LiviNg Midi-Heki CAUTION! ) Do not tread on the acrylic glass dome! ) The glass dome should be closed fully and the blackout blinds opened before commencing your journey and when laying up the vehicle for lengthy periods of time! ) Contact your local Service Centre if the Heki develops any problems or faults! ) Any snow, ice and other obstructions must be removed before opening the glass dome! ) Do not open the glass dome in high winds, rain or snow. -
Page 51: Opening/Closing The Roof Light
LiviNg Opening/closing the roof light The roof light can be opened on one side to a maximum angle of 70°. Opening Grip the middle of the transverse bar (Fig. 17, item 1) with one hand and pull downward. Hold the transverse rod (Fig. 17, item 1) pulled down and slide the roof light until it has reached the desired opening angle. -
Page 52: Opening/Closing The Quarter Vents
LiviNg Opening/closing the quarter vents The quarter vents are fitted with an automatic catch mecha- nism. When opened, the quarter vents automatically engage in the desired position. Opening Turn the locking lever (Fig. 18, item 1) to position B. Open the quarter vent to the desired position. The tele- scopic strut (Fig. -
Page 53: Variable Seat Bench (Optional Accessory)
LiviNg The illustration opposite shows the left front window blind in extended position. ) To make the inside of the vehicle completely dark, also extend the right front window blind and join it with the left blind at the rear-view mirror. Fig. -
Page 54: Tables
LiviNg 7.11 Tables 7.11.1 Hook-in table DANGER! Risk of injury When the vehicle is moving, the hook-in table may come loose and could lead to injury if the vehicle brakes suddenly. ) Before setting off, remove the hook-in table and stow it away safely. Moving the table Lift the table top (Fig. -
Page 55: Flat-Screen Tv (Optional Accessory)
LiviNg Swivelling the table top Pull the knob (Fig. 23, item 4) down. Swivel the swivelling table top (Fig. 23, item 3) until the knob latches in place. Moving the table Lift the table top (Fig. 23, item 2) on the right-hand side. Slide the lifted table along the guide rail (Fig. -
Page 56: Swivelling And Height-Adjustable Flat-Screen Tv
LiviNg 7.12.1 Swivelling and height-adjustable flat-screen TV DANGER! Risk of crushing when swivelling the TV bracket ) Take care when swivelling the TV bracket. CAUTION! Damage to the flat-screen TV ) Before starting your journey, swivel the flat-screen TV back to its original position and secure with the locking screws. -
Page 57: Sliding Flat-Screen Tv
LiviNg 7.12.2 Sliding flat-screen TV CAUTION! Damage to the flat-screen TV ) Before starting your journey, slide the flat-screen TV back to its starting position and lock it in place. ) Before lowering the lifting bed, push back the flat-screen TV and click it into place. NOTE! You will find information on operating the flat-screen TVs in the separate Operating Manual supplied by the manufacturer. -
Page 58: Kitchen Range
LiviNg 7.13 Kitchen range 7.13.1 Sink DANGER! Risk of injury When the vehicle is moving, the unfastened kitchen sink cover may lead to injury if the vehicle suddenly brakes. ) Before starting your journey, remove the kitchen sink cover and stow it away safely. Depending on the vehicle equipment, the sink is equipped with a cover. -
Page 59: Bathroom Cubicle
LiviNg 7.14 Bathroom cubicle 7.14.1 Vario bathroom CAUTION! Damage to the vario bathroom Risk of damage to the vario bathroom door when the vehicle is moving! ) Close and lock the door before setting off with the vehicle. 10900531 Fig. 28 Vario bathroom Opening the vario bathroom Open the lock (Fig. -
Page 60: Mirrors
LiviNg Setting up the shower Remove the floor plate (Fig. 28, item 2) and slide it into the holder under the rear bed (Fig. 28, item 5). Open the vario bathroom (see 7.14.1). Close the shower curtain completely. Removing the shower Wait until the shower curtain is completely dry and then open it. Close the vario bathroom (see 7.14.1). -
Page 61: Sleeping
SLEEPiNg Sleeping Depending on the layout, the vehicle comes equipped with a rear bed or a lifting bed (optional accessory). The seating group can also be converted into a bed in just a few simple steps. A double bed can be set up under the pop-up roof (optional accessory). -
Page 62: Extra Bed
SLEEPiNg 8.1.2 Extra bed Converting the seating group with swivelling hook-in table into an extra bed 10900534 Fig. 31 Conversion of an extra bed Turn the driver's seat (Fig. 31, item 6). The backrest should face the windscreen. Push the driver’s seat towards the steering wheel until the stop is reached. You may need to tilt the backrest. Lift the table top (Fig. - Page 63 SLEEPiNg Converting the seating group with hook-in table into an extra bed Turn the driver's seat (Fig. 31, item 6). The backrest should face the windscreen. Push the driver’s seat towards the steering wheel until the stop is reached. You may need to tilt the backrest. Lift the table top (Fig.
-
Page 64: Rear Bed With Lounge Function
SLEEPiNg Rear bed with lounge function The vehicle is equipped with a double bed with lounge function in the rear. DANGER! Danger of falling and risk of injury ) Before opening the rear doors, make sure the anti-fall guards have been attached to the rear beds correctly. -
Page 65: Lifting Bed (Optional Accessory)
SLEEPiNg Lifting bed (optional accessory) The vehicle may be equipped with a lifting bed in the rear as an optional accessory. In that case, the double bed does not have a lounge function. DANGER! Risk of injury ) Small children below the age of 3 may fall out of the lifting bed! ) The maximum capacity of the lifting bed of 100 kg per sleeping place must not be exceeded! ) Before using the lifting bed, the fall protection net must always be installed! CAUTION! -
Page 66: Pop-Up Roof (Optional Accessory)
SLEEPiNg Pop-up roof (optional accessory) DANGER! Risk of injury or damage to the vehicle When the vehicle is moving, the ladder may lead to injury or damage to the vehicle if the vehicle sudden- ly brakes. ) Store the ladder in a safe place during the journey. DANGER! Risk of accident An open or unlocked pop-up roof can come loose during the journey and lead to accidents. -
Page 67: Opening The Pop-Up Roof
SLEEPiNg NOTE! Information on handling To protect against burglary, always close the pop-up roof before leaving the motorhome. Do not squeeze the fabric bellows between the pop-up roof and vehicle roof. Do not leave the pop-up roof closed with wet fabric bellows for extended periods. Before placing the vehicle out of service, clean the pop-up roof and allow it to try completely. -
Page 68: Using The Bed
SLEEPiNg Open the turn locks (Fig. 38) on the right and left side: – Fold out the handle (Fig. 38, item 1) of the turn lock. – Release the turn lock by turning the handle anti- clockwise. – Release the movable hook of the turn lock (Fig. 38, item 2) from the permanently fitted counterpart (Fig. - Page 69 SLEEPiNg Anti-fall guard DANGER! Risk of injury If the bed is not properly secured, people could fall out of the bed. ) As soon as there are people on the bed, install the anti-fall guard correctly. ) Children are not allowed to use the bed unattended.
- Page 70 SLEEPiNg Open the zip fasteners (Fig. 40, item 1). Bundle fabric bellows together and fasten with the hook-and-loop straps (Fig. 40, item 2). To return the equipment to its original position, proceed in the reverse sequence. 10900509 Fig. 40 Convertible function NOTE! When closing the zip fasteners, make sure that they are not under tension (Fig.
-
Page 71: Closing The Pop-Up Roof
SLEEPiNg 8.4.3 Closing the pop-up roof Close all zip fasteners on the fabric bellows completely. Unhook the anti-fall guard and stow it under the mat- tress. Remove any bulky objects from the bed. NOTE! 10900541 The bedding can remain in place if it is laid out Fig. - Page 72 SLEEPiNg Close the quick-release buckles (Fig. 45, item 2) on the right and left side. 10. Unlock and unhook the ladder. 11. Stow away the ladder in a safe place. 12. If the pop-up roof is closed, stow the fabric bellows so that it does not protrude from the access hatch.
-
Page 73: Gas Supply
gAS SuPPLy Gas supply Notes on gas supply 9.1.1 Instructions for using the gas system DANGER! Risk of explosion ) Repairs and modifications to the gas system may only be carried out by an authorised specialist work- shop! ) It is essential to follow the safety instructions and safety information when using the gas system or gas appliances! ) Altering the gas system or appliances yourself is prohibited and dangerous! ) The only intervention that the customer is allowed to do, is connecting the pressure regulator to the gas... -
Page 74: Lpg
gAS SuPPLy NOTE! ) The complete gas system in the vehicle is designed for an operating pressure of 30 mbar (millibar)! ) At altitudes exceeding 1,000 m, malfunctions may occur when igniting gas for reasons of physics. This however does not mean that the appliance is not functioning properly. ) The gas system should be checked every 2 years by a gas engineer. -
Page 75: General Information On Gas Consumption
gAS SuPPLy CAUTION! Damage to the vehicle or gas cylinders If gas cylinders are stored in the rear garage, inside the vehicle or unsecured in the gas locker, they may become damaged or they may damage the vehicle. ) The gas cylinders may only be kept in the gas locker. ) Store the gas cylinders in the gas locker in an upright position and secured firmly with the straps provided. - Page 76 gAS SuPPLy Close the gas cylinder shut-off valve (Fig. 46, item 1). Unscrew the connecting piece with hose rupture protection push button (Fig. 46, item 3) from the gas cylinder by hand (caution: left-hand thread). Detach the fastening strap (Fig. 46, item 4) and take the empty gas cylinder out of the gas locker.
-
Page 77: Water Supply
wATEr SuPPLy Water supply 10.1 Fresh water supply NOTE! ) The water supply corresponds at least with the state of the art of 03/2009 (Directive 2002/72/EC). ) Water from the fresh water tank should be used as drinking water only if it is certain that at the time of filling the water had, and still has, drinking water quality. -
Page 78: Filling The Fresh Water Tank
wATEr SuPPLy 10.2 Filling the fresh water tank DANGER! Germ formation in drinking water Germs in drinking water can lead to diseases. ) Only user water with drinking quality to fill the fresh water tank. ) When filling the fresh water tank with a water hose, only use a drinking water hose certified by KTW and DVGW [German Technical and Scientific Association on Gas and Water]. -
Page 79: Draining The Water System
wATEr SuPPLy 10.4 Draining the water system CAUTION! Damage to the water system The water system can be damaged by freezing water. ) The entire water system should be completely drained if you intend not to use it for a longer time, especially before the vehicle is laid up for the winter. -
Page 80: Reducing Weight For Driving
wATEr SuPPLy 10.6 Reducing weight for driving The contents of the fresh water tank can be reduced to 20 litres. Open the cover to the fresh water tank. Turn the drain valve (Fig. 49, item 1) clockwise until water comes out. Do not open the drain valve all the way, as the fresh water tank will empty. Allow fresh water to drain until the reduced filling level has been reached. -
Page 81: Power Supply
POwEr SuPPLy Power supply 11.1 General information The vehicle is equipped with a 230-volt circuit and a 12-volt circuit (direct current). All appliances operated on the vehicle’s 12-volt supply system can be operated independently of an external 230-volt power supply. Appliances which can only be operated with 230 ... -
Page 82: 230-V Power Supply (Mains Voltage)
POwEr SuPPLy 11.2 230-V power supply (mains voltage) You can connect your vehicle to an external power supply of 230 Volt (mains voltage). The CEE connector is located behind a flap on the outer wall of the vehicle. Establishing/disconnecting the electrical connection between the vehicle and the power source CAUTION! When using a cable drum without a thermal safety cut-out, fully unwind the electric cable... -
Page 83: Electric Unit
POwEr SuPPLy 11.3 Electric unit The electric unit is located under one or two cover(s) on the left-hand side of the vehicle in a box under the rear bed. The electric unit is used for the safeguarding and distribution of the 230-volt and 12-volt circuits, and for further control and monitoring functions. -
Page 84: Distribution Box
POwEr SuPPLy 11.3.2 Distribution box The electrical appliances in the living area connected to the 12 Volt power supply are protected by separate wire fuses in distribution box (Fig. 52, item 4). The distributor box controls the charging process of the living area battery and starter battery. 11.3.3 Charger The charger is the central energy supply device for all 12-volt appliances in the vehicle’s electrical system. - Page 85 POwEr SuPPLy On-board control PC 110 100% 10900518 1 Button “Charging status living area battery” 2 Button “Charging status starter battery” 3 LED row “Fresh water tank level” 4 “Waste water tank full” indicator 5 Indicator light “Alternator charging the starter and living area batteries” 6 Indicator “230 Volt mains connected”...
-
Page 86: Living Area Battery
POwEr SuPPLy 11.6 Living area battery Depending on the layout, equipment or model, the living area battery is either located on the left-hand or right-hand side of the vehicle, in a box below the rear bed. All 12-volt appliances in the living area are powered by the living area battery when the system is set to 12-V operation. DANGER! Risk of chemical burns, formation of an explosive gas mixture ) No work may be performed on maintenance-free batteries. -
Page 87: Charging The Living Area Battery And The Starter Battery
POwEr SuPPLy 11.7 Charging the living area battery and the starter battery When the vehicle is connected to the 230 Volt power supply, both the living area battery and the starter battery are automatically charged via the charger. The starter battery is only charged with a trickle charge. While the engine is running, the living area battery and the starter battery are both charged by the vehicle’s alternator. -
Page 88: Installing Or Removing The Living Area Battery
POwEr SuPPLy 11.8 Installing or removing the living area battery DANGER! Short circuit or sparks Installing or removing the living area battery may cause a short circuit or sparks. ) When removing the living area battery, first detach the negative lead (black) before disconnecting the positive lead (red). -
Page 89: Example Calculation Of The Energy Consumption
POwEr SuPPLy 11.10 Example calculation of the energy consumption The calculation below is based on a power supply via a 80 Ah battery. These values are approximate and depend on the model. ENERGY BALANCE SUMMER WINTER Appliance Power Current hrs/day Power Current per hrs/day Power... -
Page 90: External 230-Volt Power Supply Via Emergency Power Generator (Optional Accessory)
POwEr SuPPLy 11.11 External 230-volt power supply via emergency power generator (optional accessory) CAUTION! Damage to the electrical system Voltage fluctuations occurring during the operation of the emergency power generator may cause damage to the electrical system of the vehicle. ) Avoid voltage fluctuations during operation via the emergency power generator. -
Page 91: Usb Charging Ports (Optional Accessory)
POwEr SuPPLy 11.12 USB charging ports (optional accessory) CAUTION! ) Only devices that are suitable for that purpose may be connected to the USB charging ports. ) These devices must be designed for a voltage of 5 volts. Some models are equipped with USB charging ports (Fig. 55, item 1) in the living area. -
Page 92: Heating, Hot Water & Air Con
hEATiNg, hOT wATEr & Air CON Heating, hot water & air con 12.1 Truma Combi D The vehicle is equipped with a Truma Combi D 6 diesel heater. The heater is located inside the bench seat. The integrated hot water boiler holds 10 litres. In winter, the water is heated when the heating system is operated. In sum- mer, the water may be heated separately from the heating system. -
Page 93: Heating And Water Heating
hEATiNg, hOT wATEr & Air CON CAUTION! Draining the living area battery Even when the Truma Combi or water pump is switched off, a few milliamperes of current will be constantly drawn from the living area battery. ) Switch the main switch on the on-board control off for longer periods of absence (see section “11.5 On-board control”). -
Page 94: Setting The Operating Mode Using The Cp Classic Control Element
hEATiNg, hOT wATEr & Air CON 12.1.2 Setting the operating mode using the CP classic control element The CP classic control element is installed in the area of the sliding door. 1 Rotary knob room temperature, continuously adjustable, step 1-5 (illuminated by green "Operating" LED) 2 Rotary switch 3 Green "Operating"... -
Page 95: Summer Operation
hEATiNg, hOT wATEr & Air CON 12.1.2.1 Summer operation Only generate hot water Set the rotary switch (Fig. 58, item 2) to the desired water temperature of 40 °C or 60 °C (Fig. 58, item 4). When the set temperature is attained, the heating element will switch off and the yellow LED (Fig. 58, item 8) will go out. -
Page 96: Cp E Classic Energy Selector Switch (Optional Accessory)
hEATiNg, hOT wATEr & Air CON 12.1.3 CP E classic energy selector switch (optional accessory) For vehicles with Truma Combi D and the CP classic control element, the CP E classic energy selector switch is additionally installed in the area of the sliding door. Selecting electric operation (230 volts) Combi E Turn the rotary knob (Fig. -
Page 97: Selecting The Operating Modes Using The Truma Cp Plus Control Element (Optional Accessory)
hEATiNg, hOT wATEr & Air CON 12.1.4 Selecting the operating modes using the Truma CP plus control element (optional accessory) The Truma CP plus control element (optional accessory) is installed in the area of the sliding door. Rotary push button (Fig. 60, item 8) serves to select menus or to change the values to be set. -
Page 98: Heating: Emptying The Hot Water Boiler
hEATiNg, hOT wATEr & Air CON 12.3 Heating: Emptying the hot water boiler 12.3.1 Truma FrostControl The Truma FrostControl is located in the area of the heating system. Truma FrostControl is an overpressure relief valve and drain valve with frost protection function which is operated without using electrical power. -
Page 99: Heating The Fresh Water Tank And Waste Water Tank
hEATiNg, hOT wATEr & Air CON NOTE! ) When the heating is off, the Truma FrostControl can only be closed at temperatures above 7 °C! ) When temperatures drop to about 3 °C and lower at the Truma FrostControl, this will open automatically and drain the content of the water lines. -
Page 100: Cooking & Baking
COOKiNg & BAKiNg Cooking & baking 13.1 Gas cooker DANGER! Risk of suffocation When the ventilation devices are blocked, a fatal concentration of gas may build up within the vehicle. ) Never cover the forced ventilation openings in the roof lights, mushroom vents and entrance area. ) Clean the ventilation equipment in regular intervals. - Page 101 COOKiNg & BAKiNg CAUTION! Damage to the kitchen area adjacent to the gas cooker Flames glinting beyond the gas cooker may damage adjacent walls, the panelling of the furniture, faceplates, curtains, blinds or other items. ) When placing the cookware (pots, pans, woks, etc.), make sure that they are placed in the centre of the burner grate and that the flames do not flare beyond the cookware.
- Page 102 COOKiNg & BAKiNg NOTE! ) A flame with an indistinct pattern is a sign of poor combustion, and we therefore recommend annual servicing by a qualified specialist. ) If the thermocouple is bent or faulty, the burner will not operate correctly and the flame will keep going out even though the control knob is pressed for a long time.
-
Page 103: Refrigerator
rEFrigErATOr Refrigerator ‹ The refrigerator can be operated with the following operating modes (types of energy): 230 V 12 V ‹ The capacity of the refrigerator is indicated on the nameplate on the interior of the refrigerator. Operating the refrigerator The control knob in the refrigerator can be used to switch the refrigerator on and off and adjust the temperature. -
Page 104: Toilet
TOiLET Toilet Cassette CAUTION! Damage to the service cassette door If the wall flue of the vehicle is located next to the service cassette door, the opened cassette door is damaged during heating operation by the heated air! ) Close the service cassette door when the heating is activated. CAUTION! Damage to the toilet Frost can cause the cassette to freeze and damage the cassette. -
Page 105: Winter Camping
wiNTEr CAmPiNg Winter camping 16.1 General notes on winter camping If you plan to enjoy the freedom of camping in winter as much as in summer, here are some advices for you should to follow: ) After driving on roads that have been sprayed with salt, wash the underbody of the base vehicle with water. ) Find out as much as you can about weather and driving conditions before you set out and during your journey. -
Page 106: Additional Notes On Winter Camping
wiNTEr CAmPiNg 16.2 Additional notes on winter camping ) Secure the vehicle against rolling away and then release the parking brake to prevent it from freezing. ) Whenever possible place all cushions in the vehicle upright to ensure they are aired and dried. ) Use only 100 % propane in winter as butane will not gasify below freezing point. -
Page 107: Recommended Accessories For Winter Camping
wiNTEr CAmPiNg 16.3 Recommended accessories for winter camping To be equipped for any eventuality when winter camping, we recommend the following accessories: Remarks: Date: Winter cover refrigerator (optional accessory) Jump leads A bag of sand is always useful should you get stuck Flue extension (optional accessory) in snow Snow covers for roof lights (only for permanent... -
Page 108: Laying Up
LAyiNg uP Laying up DANGER! ) You should completely drain the water system even if you are only laying up the vehicle for a short period. Bacteria will grow in fresh water after just a few days, making the water undrinkable. For the fresh water tank, we recommend a disinfectant available from your VANTourer dealer. - Page 109 LAyiNg uP Empty the water system completely. Metal water taps must be left open when the water system has been emptied. Make absolutely sure the mixer lever is opened to both positions ("cold water” and "hot water”) and is then left open in one of these positions. Close gas cylinder shut-off valve.
-
Page 110: Laying Up The Vehicle Over Winter
LAyiNg uP 17.2 Laying up the vehicle over winter If the vehicle is laid up over the winter, the following steps are to be taken in addition to 17.1: Clear snow from the roof of the vehicle in case of snowfall. Heat and air the vehicle well once a month. -
Page 111: Using The Vehicle Again After Laying Up Temporarily Or Over The Winter
LAyiNg uP 17.3 Using the vehicle again after laying up temporarily or over the winter The following measures must be taken to put the vehicle back into service after it was temporarily laid up: Check function of all quarter vents, forced ventilation openings and roof lights, and lift and tilt roofs (Heki). Check the function of all locks on the service hatches and vehicle doors. -
Page 112: Cleaning & Care
CLEANiNg & CArE Cleaning & care 18.1 General information Regular and properly advised care helps preserving the value of the vehicle. You can purchase the required cleaning and care products from VANTourer dealers or specialised shops. Please follow the instructions for use on the packaging. DANGER! Danger to health or risk of poisoning Cleaning and care products can be harmful or toxic when not applied correctly. -
Page 113: Cleaning And Care Of The Vehicle Exterior
CLEANiNg & CArE 18.2 Cleaning and care of the vehicle exterior CAUTION! Damage to the window panes If an agent containing alcohol is used for cleaning or, in winter, for de-icing, the vehicle's acrylic glass window panes (PMMA) will get damaged! ) Do not use cleaning agents or de-icing agents containing alcohol for the acrylic glass (PMMA) window panes! To maintain the high quality of the finish, observe the following information on care:... -
Page 114: Cleaning Plastic Parts On The Outside Of The Vehicle
CLEANiNg & CArE 18.2.1 Cleaning plastic parts on the outside of the vehicle ) Products made of plastic and/or GRP products can be cleaned gently using warm water with the addition of a weak acidic, neutral or weak alkaline cleaner. ) You can use low concentrations (< 2 %) of mild household cleaners dissolved in water. -
Page 115: Cleaning Plastic Parts Of The Vehicle's Interior
CLEANiNg & CArE NOTE! Sunshine can cause plastic parts in the interior of the bathroom cubicle to turn yellow over time. This is not however a quality defect. 18.3.1 Cleaning plastic parts of the vehicle’s interior DANGER! Working with concentrated acids is dangerous and should be avoided! To remove calcium deposits, use commercially available acids only (e.g. -
Page 116: Cleaning And Care Of Stainless Steel Surfaces
CLEANiNg & CArE 18.4 Cleaning and care of stainless steel surfaces ) Clean all stainless steel surfaces (e.g. sink) only with common household cleaners. CAUTION! Metallic objects may not be placed for a longer period of time on stainless steel surfaces (e.g. sinks) due to the risk of contact corrosion! 18.5 Cleaning the acrylic glass windows in the vehicle body and the roof scoop... -
Page 117: Cleaning And Care Of The Awning
CLEANiNg & CArE ) Never use aggressive cleaners (solvents/scouring agents). ) The ventilation grilles and light covers can be removed for cleaning. ) Only clean acrylic glass (glass dome) and frame elements with a damp cloth and mild soap solution, if necessary use a special cleaner (at your own risk). -
Page 118: Regular Cleaning
CLEANiNg & CArE 18.8.1 Regular cleaning ) Clean or vacuum the fabric bellows and mosquito net with a soft brush at regular intervals when they are dry. Recommendation: after every long journey where the pop-up roof was used and at the end of the camping season. -
Page 119: Re-Impregnation Of The Fabric Bellows
CLEANiNg & CArE 18.8.4 Re-impregnation of the fabric bellows An impregnation contains environmentally-friendly microcides to protect the textile as much as possible from the forma- tion of mould. However, the approved impregnating agents do not act universally against all microorganisms. Therefore, the care and cleaning of textiles are of particular importance. -
Page 120: Maintenance & Inspection
mAiNTENANCE & iNSPECTiON Maintenance & inspection 19.1 Maintenance work In the interest of road safety, the vehicle must be maintained as regularly and carefully as a normal passenger car. CAUTION! ) Carrying out maintenance work requires specialist skills and knowledge. This is why you should only have servicing performed by a specialist workshop! ) The service centre will stamp your Customer Service Record Book to confirm that the leak tests on all tanks and pipes, hoses etc. -
Page 121: Superstructure Maintenance Plan
mAiNTENANCE & iNSPECTiON 19.3 Superstructure maintenance plan Just like any other technical equipment, your vehicle also needs to be properly maintained and serviced from time to time. The scope and frequency of this work depends first and foremost on the conditions under which the vehicle is used and operated. -
Page 122: Troubleshooting And Fault Rectification
TrOuBLEShOOTiNg ANd FAuLT rECTiFiCATiON Troubleshooting and fault rectification DANGER! For your own safety, have repairs on the base vehicle carried out by an authorised specialist workshop, especially repairs and adjustments to the brake system! 20.1 Replacing the illuminants of the rear lights DANGER! Risk of injury due to electric shock When the caravan is connected to the 230-volt mains, there is a risk of electric shock. - Page 123 TrOuBLEShOOTiNg ANd FAuLT rECTiFiCATiON Depending on the equipment of the vehicle, different covers are used. The illustrations may differ from the actual appearance. Disconnect the 230 volt power supply. Remove mattresses or cushions if necessary. Remove the protective caps (Fig. 63, item 1) from the cover (Fig.
-
Page 124: Changing A Wheel
TrOuBLEShOOTiNg ANd FAuLT rECTiFiCATiON Loosen both nuts (Fig. 65, item 2) of the rear light with the tool in the onboard toolkit (Fig. 65, item 1) and remove them by hand. Carefully remove the rear light from the vehicle. 10. Unscrew the screws of the inner lamp socket and pull out lamp socket. -
Page 125: Towing
TrOuBLEShOOTiNg ANd FAuLT rECTiFiCATiON NOTE! You will find further information in the separate Operating Manual supplied by the manufacturer of the base vehicle. 20.3 Towing 20.3.1 Towing the vehicle CAUTION! Damage to the chassis and the superstructure If the tow rope or the tow bar are not attached to the towing eye for towing the vehicle or if the towing rope used does not have sufficient tensile strength, the chassis and the body will get severely damaged! ) Only use the front towing eyelet for towing the vehicle. -
Page 126: Towing With The Vehicle
TrOuBLEShOOTiNg ANd FAuLT rECTiFiCATiON 20.3.2 Towing with the vehicle CAUTION! Damage to the chassis and the superstructure Towing other vehicles with the vehicle if the vehicle is not equipped with a trailer hitch will result in severe damage to chassis and body. ) Towing other vehicles with the vehicle is only permitted if the vehicle is equipped with a trailer hitch. -
Page 127: Troubleshooting Tables
TrOuBLEShOOTiNg ANd FAuLT rECTiFiCATiON 20.4 Troubleshooting tables ) Troubleshooting should be carried out by reference to the following Troubleshooting table. ) If you are unable to correct faults yourself, you should contact customer service at your local VANTourer service centre or the respective appliance manufacturer (heating = Truma or Alde, refrigerator = Dometic or Thetford, toilet = Thetford etc.). - Page 128 TrOuBLEShOOTiNg ANd FAuLT rECTiFiCATiON TRUMA COMBI HEATER/HOT WATER BOILER with CP classic control element The Truma CP (E) classic control element indicates faults using green, yellow and red LEDs that either light up or flash. You will find further information on what the various LED signals mean in the separate operating manual supplied by the device manufacturer.
- Page 129 TrOuBLEShOOTiNg ANd FAuLT rECTiFiCATiON GAS COOKER Fault Cause Action No ignition, flame goes out when Ignition detector defective. Contact customer service. control knob is released. Flame goes out on "Low Flame” Ignition detector sensor Adjust ignition detection sensor setting. not correctly adjusted. correctly (do not bend!).
- Page 130 TrOuBLEShOOTiNg ANd FAuLT rECTiFiCATiON POWER SUPPLY Fault Cause Action Living area battery not charging Automatic circuit breaker switched Reset automatic circuit breaker. when connected to 230 Volt mains. off. Green LED on the on-board control Fuses 2 A or 20 A in charger Replace defective fuse.
- Page 131 TrOuBLEShOOTiNg ANd FAuLT rECTiFiCATiON POWER SUPPLY Fault Cause Action Water pump without function. Main switch (Fig. 54, item 9) or Switch appropriate switch on. water pump switch (Fig. 54, item 10) on the on-board control switched off. Fuse in distribution box defective. Replace fuse.
- Page 132 TrOuBLEShOOTiNg ANd FAuLT rECTiFiCATiON WATER SUPPLY Fault Cause Action No fresh water. Fresh water tank empty. Fill fresh water tank. Fuse in distribution box defective. Replace or press in defective fuse. Water pump defective. Have the water pump replaced by customer service at your local VANTourer service centre.
- Page 133 TrOuBLEShOOTiNg ANd FAuLT rECTiFiCATiON REFRIGERATOR Fault Cause Action Refrigerator does not switch on in Refrigerator fuse in distribution box Replace the fuse. 12-volt operation. defective. Battery is discharged. Charge battery. Always make sure the battery is charged. 109-0006-08EN - 21/09...
- Page 134 TrOuBLEShOOTiNg ANd FAuLT rECTiFiCATiON Seat heating Fault Cause Action The heating does not work even Fuse defective. Check and replace the fuse. though it is switched on. The fuse for the seat heating is lo- The LED does not light up. cated in the FIAT battery box on the driver's side.
-
Page 135: Technical Data
TEChNiCAL dATA Technical data 21.1 Vehicle dimensions Please refer to the registration certificate (vehicle documents) for the technical data (engines, weights, dimensions etc.). NOTE! ) Dimensions and weights may vary within ± 5 % due to the use of natural raw materials. ) The weights and dimensions specified in the registration certificate (vehicle documents) do not include any additional equipment. -
Page 136: Payload
TEChNiCAL dATA 21.2 Payload DANGER! ) Do not exceed the permissible maximum laden mass of the vehicle as specified in the registration certificate (vehicle documents). ) An overloaded vehicle may veer out of control while driving. ) Load the vehicle according to section “4.3 Loading the vehicle”. ) Before starting the journey, weigh the completely loaded vehicle on a public weighbridge. -
Page 137: Determining The Payload Weight
TEChNiCAL dATA 21.2.3 Determining the payload weight 21.2.3.1 Optional accessories This includes all items that are available in addition to the standard equipment. 21.2.3.2 Personal equipment Personal equipment comprises articles carried on the vehicle over and above the optional accessories such as: Pets Food, drink Clothing, shoes... -
Page 138: Weights Of The Equipment And Accessory Packages
TEChNiCAL dATA 21.2.5 Weights of the equipment and accessory packages The following table lists the weights of the different VANTourer equipment and accessory packages. The empty lines below this can be used to enter further accessories which are installed in your vehicle. You will find the weight specifications in the VANTourer price list. -
Page 139: Weights Of Personal Equipment
TEChNiCAL dATA 21.2.6 Weights of personal equipment Use this page to enter and add up the weight of the personal equipment you carry along. Remarks: Date: Page Total weight of the personal equipment on board Copy if necessary 109-0006-08EN - 21/09... -
Page 140: Total Weight Of The Vantourer Accessories And The Personal Equipment
TEChNiCAL dATA 21.2.7 Total weight of the VANTourer accessories and the personal equipment DANGER! The total (sum of the VANTourer accessories plus all persons on board plus personal equipment) must never exceed the specified maximum load capacity. NOTE! Once you have entered into the list and added up all weights – that of the VANTourer accessories, all persons on board and the personal equipment –... -
Page 141: Tyre Pressure And Wheel Bolt Tightening Torque Table
TEChNiCAL dATA 21.3 Tyre pressure and wheel bolt tightening torque table Tyre pressure [bar or kg/cm Size of Size of Tyre size alloy wheel rims steel wheel rims Front Back Spare wheel 235/60 R17 C 71/2 J x 17 – The specified tyre pressure values apply to cold tyres and a fully laden vehicle. Tab. -
Page 142: Information & Tips
iNFOrmATiON & TiPS Information & tips NOTE! ) All stipulations made in this chapter are only applicable in Germany. ) For journeys abroad, the regulations in the specific country are to be observed. 22.1 Emergency accessories to be carried by motorhomes (Germany) Accessories to be carried Motorhome Motorhome... -
Page 143: Reflective Vest Mandatory (Europe)
iNFOrmATiON & TiPS 22.4 Reflective vest mandatory (Europe) NOTE! Equip your vehicle in accordance with the legal requirements. For journeys abroad, the regulations in the specific country are to be observed. 22.5 Provisions governing road tolls (Europe) Road toll charges are nowadays applicable in many European countries. The provisions governing road tolls and the method of collection vary between countries. -
Page 144: Checklist
ChECKLiST Checklist 23.1 Checklist before setting off Check the motorhome according to the following checklist before starting each journey: Remarks: Date: Page Have you got all the vehicle documents (including the green insurance card) on board, and have all passengers got their travel documents (passports, ID cards, children’s passports etc.)? Check that travel documents are still valid in good time! Have you got all the necessary documents (health and vaccination certificates) for pets with you? Information on the necessary documents can be obtained from the relevant consulate, the tourist office or an automobile club. -
Page 145: Checklist For Personal Entries
ChECKLiST Checklist for personal entries 23.2 Remarks: Date: Page Copy if necessary 109-0006-08EN - 21/09... -
Page 146: Index
iNdEx Index Cleaning and care of roof lights and roof windows ......116 Cleaning and care of stainless steel surfaces ....... . 116 0 - 9 Cleaning and care of the vehicle exterior . - Page 147 iNdEx Filling the fresh water tank ........... .78 Ignition key .
- Page 148 iNdEx Obtaining replacement keys ..........34 Rating plate .
- Page 149 iNdEx Tables ............... . .54 Waste water disposal .
- Page 150 NOTES...
- Page 151 NOTES...
- Page 152 NOTES...
- Page 153 Angelestraße 56 - D-88214 Ravensburg info@tef.de – www.tef.de Printed on paper bleached without the use of chlorine...
- Page 154 Art.-Nr. R0410P51648 - EN EuroCaravaning GmbH & Co. KG Im Metternicher Feld 5-7 D – 56072 Koblenz Germany www.vantourer.de...
Need help?
Do you have a question about the VANTourer 2021 and is the answer not in the manual?
Questions and answers