Advertisement
- 1 Introduction
- 2 Daily maintenance
- 3 Handling Precautions
- 4 Safety Precautions
- 5 Part Names
- 6 Operation panel
- 7 Accessories
- 8 Loading and replacing paper
- 9 Removing and charging the battery pack
- 10 Connection
- 11 How to remove a paper jam
- 12 Regular cleaning
- 13 TEST PRINT
- 14 Specifications
- 15 Documents / Resources
Introduction
- Please carefully read this operation manual before use and save it for future use.
- The contents of this manual are subject to change without notice. Reproducing this operation manual in part or in whole without notice is strictly prohibited.
- Do not handle, clean, disassemble or repair any other parts than those instructed in this operation manual.
- Please note we will not be responsible for any damages caused by customer mishandling or the use environment.
- Do not conduct operations that are not described in this operation manual. They may cause accidents or failure.
- Data cannot be stored long-term, permanently or saved since it is basically evanescent. We are not responsible for any damages because of data deletion or lost income due to breakdown, repair or inspection.
- Please contact us if you find any descriptions unclear or anything which seems to be mistyped or mistranslated.
- Be aware that we are not liable for any effects resulting from operations according to this manual regardless of the items above.
Daily maintenance
- Turn off the main unit power to conduct maintenance. If the battery is installed, remove it.
- When you clean the platen roller, remove trash and dust with cotton-tipped swabs moistened with ethanol or isopropyl alcohol.
- When cleaning the surface of the main body case, wipe off the dust and unclean parts with a soft and dry cloth. For very unclean parts, gently wipe with a lightly wrung wet cloth. Do not use any alcohol (except isopropyl alcohol), thinner, trichloroethylene, benzene, ketone series of organic solvent or chemically treated cloth.
- When the main body gets dirty with paper dust, clean with a soft-bristled brush, etc.
- The thermal head and motor become very hot. Do not touch them right after printing.
Handling Precautions
Since the handling below may cause failure, be sure to follow the cautions below:
- Do not print without setting paper.
- Do not drop or insert foreign objects such as paper clips, pin or screws inside the main unit.
- Do not spill liquids such as water and coffee or spray medical agents, etc.
- Do not step on, drop, hit or strongly jolt or impact the unit.
- Do not conduct operations of the operation panel with sharp items such as pen tips, etc.
- Do not attempt continuous usage of the paper by connecting the paper with scotch tape, etc.
- Do not forcedly pull the paper loaded in the printer with your hands.
- Be careful not to injure your body or other objects at the edge of the plating.
- If an abnormality occurs during use, stop use immediately and unplug the power cord from the outlet.
- Only qualified servicepeople can disassemble this printer.
- Be careful not to pinch your hand or fingers when opening and closing the paper cover.
- When not using this unit for a long time, unplug the power cord from the outlet and remove the battery. Also, leave the paper loaded to protect the platen roller.
- Be sure to use the provided AC adapter, the provided AC power cord and the specified battery.
Safety Precautions
The following symbols are used in this manual in order to care for the printer properly, prevent the printer from being damaged and protect users.
 | Failure to follow the guidelines marked with this symbol could result in severe personal injury or death. |
 | Failure to follow the guidelines marked with this symbol could result in minor personal injury or product and/or peripheral damage. |
 | Do not attempt to disassemble or modify this unit. Injury may occur due to ignition or abnormal operation. |
 | If smoke, a strange odor or noise occurs, immediately turn off the power switch and disconnect the power plug from the AC outlet. Continuing to use the printer may cause a fire or electric shock due to a short circuit. |
| | If you drop the printer or give it a jolt or strong impact, immediately turn off the power switch and disconnect the power plug. Continuing to use the printer may cause a fire or electric shock due to a short circuit. |
| | Unplug the power plug before installing, removing or cleaning accessories and consumables. Failure to do so may cause electric shock or injury. |
| | Do not use a damaged power cord, power plug or loose outlet. Failure to do so may cause electric shock, short circuit or fire. |
| | Hold the plug, not the cord, when unplugging the power cord. This will prevent scratching the power cord, resulting in a fire or electric shock. |
| | Do not touch the power plug or battery with wet hands. Inserting or removing the power plug with wet hands may cause electric shocks. |
 | If liquid or foreign matter enters the unit, turn off the power switch and remove the power plug from the AC outlet. Continuing to use the printer may cause a fire or electric shock due to a short circuit. |
| | Do not drop or put metal pieces into the gaps in the printer. Also, do not spill liquids such as water and coffee. This may cause a fire, electric shock or printer malfunction. |
 | Do not use this unit where there is excessive humidity or water may be splashed. This may cause a fire, electric shock or printer malfunction. |
| | Do not touch the thermal head immediately after printing because the thermal head may be hot. Make sure that the thermal head is cool before replacing or cleaning the paper. |
 | When disconnecting the power cord or interface cable from the connector or outlet, hold the connector. Pulling on the cable may cause a malfunction. |
 | In the following cases, turn off the power using the power switch, remove the power plug from the outlet and remove the battery. If used in an abnormal condition, it may cause an accident or fire.
|
 Installation Precautions
| Do not install in the following locations: It may cause an electric shock, fire or adversely affect the printer.
|
when using the battery pack
| | When the battery pack is in the following state, remove the battery pack from the printer and stop using it and keep it away from fire. Otherwise, it may cause leakage, heat generation, explosion and ignition resulting in fire.
|
| | Do not attempt to perform disassembly, modification and soldering. Otherwise, it may cause leakage, heat generation, explosion and ignition resulting in fire. |
| | Do not throw the battery pack in a fire, heat the battery pack, or give a shock to the battery pack. Otherwise, it may cause leakage, heat generation, explosion and ignition resulting in fire. |
| | Do not touch or short-circuit the terminals. Do not soak the battery pack in water or place it in a place where water splashes. Otherwise, it may cause leakage, heat generation, explosion and ignition resulting in fire. |
| | If the liquid leaked from the battery pack gets in your eyes, immediately wash your eyes with clean water and receive medical attention. It can result in blindness. |
| | Do not use or store in the following locations. Otherwise, it may cause leakage, heat generation, explosion and ignition resulting in fire.
|
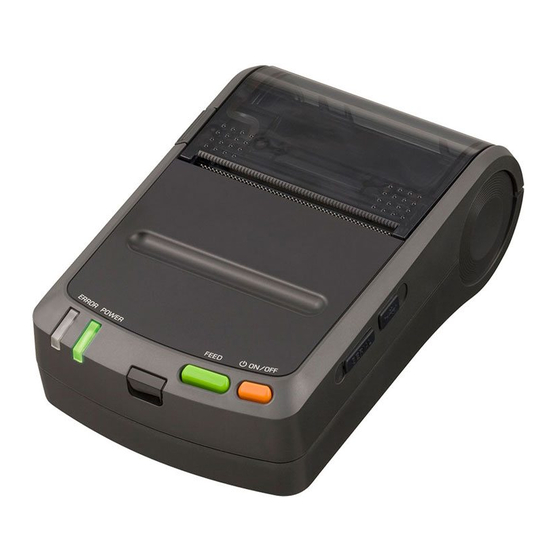
Part Names

Operation panel
- POWER LED
Lights up when the power is turned on and turns off when the power is turned off. The LED blinks or lights in special modes and errors. - FEED switch
Pressing the FEED switch will feed paper. - ERROR LED
The LED lights or blinks when there is no paper or an error occurs.
The type of status is categorized by the blinking interval. (See the table below.)
| LED display | ERROR LED (orange) | POWER LED (green) |
| Initialization is in progress | On | On |
| No paper | Blinking | On |
| Cover open error | Blinks twice | On |
| The battery is drained, power supply error | On | Blinking |
| Thermal head temperature error | On | Blinks twice |
| Charging is in progress | Off | Blinking |
| Function setting mode | On | Off |
| Hardware error * 1 | Blinking | Off |
*1 Please contact your dealer or us.
Accessories
Check the accessories when unpacking.
- Printer VZ-390
- AC power cord
- AC adapter
- Printer cable (The shape differs depending on the measuring instrument.)
- Battery pack
- Paper (thermal roll paper)
- Operating Manual (this document)
Loading and replacing paper

- Press the cover open button to open the paper cover.
- If the cover open button is not fully pressed, the paper cover may not open.
- When opening the paper cover, do not apply excessive force beyond the stop position.
- Remove the old paper core before inserting new paper.
- Set the paper orientation as shown. (If the front and back of the paper are not correct, it will not be printed.)
- The part with glue is not printed. Please remove all the glue.
- Use undeformed paper. Using deformed paper may cause printing defects or malfunctions.
- If the paper is slack, remove the slack.
- Pull the leading edge of the paper forward from the paper cutter and close the paper cover.
- Set the paper straight. If the paper cover is closed while the paper is tilted, it may cause edge folding or a paper jam.
- If the paper cover is not pressed near both ends, the lock may be incomplete and printing may not be performed.
- Since printing is not possible while the ERROR LED is lit up, be sure to close the paper cover.
- Be careful not to get your fingers or hands caught in the paper cover.
Removing and charging the battery pack

A rechargeable battery pack is installed in this printer. The battery pack can be charged by connecting the printer to an outlet. Though the battery pack may be slightly charged at the time of shipping, charge the battery pack by referring to the following before starting to use the battery pack.
- Remove the battery cover at the bottom of the printer.
- Disengage the claw locking the battery pack in the printer by hand. The battery pack will be pushed out by the spring. When inserting the battery pack, insert it from the terminal side and push it until it is locked by the claw.
- Attach the battery cover.
- Be sure to turn off the power when removing the battery pack.
- When not using for a long time, remove the battery pack from the printer.
- Refer to the section "6. Connection" to connect the AC adapter to the printer if it is not connected. When the power is turned on, initialization will start and then charging will start after the initialization is completed.
- Printing and data reception are available during charging.
- When charging is completed, the POWER LED stops blinking and stays lit.
When the battery is run out, it will take around 3 hours to fully charge the battery though the charging time varies depending on the ambient temperature and the condition of the battery pack.- When the power of the printer is off, the battery pack will not be charged.
- To stop charging, press the power switch. The power of the printer will be turned off and the charging will stop. To resume the charging, repeat operation from ④.
Connection
Connecting the AC adapter and AC cable
- Turn off the power switch.
- Plug the AC adapter cable connector into the power connector on the back of the printer.
- Connect the AC power cord to the AC adapter inlet; plug the AC power cord into a power outlet.
- Always hold the connector when connecting or disconnecting the AC adapter cable connector.
- Keep the AC power supply away from other noise generating devices.
- Pulling the power cord may damage the cord and cause a fire, electric shock, or disconnection.
- Keep the power cord away from heating equipment. Otherwise, the power cord covering may melt and cause a fire or electric shock.
- Install the cable so that your feet do not get caught in it.
Connecting the printer with a measuring instrument

- Turn off the power of the printer.
- Flip up the "SERIAL" cover of the interface connector and connect the printer cable.
- Turn the power of the printer on and transmit data from the measuring instrument.
How to remove a paper jam
If you press it with your hand while the paper is being discharged, it may cause a paper jam or a line feed failure. Follow the steps below to remove the paper.
- With the power off, press the cover open button to open the paper cover.
- Remove the jammed paper by pulling it by hand.
- Take care not to touch the thermal head because it is easily damaged.
- Set the paper straight and close the paper cover.
- Turn on the power switch.
- Immediately after printing, the thermal head is hot. Be careful not to touch it with your hands. Do not touch the surface of the heating element of the thermal head with your hands or metal.
- When loading paper, be careful not to cut your hands on the edges of the paper.
- Make sure that the ERROR LED is off.
Regular cleaning
Characters may not be printed partially due to paper dust or dirt. Depending on the frequency of use, clean at least once a month. Be sure to turn off the printer and remove the battery pack before cleaning.
Thermal head
Use a cotton swab soaked in ethanol or isopropyl alcohol to wipe off the black dust on the surface of the heating element.
- Make sure that the temperature of the thermal head is cool enough for cleaning.
- Take care not to damage the thermal head because it is easily damaged.
- If the printer is turned on before the thermal head dries, it may be damaged. Allow the printer to dry before turning on the printer.
Platen roller
Wipe the roller gently with a dry cloth to remove dust and dirt from the surface.
TEST PRINT
Simultaneously hold down the power switch of the printer and the FEED switch until the POWER LED lights up. When the POWER LED lights up, release your finger from the power switch first and then from the FEED switch in order. Test print with several dozen of lines will start.
Specifications
Printer
| Printing method | Thermosensitive method |
| Number of printing digits | 24 digits (when half width characters and spaces between characters are 4 dots) |
| Character size (Vertical x Horizontal) | Half width characters: 24 dots x 12 dots Full width characters: 24 dost x 24 dots |
| Number of effective dots | 384 dots |
| Dot density | 8 dots/mm |
| Printing width/paper width | 48/58 mm |
| Printing speed | Maximum 100 mm/sec |
| Operating environment temperature and humidity | Temperature: –10 to 50°C Humidity: 30 to 80% RH (no condensation) |
| Storage environment temperature and humidity | Temperature: –30 to 70°C Humidity: 5 to 90% RH (no condensation) |
| Power consumption | 0.102W (when the power is off) |
| Dimensions: | 83 (W) x 130 (D) x 45 (H) mm (excluding protrusions) |
| Mass | Approx. 280 g (including the battery pack) |
AC adapter
| Input voltage | 100 V - 240 V AC, 50/60 Hz |
| Rated output | 9.0 V DC, 4 A |
| Operating temperature | 0 - 40°C |
| Dimensions | 115 (W)×53 (D)×38 (H) mm (excluding cable) |
| Mass | Approx. 318 g |
Battery pack
| Battery used | lithium ion |
| Rated voltage | 7.4 V DC |
| Nominal capacity | 1600 mAh |
| Operating temperature | –10 to 50°C (when discharging), 0 to 40°C (when charging) |
Printer paper
| Paper width | 58mm |
| Roll outer diameter | 38 mm |
KETT ELECTRIC LABORATORY
1-8-1 Minami-Magome Ota-Ku, Tokyo 143-8507 Japan
Tel.+81-3-3776-1121 Fax.+81-3-3772-3001
URL http://www.kett.co.jp E-mail overseas @ kett.co.jp

Documents / Resources
References
Download manual
Here you can download full pdf version of manual, it may contain additional safety instructions, warranty information, FCC rules, etc.
Advertisement


Need help?
Do you have a question about the VZ-390 and is the answer not in the manual?
Questions and answers