Advertisement
Quick Links
〇エアツールを
安全に使用していただくための警告・注意
〇インパルスレンチを
安全に使用していただくための警告・注意
〇外観図/仕様/標準附属品
〇リバースレバーの操作方法
〇タッチジョイント締付トルク
〇スロットルノブの操作方法
〇トルクの調整方法
〇ソケットの取付け方
〇ビットの取付け・取外し方
〇点検とその処置
●このたびはヨコタ製品をお買い上げいただきまして、まことにありが
とうございます。
●ご使用の前に必ず本書をよくお読みになり、内容を十分にご理解の上、
正しくご使用ください。
●この取扱説明書は必ず保管してください。
インパルスレンチ取扱説明書
ピストル型/Sqタイプ・ビットタイプ
保 管 用
Y-41A/41B
Y-46/46E/46A/46B
Y-140/140E
目次
1〜8
18〜20
24〜27
28
28
29
30〜31
32
33
34〜35
Advertisement

Related Manuals for Yokota Y-41A


Summary of Contents for Yokota Y-41A
- Page 1 保 管 用 インパルスレンチ取扱説明書 ピストル型/Sqタイプ・ビットタイプ Y-41A/41B Y-46/46E/46A/46B Y-140/140E 目次 〇エアツールを 安全に使用していただくための警告・注意 1〜8 〇インパルスレンチを 安全に使用していただくための警告・注意 18〜20 〇外観図/仕様/標準附属品 24〜27 〇リバースレバーの操作方法 〇タッチジョイント締付トルク 〇スロットルノブの操作方法 〇トルクの調整方法 30〜31 〇ソケットの取付け方 〇ビットの取付け・取外し方 〇点検とその処置 34〜35 ●このたびはヨコタ製品をお買い上げいただきまして、まことにありが とうございます。 ●ご使用の前に必ず本書をよくお読みになり、内容を十分にご理解の上、 正しくご使用ください。 ●この取扱説明書は必ず保管してください。...
- Page 2 〇Mounting and removal of a bit 〇Checks and countermeasures 36〜37 ●Thank you very much for purchasing this YOKOTA product. ●Please be sure to thoroughly read this Instruction Manual and fully understand the instructions before use. ●Please be sure to retain this Instruction Manual at hand.
- Page 3 エアツールを安全に使用していただくための警告・注意 警告:下記項目内容を十分理解の上、本書をお読みください。 ■安全上の注意事項は、次の見出しを掲げております。いずれも安 全に関する重要な内容を記載していますので、必ず守ってください。 警告 …誤った取扱をしたときに、使用者が死亡または重症を 負う可能性が想定される場合。 注意 …誤った取扱をしたときに、使用者が障害を負う可能性 が想定される内容、および物的損害のみの発生が想定 される場合。 ※「 注意」に記載した事項でも、状況によっては重大 な結果に結びつく可能性があります。 ■本書はご使用される方が、いつでも利用できる場所に大切に保管し、 繰り返しお読みください。 ■本書および製品に貼付けされている警告ラベルを紛失または汚損 された場合は、弊社もしくはご購入の販売店を通じ、速やかにお 取寄せの上、正しく保管または貼付けしてください。 ■当製品を譲渡もしくは貸出される場合は、本書を必ず添付してく ださい。 お買い上げの製品または本書の内容について、ご質問がおありの場合は 弊社もしくはお買い上げの販売店までお問い合わせください。...
- Page 4 警 告 ■ご使用前に必ず本書をよくお読みになり、内容 を十分にご理解の上、正しくご使用ください。 注 意 ■エアツールを使用する前に準備頂くもの ●適正な配管設備をご準備ください。 配 管 略 図 枝パイプ 勾配1/100以上 ストップバルブ メインパイプ フィルタ レギレータ ルブリケータ ドレンタンク コンプレッサ カプラ 推奨内径のホース使用 配管は清浄で乾燥した圧縮空気を送るよう実施しなけれ ばなりませんので、いかにコンプレッサーを合理的に設 置しても配管に注意を怠りますと圧力降下、ドレンなど の悪影響により、出力の低下、および工具の早期破損を 生ずる原因となりますので十分にご注意ください。 圧力はコンプレッサーの近くと遠くとでは必然的に差が できるものですが、特に空気の流れの速い場合はかなり の値に達することがあります。これは一般に途中損失、 またはパイピングロスといわれるもので空気流とパイ プ、またはホースの内壁との摩擦による損失や外部への 洩れなどが原因です。 その圧力降下は管が大きくなれば減り、管の長さに損失 は比例するもので、上記配管略図のようにレシーバーか ら各々のパイプを経て、フィルタ、レギレータ、ルブリ ケータによってドレン、および塵埃などの除去、適正圧 力の確保、自動給油を行い、種々の悪影響を防ぎます。...
- Page 5 注 意 ●ドレンの除去 午前午後の作業開始前にドレンタンク内のドレンの除去 を行ってください。使用前にはエアホースの空吹かしを 行ってエアホース内のドレンを吹き出してから、エア ホースを接続してください。 注 意 ●適正な空気圧力で使用してください。 指定空気圧力以上での使用は製品の破損・事故の原因と なりますので、圧力計、減圧弁等を設置して、必ず適正 な空気圧力(無負荷時の配管動圧)で使用してください。 空気圧力の設定方法は、ツールから先端工具が取り外さ れている状態で、ツールを無負荷で作動させ、配管上の レギレータで設定してください。 ※指定空気圧力はP18参照 注 意 ●清浄で乾燥した圧縮空気を供給してください。 塵埃、ドレン等は故障および事故の原因となりますの で、清浄で乾燥した圧縮空気を供給するようにしてくだ さい。エアドライヤ、エアフィルタ等の設置をおすすめ します。 警 告 ●適正なエアホースを使用してください。 エアホースは耐油性で外面が耐摩耗性を有し、規定内径 で作業空気圧力に適合したものを使用してください。 また、老朽化したものや極端に長いもの(推奨長さ:5m 以内)は使用しないでください。 警 告 ●適切な周辺機器・アクセサリをご使用ください。 先端工具・ソケット・ビット・ドリル・砥石・チゼル・ ニードル等、動力工具に適合したものをご使用ください。 また安全で正しい使用方法に関して不明点や疑問のある 場合は、本機を使用する前にメーカーまたは販売店に必 ずご相談ください。...
- Page 6 警 告 ■作業環境について ●作業場は十分に明るくし、いつもきれいに保ってください。 暗い作業場や散らかった作業場は事故の恐れがありま す。照明等に留意し、整理整頓を心がけてください。 ●爆発の危険のあるところでは使用しないでください。 エアツールは引火や爆発の恐れがある場所では、危険で すので絶対に使用しないでください。 ●高所作業には十分注意してください。 エアツールの落下による事故を防止するため、高所での 作業時は安全ワイヤの使用等の落下防止策を講じてくだ さい。また足場の安全性を十分確認し、転落事故に注意 してください。 ●関係者以外は近づけないでください。 作業場所には作業関係者以外は近づけないでください。 特に子供は危険です。 ●騒音に注意してください。 騒音に関しては法令および各都道府県の条例で定める規 制があります。周囲に迷惑をかけないよう規制値以下で 使用されることが必要です。必要に応じ遮音壁等を設け てください。 騒音が作業者の位置にて85dB(A)を越える場合は、必 ず耳栓を使用してください。また85dB(A)以下の場合 についても、耳栓を使用されることをおすすめします。 警 告 ■作業保護具について ●作業保護具を使用してください。 人体保護のため、作業に応じヘルメット、保護めがね、耳栓、 防塵マスク、安全靴等の作業保護具を使用してください。 ●適した服装で作業してください。 ダブダブの服やネックレス等の装身具は着用せず、作業 に適した服装で作業してください。また、長い髪の毛が エアツールにかからないように、帽子等で覆ってください。...
- Page 7 警 告 ■エアツール使用時の基本的な注意事項について ●作業は十分注意して行ってください。 軽率な行動や非常識な行動および疲れている場合の使用 等はけがや事故の原因となりますので、油断しないで、 十分注意して作業を行ってください。 ●指定された用途以外に使用しないでください。 指定用途以外への使用は事故の原因になりますので、絶 対に行わないでください。 ●無理な使用は行わないでください。 過負荷での無理な使用は、エアツールの破損や故障の原 因となりますので、能力以内で使用するようにしてくだ さい。 ●エアツールの取扱は丁寧に行ってください。 乱暴な取扱は事故や故障の原因となりますので、エア ツールを投げたり落としたりして、衝撃を与えないよう にしてください。 ●エアホースの取扱は丁寧に行ってください。 エアホースをエアツールの支えや、上げ下げに使用しない でください。エアホースの破損は事故の原因となります。 ●使用した工具類は、必ず取外してください。 エア源とつなぐ前に、アクセサリ固定に用いたスパナ や、能力調整に用いた六角レンチ等の工具類が取り外し て有る事を確認してください。 ●エアコンプレッサ以外の動力源を使用しないでください。 エアツールはエアコンプレッサによる圧縮空気を動力源 とする工具です。圧縮空気以外の高圧ガス(酸素・アセ チレンガス・プロパンガス等)を使用すると爆発の危険 があります。...
- Page 8 ●エアホース取付け具は確実に取付けてください。 取付け不備によりエアホースがはずれた場合、エアの噴 射によりエアホースが飛び回り、非常に危険ですので、 エアホース取付け具はエアホースおよびエアツールに確 実に取付けてください。 ●エアホースの接続時はゴミ等の混入に注意してください。 エアホースを本機に接続する際は、必ずゴミやドレンが なくなるまでエアブローを行ってください。またエア ホース接続部のゴミ等は必ず取除いてから接続してくだ さい。 ●作業対象物をしっかりと固定してください。 作業対象物の固定が不十分な場合、作業対象物が飛んで けがをする恐れがありますので、確実に固定して作業を 行ってください。 ●可動部に手や布きれ等を近づけないでください。 使用中は非常に危険ですので、可動部に手や布きれ等を 絶対に近づけないでください。 ●電気に対し接触させないでください。 エアツールは電気との接触に対し絶縁されていませんの で、電気に対し接触させないように注意して使用してく ださい。 ●不意な始動を避けてください。 エアホースを接続する場合は、始動スイッチが停止位置 になっているかを確認してください。またエアツールを 持ち運びする場合は、始動スイッチに手をかけないでく ださい。 ●排気の方向には十分に注意してください。 エアツール作動時にはオイルミストが発生いたします。 またコンプレッサーや配管内の異物等も排出される場合 がございますので、排気が直接目や耳にあたらないよう に、排気方向に注意して使用してください。...
- Page 9 ●無理な姿勢での作業は危険です。 エアツールを確実に保持し、突発的な動きにも対応できる ようにして、安定した作業姿勢で作業を行ってください。 ●適切に休憩をおとりください。 長時間の連続作業は疾病等の原因となりますので、適当 に休憩をおとりください。また痛み等、身体に異常を感 じた場合は、直ちに使用を中止し、医師の診断を受け、 その指示に従ってください。 ●改造は絶対にしないでください。 改造を行っての使用は事故の原因になりますので、絶対 に行わないでください。また、純正部品以外の部品を組 み込むことも行わないでください。 ●部品を取外さないでください。 取付けてある部品やねじ類を取外しての使用は、事故の 原因になりますので、絶対に行わないでください。 ●エアツールに異常を感じた場合は直ちに使用を中止して ください。 使用中に異常を感じた場合は直ちに使用を中止して、点 検・修理を依頼してください。 ●危険が予測される場合はエアの供給を止め、エアホース をエアツールからはずしてください。 使用しない、または保守点検を行う場合や、先端工具・ 砥石・チゼル等の交換を行う場合、その他危険が予測さ れる場合は、必ずエアの供給を止め、エアホースをエア ツールからはずしてください。なお、自動的に圧縮空気 を遮断する保護装置(カップリング等)を使用していな い限り、エアホースを取外す場合は、まず元コックを締 め、エアホースへの圧縮空気の供給を止め、次に本機の バルブを開き、エアホース内の残存空気を排出してから 行ってください。...
- Page 10 警 告 ■保守・点検・修理について ●保管には十分な配慮を行ってください。 使用しない場合は、十分に手入れを行い、子供の手の届 かない、乾燥した場所に保管してください。 ●給油は大切です。 給油の効果として、エアモーター部、及びギヤ等の早期 磨耗を防ぎ、錆びの発生を抑制します。給油を怠ります と、故障の原因となるばかりでなく事故の恐れがありま すので、エアモータ部に1日2〜3回、TKa等油圧ユニット 搭載モデルにはコスモロックドリル46を、他のツールに はコスモ タービン32(タービン油 ISO VG32)を数滴給気 口より補給してください。自動滴下機能を有するルブリ ケータの設置をおすすめします。 ※上記推奨オイルは弊社で取り扱いできます。 ●使用前には必ず点検を行ってください。 使用前にはねじ部のゆるみや部品の損傷等がないか必ず 点検してください。性能の低下や故障の原因となるばか りでなく、危険をともなう恐れがあります。 ●保守・点検を必ず実施してください。 安全に効率良く作業していただくために、保守・点検を 怠らないでください。 ●先端工具等、周辺機器の点検を必ず実施してください。 先端工具(ソケット・ビット・ドリル・砥石・チゼル・ ニードル等)の周辺機器も安全に効率よく作業いただく ために、保守・点検を実施してください。先端工具等と 本体との接続部分も常に摩耗、破損等が無いか点検し、 必要なら交換もしくは修理を依頼してください。接続部 分に遊び、ガタつきの大きいものは、破損して怪我をする おそれがありますので、絶対に使用しないでください。 ●修理は弊社または弊社認定(指定)のサービス工場にご 依頼ください。 修理は弊社または弊社認定(指定)のサービス工場に、 お買い求めの販売店または代理店等を通じ、ご依頼くだ さい。お客様の勝手な処置により、事故や不具合が生じ た場合は責任を負いかねますので、あらかじめご了承く ださい。...
- Page 11 ■In cases where you lose this Instruction Manual or the warning label affixed to the product or make it dirty, immediately contact us or your YOKOTA representative to obtain the Manual or the warning label, and then properly retain the Manual or replace the warning label.
- Page 12 ■Be sure to thoroughly read this Instruction WARNING Manual and fully understand the instructions before use. ■Preparation before use of pneumatic tool ●Proper piping facility should be prepared. Schematic Piping Diagram Branch pipe Gradient: Not less than 1/100 Stop valve Main pipe Filter Regulator...
- Page 13 ●Elimination of drain CAUTION Before starting work in the morning and afternoon, elimi- nate drain from the drain tank. Before use, purge air through the air hose to eliminate drain from the air hose, and then connect the air hose to the pneumatic tool. ●Use this pneumatic tool at proper air pressure.
- Page 14 ●Do not use this pneumatic tool in places with an WARNING explosion hazard. NEVER use the pneumatic tool in places with explosion and fire hazards. Doing so could induce a hazardous situation. ●Pay careful attention to the work in high places To prevent accidents resulting from the drop of the pneu- matic tool, take drop preventive measures such as use of safety wire to work in high places using the pneumatic tool.
- Page 15 WARNING ■Basic precautions for use of this pneumatic tool: ●Pay careful attention to work. Hasty or thoughtless action or using the pneumatic tool when you are tired could result in injury or accidents. Use the pneumatic tool with your eye kept on and careful attention paid to it.
- Page 16 ●Securely mount air hose attachments. Disconnection of the air hose could cause it to fly about due to air jet, thus inducing an imminently hazardous situation. To avoid that, securely mount the air hose attachment to the air hose and the pneumatic tool, respectively.
- Page 17 ●Do not work in an improper body posture. Use the pneumatic tool in a stable working posture by securely holding it to be ready to respond to unexpected movement. ●Take a break as appropriate. Continuous work for an extended period of time could result in illness.
- Page 18 ■Maintenance, check, and repair WARNING ●Pay the adequate consideration to store the pneu- matic tool. Unless the pneumatic tool is used, store it in the dry place beyond children’s reach, giving it the enough maintenance. ●Lubrication is important. As the result of lubrication, the premature wearing can be prevented and appearance of rust also can be restricted on the air motor part, gear and so on.
- Page 19 ●For repair, ask us or our authorized (or designated) service factory. For repair of the pneumatic tool, ask us or our authorized (or designated) service factory through your YOKOTA dealer or distributor. Note that we are not responsible for any accidents or defects arising from customer’s arbitrary actions or measures.
- Page 20 インパルスレンチを安全に使用していただくための警告・注意 本機は、ボルト・ナット・ビス等の締付け作業を低振動・低騒音で行う ことを目的とした手持ち用エアツールです。 警 告 ■指定以外の用途、使用は重大な事故につながる おそれがあります。ご使用の前に必ず本書をよ くお読みになり、内容を十分にご理解の上、正 しくご使用ください。 注 意 ■使用前の注意事項 ●空気圧力(無負荷時の配管動圧)は0.4〜0.6MPa内の一 定圧力のもとでご使用ください。 ・ レギレータをご使用く ださい。 圧力の変動は発生トルクが不安定になる原因になります。 ●エアホースは規定内径のものをご使用ください。 規定内径以外のものは流量過不足を生じ能力や動作不良 の原因になります。 注 意 ■先端工具について ●先端工具は必ず動力工具用を使用してください。 手動用の先端工具を使用しますと、破損し、破片が飛散 する等、事故のおそれがありますので、本機に使用する 先端工具は、必ず動力工具用のものを使用してください。 ●ソケットのガタの大きいものは使用しないでください。 ●先端工具を取り付け、取り外し時は、エアホースを外し てください。 先端工具の取付け、取替え時は、必ず圧縮空気の供給を 止め、エアホースを取外してから行ってください。 なお、自動的に圧縮空気を遮断する保護装置(カップリ ング等)を使用していない限り、エアホースを取外す場 合は、まず元コックを締め、エアホースへの圧縮空気の 供給を止め、次に本機のバルブを開き、エアホース内の 残存空気を排出してから行ってください。 -18-...
- Page 21 ●ソケット、ビットは確実に取付けてください。 ソケット、ビットは取付け後、軽く引っ張って抜けない か確認してください。不確実な取付けは、ソケット、 ビットの破損や、本機の早期故障を招くばかりでなく、 事故の原因になりますのでご注意ください。 ●ソケット留め具は指定のものを使用してください。 ソケット留め具はソケットメーカーもしくは弊社指定の ものを使用してください。針金やくぎ等によるソケット 留め具の代用は非常に危険ですので、絶対に行わないで ください。 ●吊り下げは確実に行ってください。 本機をバランサ等にて吊り下げる場合は、本機の吊り環 にバランサ等の引っかけ具が、確実に取付けられている か確認してください。また吊り環および引っかけ具は、 定期的に損傷がないか点検し、必要なら交換してください。 注 意 ■使用時の注意事項 ●回転方向を必ず確認してください。 回転方向切換レバーの回転方向を、必ず確認してから始 動してください。また回転方向の切換は、必ず停止した 状態で行ってください。 ●ソケットはボルトに確実に挿入してください。 使用中にソケットがボルトよりはずれると非常に危険で すので、ソケットやビットは、ボルトおよびナットに確 実に挿入して使用してください。 ●ビットは確実にねじにあてて使用してください。 使用中にビットがねじよりはずれると非常に危険ですの で、 + 1 のビットで + 2 のねじ頭を締める等の誤った使 用は行わないで、必ずねじ頭にあったビットを使用して ください。またビットはねじ頭に対してななめにあてた りせず、必ず垂直にあてて使用してください。 ●反力に対する備えを怠らないでください。 締付け時に反力で振り回される危険がありますので、本 体を確実に保持し、反力に備えるようにしてください。...
- Page 22 ●無負荷の作動には注意してください。 無負荷で作動させる場合は、先端工具は必ず取り外され ている事を確認し、周囲に注意をしてください。 長時間の無負荷運転は、部品の焼き付きや、早期摩耗の 原因に成ります。 ●火傷に注意してください。 作業後の先端工具およびボルト、ナット等は熱くなって いることがありますので、不用意にふれて火傷をしない ようにしてください。 注 意 ■その他の注意事項 ●修理時以外はオイルプラグをさわらないでください。 早期オイル洩れの原因になります。 ●6ヶ月以上保管状態の製品を作動させる場合、打撃部の シール部分を損傷しオイル漏れを起こす可能性があります。 製品を長期保管される場合、6ヶ月毎に負荷を与える状態 でツールを作動させ、シール部が固着しないように定期 メンテナンスをお願いします。 弊社でも点検サービスを実施していますので、ご利用く ださい。 ●寒冷地、及び冬季の始業時には暖機運転を行ってください。 メインシャフトに負荷をかけて約10秒間暖機運転を行っ てください。 スリップ現象(パルスが発生しない)が起こる場合があ ります。 ※使用推奨温度 5℃〜40℃ バイス等 ●長いソケットや大きなソケットなどは、スリップ現象を 起こす原因になります。 -20-...
- Page 23 Warnings and cautions for impulse wrenches safely This tool is a hand-held pneumatic tool to tighten bolts, nuts and screws with low noise and vibration. ■ WARNING Using the pneumatic tool for any applications other than those specified could result in serious accidents.
- Page 24 ●Use a specified socket stopper. Use socket stoppers specified by Yokota or socket makers. Do not use wire, a nail and others as a substitute for a socket stopper, which can cause serious accidents.
- Page 25 ●Be careful with the operation of a tool at no load. When running the tool at no load, be sure that the tip tool was removed without fail and be careful about the surroundings. The operation at no load for a long time will be the reason for the part breakdown with seizure, early wear and so on.
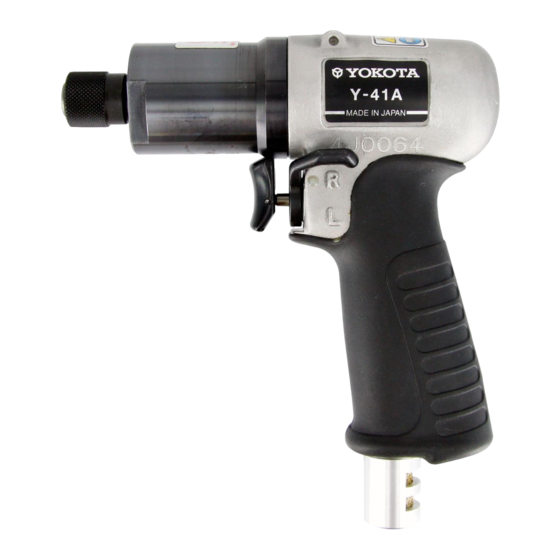
- Page 26 □Y-46 外 観 図 External View 標準附属品 Standard Accessories 全長 プロテクタ1個 Overall Length (about) Protector : 1 piece ヘキサゴンレンチ ( H5/32 ) 1個 Hex. Wrench (H5/32) : 1 piece ヘキサゴンレンチ1個 Hex. Wrench : 1 piece E型 (H2) Y-46 E Type ハンガ1個...
- Page 27 Protector : 1 piece ヘキサゴンレンチ ( H5/32 ) : Y-46A・B 1個 Hex. Wrench (H5/32) : 1 piece for Y-46A・B ヘキサゴンレンチ ( H4 ) : Y-41A・B 1個 Hex. Wrench (H4) : 1 piece for Y-41A・B ヘキサゴンレンチ1個 Hex. Wrench : 1 piece (H2) Y-46A・B/Y-41A・B ハンガ1個...
- Page 28 □Y-140 外 観 図 External View 標準附属品 Standard Accessories 全長 プロテクタ1個 Overall Length (about) Protector : 1 piece タッチジョイント ( 1/4 ) 1個 Touch Joint (1/4) : 1 piece ヘキサゴンレンチ ( H5 ) 1個 Hex. Wrench (H5) : 1 piece E型...
- Page 29 -27-...
- Page 30 ■リバースレバーの操作方法 How to operate a reverse lever リバースレバーをR(締め)L(ゆるめ)にまわして切替えてください。 回転方向の切替えは必ずモータが停止した状態で行ってください。 リバースレバーはR側またはL側の位置にきちんと合わせてください。中間の位 置では回りません。 Please turn a reverse lever to switch R (tightening) and L (loosening). Switching rotation direction should be made when the motor is in stop condition. Place a reverse lever to the positions of R or L properly. A tool does not rotate with the reverse lever set to the intermediate position.
- Page 31 ■スロットルノブの操作方法 How to operate a throttle knob 回転方向切替えレバーの回転方向を必ず確認してから始動してください。 Operate a tool after checking the direction of the switching lever. 2段リニア式スロットル機構装置 Two stage linear type throttle mechanism 1段目は低速回転し、1段目から2段目までス ロットルノブをゆっくり引くとそれに応じ て回転(負荷時では発生トルク)も徐々に あげることができます。 Two stage linear type throttle mechanism allows lower rotation at the first step and corresponding rotation (Torque generation in the event of load) can be gradually increased by pulling a throttle knob slowly from the first step to the second.
- Page 32 ■トルクの調整方法 How to adjust torque 六角穴付プラグ ハンマケース前部の六角穴付プラ Hexagon Plug グをヘキサゴンレンチで外してく ださい。 Remove the hexagon plug on the hammer case front part with a ヘキサゴンレンチ hexagon wrench. Hexagon Wrench ハンマケース Hammer Case トルク調整ネジ プラグ穴 トルク調整ネジ又はトルク調整用 Torque Adjustment Screw Plug Hole 丸穴がプラグ穴から見えるように メインシャフトを指で回します。 Turn the main shaft with fingers so that the torque adjustment screw or the round hole for the adjustment...
- Page 33 トルク調整ネジはいっぱいに閉めた トルク調整ネジ全閉 位置から1回転以上ゆるめた位置で Torque Adjustment の使用をお勧めします。全閉位置で Screw : full max 必要トルク は1パルス当たりのトルク値は大きく NecessaryTorque なりますが、パルス数は少なくなり、 トルク トルクの立ち上がりは遅くなります。 Torque トルク調整ネジ It is recommended to use a tool with 1回転ゆるめ the torque adjustment screw set at Torque Adjustment Screw : one turn loosened the position one turn loosened from from full max the maximum tightened position.
- Page 34 ■ソケットの取付け方 Mounting of a socket ピン穴 メインシャフトのピン穴とソケッ Pin Hole トのピン穴が合うようにソケット を取付けてください。 Mount a socket by aligning the socket pin hole over the main shaft pin hole. ソケット Socket メインシャフト Main Shaft ピン穴にピンを挿入します。 Insert a pin to the pin hole. 注意:ピンはソケットからはみ出さない 長さの物をご使用ください。 Note: The length of the pin should be proper enough not to be extruded ピン...
- Page 35 ■ビットの取付け・取外し方 Mounting and removal of a bit ビットチャックを引っ張りなが 引っ張る ら、ビットを奥まで挿入してくだ A type : 9mm Pull B type : 13mm さい。 A型のメインシャフトにはA型ビッ トをB型のメインシャフトにはB型 ビット ビットを使用してください。 ビットチャック Insert a bit as far as it will go while Bit Chuck pulling the bit chuck. Use A type bit for the A type main shaft, B type bit for the B type main shaft.
- Page 36 点検 と その 処置 日常点検/使用まえには発生トルクのチェックをしてください。 ●故障発生時の内容とその処置 故 無 負 荷 で 回 転 す る 障 発生トルクが低い(締付け不足の発生) の 内 容 油 圧 部の モータ部の 回 転 数 が 少 な い 不 良 不良 メ リ 使 サ ス 油 オ...
- Page 37 ●故障発生時の内容とその処置 故 無 負 荷 で 回 転 す る 無 負 荷 で 回 転 し な い 障 の 負荷をかけると 内 スロットルレバーを 手で 手で 容 はなしても メインシャフトを メインシャフトを 油圧部が 作動しない 空すべりを (パルスが 止まらない 回すと回転しない 回すと回転する 起こす 発生しない) ス 気...
- Page 38 Low torque (Insufficient tightening torque) Faulty Low r.p.m. Faulty motor part impulse part The repair is authorized. Repair Immediately stop using the tool. If there is no improvement with 〇Ask your YOKOTA dealer above countermeasures and repair. for repair. -36-...
- Page 39 (No pulsing) is released. The repair is authorized. Repair Immediately stop using the tool. If there is no improvement with 〇Ask your YOKOTA dealer above countermeasures and repair. for repair. -37-...
- Page 40 Yokota Industrial Co., Ltd. 本社・本部 〒578-0947 東大阪市西岩田3丁目5-55 TEL 0 6-6788-1381 FAX 0 6-6781-4519 仙台出張所 〒981-3103 宮城県仙台市泉区山の寺1丁目10-15 TEL 0 285-31-0002(小山) FAX 0 285-29-0702(小山) 小山営業所 〒323-0819 栃木県小山市大字横倉新田312-5 TEL 0 285-31-0002 FAX 0 285-29-0702 東京営業所 〒143-0016 東 京都大田区大森北3-4-3 TEL 0 3-3762-6411 FAX 0 3-3762-6413 名古屋営業所...
Need help?
Do you have a question about the Y-41A and is the answer not in the manual?
Questions and answers