Table of Contents
Advertisement
Quick Links
Advertisement
Table of Contents

Related Manuals for Rapiscan Mobile Trace

Summary of Contents for Rapiscan Mobile Trace
- Page 1 ® MobileTrace User's Guide For P0007027 MA001133 Revision...
- Page 3 Copyright © 2018 Rapiscan Systems. All rights reserved. Rapiscan® is a registered trademark of Rapiscan Systems. We have endeavored to ensure that the information in this manual is comprehensive and accurate, as of the date of publication. The product you have purchased may contain features not covered by this manual.
-
Page 4: Table Of Contents
Preface Conventions Safety Terms and Symbols Warnings and Cautions Battery Charger Warnings xiii Universal Symbols CHAPTER 1 Device Overview Product Overview Hardware Requirements Software (Installed) Related Documentation Before You Begin Major Components Touchscreen Navigation Pad and Control Buttons Stylus and Stylus Holder Desorber and Desorber Cover Filter/Pump Cover Battery Compartment and Main Battery... - Page 5 Set Default Cal Factors Verify - Particle Mode Vapor Mode Cal - Vapor Mode Manual Calibrate - Vapor Mode Dual Peak Calibrate - Vapor Mode Single Peak Calibrate - Vapor Mode Verify - Vapor Mode CONTENTS│User's Guide Rapiscan Systems Proprietary and Confidential...
- Page 6 Adjust Date & Time Calibrate Flows Calibrate Touchscreen Calibrate Temperatures Copy Alarm Files to External Media Import User Database Open Alarms Folder Copy Files to USB Storage Device Copy Files to a Shared Network Drive PIC Diagnostics Rapiscan Systems Proprietary and Confidential...
- Page 7 By Hand Using a Sample Trap in a Sample Wand By Vapor Sampling Using the Device Removing the Desorber and Installing the Vapor Plate Taking a Vapor Sample Sampling Sequence No Alarm Alarm CONTENTS│User's Guide Rapiscan Systems Proprietary and Confidential...
- Page 8 Low Battery and Backup Battery in Use Resolution Stabilizing Temperature Resolution Change the Dryer Material Reminder Resolution Replace the Membrane Reminder Resolution CHAPTER 7 Maintenance Introduction to Maintenance Shift Maintenance Clean the Touchscreen Check the Supplies Rapiscan Systems Proprietary and Confidential...
- Page 9 Shift Maintenance Schedule Weekly Maintenance Schedule Monthly Maintenance Schedule As-Needed Maintenance Schedule CHAPTER 8 Desktop Application Connecting to the Device Desktop Application Main Screen Desktop Application Menu Functions Recall Options Users Default User Privileges CONTENTS│User's Guide Rapiscan Systems Proprietary and Confidential...
- Page 10 Upgrade Software from the Device Application CHAPTER 9 Parts and Accessories Device and Replacement Part Numbers CHAPTER 10 Service and Support Technical Support Customer Service Rapiscan Systems Locations Rapiscan Systems International Locations Warranty Information Consumables INDEX Rapiscan Systems Proprietary and Confidential...
- Page 11 This page intentionally left blank to ensure new chapters start on right (odd number) pages. CONTENTS│User's Guide Rapiscan Systems Proprietary and Confidential...
-
Page 12: Preface
Your organization’s alarm resolution protocols Read these instructions and all ancillary documentation entirely before installing or operating the device. The most current versions of this and related documentation are available through Rapiscan Systems Customer Service Department. For instructions on purchasing additional publications, . NOTE: A qualified service person, complying with all applicable codes, should perform all required hardware installation. -
Page 13: Conventions
WARNING: User should use appropriate electrical safety precautions. WARNING: User should use care when working near or on the labeled item as the item may be hot. PREFACE│User's Guide Rapiscan Systems Proprietary and Confidential... -
Page 14: Warnings And Cautions
The detector has been designed in compliance with the United States Nuclear Regulatory Commission (USNRC) guidelines for safety. If a problem is suspected with the detector, DO NOT open the detector—call Rapiscan Systems’s Technical Support Department. Then, if necessary, return the instrument to Rapiscan Systems for service. - Page 15 "Request for the supply of sealed sourced”, matrix based on the content/data of your authorization. • You will fill this request and send it to Rapiscan Systems who will complete it and will affix its commitment to take back the sources, before transmitting it to the Department of Source Expertise at the IRSN.
-
Page 16: Battery Charger Warnings
Do not cover the fan exhaust or obstruct the airflow. This will cause overheating. WARNING: Use only the manufacturer's power supply, and observe terminal polarity. WARNING: Place the charger in a cool spot, away from external heat sources. CAUTION: During recalibration the charger may become warm. xiii Rapiscan Systems Proprietary and Confidential... -
Page 17: Universal Symbols
Universal Symbols Table 4-1 Universal symbols Symbol Description Network Reset Power Direct Current Fuse Battery Power/Charging Enter Trigger PREFACE│User's Guide Rapiscan Systems Proprietary and Confidential... -
Page 18: Device Overview
Device Overview Product Overview Before You Begin Device Specifications Storage Shipping the Device... -
Page 19: Product Overview
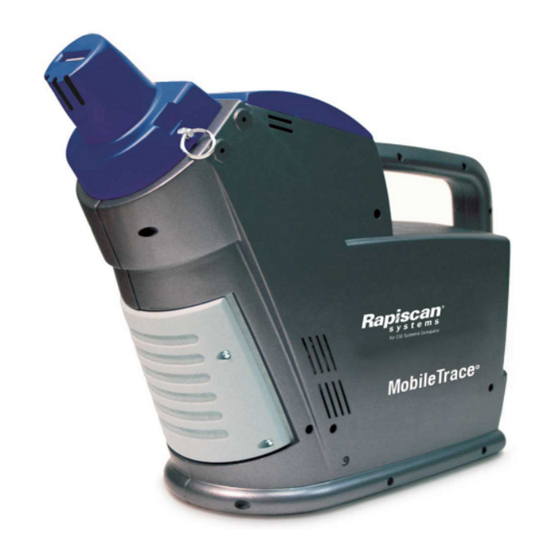
Product Overview ® The MobileTrace is designed and manufactured by Rapiscan Systems. It employs a patented technology to detect and identify explosives and narcotics. This technology (Ion Trap Mobility Spectrometry) increases efficiency and sensitivity over conventional Ion Mobility Spectrometry (IMS). -
Page 20: Major Components
4-way navigational pad, and the other is located on the handle. The trigger button located on the handle is for ease of vapor sampling at awkward angles. Rapiscan Systems Proprietary and Confidential... -
Page 21: Stylus And Stylus Holder
( see "Weekly Maintenance" on page 116 ) Filter/Pump Cover The filter/pump cover enables access to the sample pump and sample pump filter. NOTE: The sample filter is checked monthly. ( see "Monthly Maintenance" on page 123 ) Rapiscan Systems Proprietary and Confidential... -
Page 22: Battery Compartment And Main Battery
Rechargeable Battery Recycling Corporation (RBRC) at www.rbrc.org. NOTE: For information about the battery or charger, see the Inspired Energy CH5000A instruction sheet included with the charger or visit www.inspiredenergy.com. Rapiscan Systems Proprietary and Confidential... -
Page 23: Rear Panel
• Slow Blink - CPU is powered on running off a low main battery. • Fast Blink - CPU is powered on running off the backup battery. NOTE: The device is designed to be left ON continuously to keep the detector hot. Rapiscan Systems Proprietary and Confidential... -
Page 24: Device Specifications
Hardware Reset Resets the device hardware. NOTE: If the device hardware needs to be reset, press the power button to perform a full restart. For further assistance, contact Rapiscan Systems Technical Support. ( see "Technical Support" on page 152 ) Device Specifications... - Page 25 AC to DC power supply and DC vehicle power adapter Vehicle Power Adapter 15 A, 32 V, time delay Cable Fuse Keyboard USB 1.1 Dopants • Ammonium Carbamate • Dichloromethane Internal Calibrant Signal Processing Variable integration time, simultaneous positive and negative ion mode Rapiscan Systems Proprietary and Confidential...
-
Page 26: Weight And Dimensions
This is not a complete list of explosive and narcotic substances that could be detected by the device. Table 1-5 Custom library Explosives Narcotics Vapor COCAINE RDX/HMX HEROIN RDX/HMX RDX-H NITRO Neg-Ver METHAM TATP Rapiscan Systems Proprietary and Confidential... - Page 27 • NITRATES • Ammonium Nitrate • Urea Nitrate • HMTD DMNB Ketamine p-MNT HMTD Pos-CAL (particle mode calibration, Vapor-Neg-CAL (vapor mode internal Cocaine equivalent) calibration) p-MNT COCAINE Black Powder (Various Gun Powders) RDX/HMX HEROIN Neg-CAL Neg-Ver Rapiscan Systems Proprietary and Confidential...
-
Page 28: Storage
(particle mode calibration, cocaine equivalent) Default sample time: 10.0 seconds Default sample time: 11.0 seconds Default sample time: 10.0 seconds Storage This section describes dopant shelf life. It also discusses how to store dopants and the device. Rapiscan Systems Proprietary and Confidential... -
Page 29: Dopant Shelf Life And Storage Conditions
The following tables are dopant shelf and product lives and their corresponding storage temperatures. Actual results may differ. Rapiscan Systems recommends that the negative ion dopant not be stored in the freezer for longer than 20 months to ensure greater than 80% usable life. Similarly, Rapiscan Systems recommends that the positive ion dopant not be stored in the freezer for longer than 17 months to ensure greater than 80% usable life. -
Page 30: Shipping The Device
CHAPTER 1 │User's Guide Rapiscan Systems strongly recommends that the device be powered down, cooled, and all components be placed in their original shipping containers whenever they are to be moved or stored. If the device is to be used again soon (within several days), leave the external power supply connected and the device powered up. - Page 31 This page intentionally left blank to ensure new chapters start on right (odd number) pages.
- Page 32 Preparing the Device Performing Initial Setup Receiving the Device Receiving and Installing Dopants BHT Vapor Mode Calibration Tube Powering Up the Device Logging On to the Device Warm-Up Time Charging the Batteries Installing the Battery...
-
Page 33: Performing Initial Setup
The dopant tubes are shipped inside a plastic tube with end caps taped on. If the dopants are not being used right away, they should immediately be placed in cold storage (in a freezer, if possible) to extend the dopant life. Rapiscan Systems Proprietary and Confidential... - Page 34 4. Insert the dopant tubes into the dopant chamber. ( see "BHT NOTE: The BHT tube is already installed the dopant chamber. For information on the BHT tube, Vapor Mode Calibration Tube" on the next page 5. Replace the dopant chamber end cap. Rapiscan Systems Proprietary and Confidential...
-
Page 35: Bht Vapor Mode Calibration Tube
2. Push the power button on the rear panel. NOTE: The green LED on the power button illuminates. Logging On to the Device The Log On screen displays each time the ITMS™ software is started or the computer is rebooted. Rapiscan Systems Proprietary and Confidential... -
Page 36: Warm-Up Time
After the FIRST TIME burn, if the device has been powered off for only a few hours, power up the (Off for a few hours) device and after temperatures have stabilized, the device is ready for use. Rapiscan Systems Proprietary and Confidential... -
Page 37: Charging The Batteries
For information about the battery or charger, see the Inspired Energy CH5000A instruction sheet included with the charger or visit www.inspiredenergy.com. Using the Battery Charger In order to maintain maximum performance of the main batteries, Rapiscan Systems recommends periodically using the battery charger to check battery status and perform recalibration as needed. NOTE: Use only the battery charger specified by Rapiscan Systems. -
Page 38: Battery Recharge Time
The status of the battery is indicated by the LEDs visible in the status window. Battery charger LEDs Table 2-3 Color Description Status Green flashing Battery charging Green solid Battery fully charged Blue flashing Battery in calibration mode Rapiscan Systems Proprietary and Confidential... -
Page 39: Installing The Battery
1. Rotate the battery compartment door latch clock-wise to open the device’s battery compartment. 2. Insert the battery into the rear of the device, ensuring the tab displays on the bottom right of the battery. 3. Close the battery compartment door latch turning counter clock-wise. Rapiscan Systems Proprietary and Confidential... -
Page 40: Calibration And Verification
Calibration and Verification Sample, Calibration, and Verification Traps Calibration Overview Particle Mode Vapor Mode... -
Page 41: Sample, Calibration, And Verification Traps
The tapered ends are inserted into the desorber for analysis. Handle sample, calibration, and verification traps with clean cotton gloves and by the wide or handle end only. Sample, Calibration, and Verification Traps Figure 3-1 Rapiscan Systems Proprietary and Confidential... -
Page 42: Calibration Overview
Calibration Overview There are six ways to calibrate the device: • Automatic calibration in particle mode • Manual calibration in particle mode Dual peak Single peak • Automatic calibration in vapor mode Rapiscan Systems Proprietary and Confidential... -
Page 43: Particle Mode
The ionization process in the detector is affected by moisture, temperature, and pressure. Large increases in contamination can lead to shifts in the peak positions in the plasmagram. Rapiscan Systems recommends performing routine auto calibration to compensate for these changes in the environment. - Page 44 A calibration trap MUST be used only once and then discarded immediately after the calibration is performed. 6. Press OK. The device alarms on TNT (in Explosives mode) or Cocaine (in Narcotics mode). The Explosives Detected or Drugs Detected message displays. Rapiscan Systems Proprietary and Confidential...
-
Page 45: Manual Calibrate - Particle Mode
The No Alarm - Ready message displays. 11. Remove the sample trap. 12. Once the calibration is complete, Rapiscan Systems recommends that you verify the successful ( see "Verify - Particle Mode" on page 34 ) calibration. -
Page 46: Dual Peak Calibrate - Particle Mode
A message displays to insert a calibration trap. 5. Wearing clean cotton gloves, remove a calibration trap from the package. 6. Close the cover immediately to avoid contamination. 7. Insert the calibration trap into the desorber. Rapiscan Systems Proprietary and Confidential... - Page 47 Set Default Cal Factors before you can verify the successful calibration. ( see "Set Default Cal Factors" on page 33 ) This shifts the white window to be centered around the newly selected peak. 11. Press OK. A message to select the calibration substance displays. Rapiscan Systems Proprietary and Confidential...
- Page 48 A message displays to select the correct peak. Figure 3-10 Particle: Pos-CAL peak 14. Observe the Pos-CAL peak in the white window. Touch slightly above the top of the peak until the dot, drift time, and peak height display. Rapiscan Systems Proprietary and Confidential...
- Page 49 A message displays the device has been calibrated. 17. Press OK. Figure 3-12 Particle: Calibration - Explosives Detected The device alarms on TNT (in Explosives mode) or Cocaine (in Narcotics mode). The Explosives Detected or Drugs Detected message displays. 18. Press Clear. Rapiscan Systems Proprietary and Confidential...
-
Page 50: Single Peak Calibrate - Particle Mode
The No Alarm-Ready message displays. 22. Remove the sample trap. 23. Once the calibration is complete, Rapiscan Systems recommends that you verify the successful calibration. ( see "Verify - Particle Mode" on the next page ) -
Page 51: Verify - Particle Mode
RDX/HMX (in Explosives mode) or Ephedrine (in Narcotics mode). If the alarm displays, the verification is successful. If it does not display, repeat the calibration and verification. If the Verification Failed message displays again, contact Rapiscan Systems Technical Support. ( see "Technical Support"... -
Page 52: Vapor Mode
A message displays to press Clear . 5. Press Clear. The device begins the clearing process, and the No Alarm-Ready message displays. 6. Once the calibration is complete, Rapiscan Systems recommends that you verify the successful calibration. ( see "Verify - Vapor Mode" on page 40 ) -
Page 53: Dual Peak Calibrate - Vapor Mode
4. Select a substance from the negative ion list of substances. • If you want to calibrate using the internal calibrant, select Vapor-Neg-CAL. • If you would like to calibrate using the Check Sample vial, select Vapor-Neg-Ver. Rapiscan Systems Proprietary and Confidential... - Page 54 A substance other than Vapor-Neg-CAL, collect for 5-10 seconds, and press Stop. A message displays to select the correct peak. Vapor: Neg-CAL peak Figure 3-17 9. Verify the calibration peak displays in the white window. Rapiscan Systems Proprietary and Confidential...
- Page 55 Set Default Cal Factors before you can verify the successful calibration. ( see "Set Default Cal Factors" on page 33 )This shifts the white window to be centered around the newly selected peak. 12. Press OK. A message to select the calibration substance displays. Rapiscan Systems Proprietary and Confidential...
- Page 56 A message displays to select the correct peak. Vapor: Vapor-Pos-CAL peak Figure 3-20 15. Verify the calibration peak displays in the white window. 16. Touch slightly above the top of the peak until the dot, drift time, and peak height display. Rapiscan Systems Proprietary and Confidential...
-
Page 57: Single Peak Calibrate - Vapor Mode
19. Press OK. 20. Press Clear. The device begins the clearing process, and the No Alarm-Ready message displays. 21. Once the calibration is complete, Rapiscan Systems recommends that you verify the successful calibration. ( see "Verify - Vapor Mode" below ) - Page 58 Verification Successful! message does not display. If the Verification Failed message displays, repeat the calibration and verification. If the Verification Failed ( see "Technical Support" on message displays again, contact Rapiscan Systems Technical Support. page 152 ) 6. Press OK.
- Page 59 CHAPTER 3 │ User's Guide The device alarms on DNT and Ephedrine . The Contraband Detected message displays. 7. Press Clear. The device begins the clearing process, and the No Alarm-Ready message displays. Rapiscan Systems Proprietary and Confidential...
-
Page 60: Menu Functions
Menu Functions Main Screen Menu Functions... -
Page 61: Main Screen
For information about user levels, ( see "Default User Privileges" on page 55 Figure 4-1 Main screen Main screen - icons Figure 4-2 Table 4-1 Status bar indicators Status Bar Color Description Green Device ready Yellow Warnings and Diagnostics Alarm Rapiscan Systems Proprietary and Confidential... -
Page 62: Menu Functions
Press Menu on the Main screen. Any buttons that ( see "Default are greyed out are not accessible by the level of the current user. For a list of default user privileges, User Privileges" on page 55 Rapiscan Systems Proprietary and Confidential... -
Page 63: Recall
If you are logged on as a Maintenance level user, the simplified recall screen displays the alarm or signal files stored on the hard disk in the form of .sca files. Go to (see Step Rapiscan Systems Proprietary and Confidential... - Page 64 In the advanced recall screen, double-click the desired file. • If you want to recall an archived file, navigate up one level to \Storage Card\ITI\ITMSWIN\Alarms- Archive-mm-dd-yyyy, and double-click the appropriate file. • In the simplified recall screen, select the appropriate file. Press OK. Rapiscan Systems Proprietary and Confidential...
-
Page 65: Save
If there is no space available on the drive, the device displays “ The alarms folder is full, save failed. ” and cancels the save. To save files to an external storage device, ( see "Copy Alarm Files to External Media" on page 69 Rapiscan Systems Proprietary and Confidential... -
Page 66: Options
• When this box is checked, the codes for the substances display. Code • When the box is not checked, the names of the substances display. Auto Logon as Specifies initial user level logon as Operator and does not require entering a password. Operator Rapiscan Systems Proprietary and Confidential... -
Page 67: Configuration
Enables you to view the substances available for detection, as well as add, modify, and delete substances. You cannot modify or delete substances from the custom library. You can only modify and delete substances that Rapiscan Systems Proprietary and Confidential... -
Page 68: Select And Deselect
Any additions to the custom library without the express prior permission of Rapiscan Systems are at the customer’s sole risk. See the applicable Terms and Conditions of sale for more details. For support with adding, modifying, and deleting substances, contact Rapiscan Systems Technical Support. -
Page 69: Add
Secondary Substance Selection Figure 4-10 4. Press the keyboard icon to display the keyboard. 5. Enter a Name, Code, and Notes using the keyboard. NOTE: You cannot use duplicate substance names. Each substance name must be unique. Rapiscan Systems Proprietary and Confidential... - Page 70 Figure 4-11 Line information screen 10. Configure the fields as necessary. NOTE: These fields should be configured with support from Rapiscan Systems’ Technical Support. ( see "Technical Support" on page 152 ) 11. Press OK until the Substance Selection screen displays.
-
Page 71: Modify
Using the keyboard , modify the fields as necessary. NOTE: These fields should be modified with support from Rapiscan Systems Technical Support. ( see "Technical Support" on page 152 ) 5. Press OK until you return to the Main screen. -
Page 72: Users
ü Plasmagram ü ü ü -ION, +ION, and +/-ION ü ü ü Select Scan ü ü ü Intensity Map ü ü ü ü Menu Functions (Alt+M) File Recall ü ü Save Alt+S ü ü View Rapiscan Systems Proprietary and Confidential... - Page 73 Ctrl+L ü ü Verify ü ü ü Help ü ü ü Cancel ü ü ü Advanced Menu Functions (Ctrl+N) Adjust Date & Time ü Advanced Configuration Calibrate Flows ü Calibrate Temperatures ü Calibrate Touchscreen ü Rapiscan Systems Proprietary and Confidential...
-
Page 74: Add
Keystroke Function Restore a saved config from Ctrl+R ü config.sav * * Manipulation of the configuration is not recommended. NOTE: You cannot have more than 500 users. 1. Select Menu > Users. 2. Press Add. Rapiscan Systems Proprietary and Confidential... -
Page 75: Modify
5. Assign the appropriate user privilege level. 6. Press OK. The newly-added user displays in the Users list. Newly-added user Figure 4-14 7. Press Close. Modify 1. Select Menu > Users. 2. Highlight the user you want to modify. Rapiscan Systems Proprietary and Confidential... -
Page 76: Delete
Notes information, select Menu > Config Notes. To view the substance configuration, press the Substance Config tab. Figure 4-15 Config Notes Only substances, for the existing detection mode, that are selected for detection display in Config NOTE: Notes . Rapiscan Systems Proprietary and Confidential... -
Page 77: History
Displays files of samples or saved files in the list. Show File Saves From/Through Displays history for a specific date range. Add Maintenance Log Adds a maintenance log. Export History Exports the history to a .csv file. Purge History Purges the history. Rapiscan Systems Proprietary and Confidential... -
Page 78: Add Maintenance Log
Copy to USB 1. Select Menu > History. 2. Insert the USB storage device into the USB port on the rear panel. 3. Select the From and Through dates. 4. Press Export History. Rapiscan Systems Proprietary and Confidential... -
Page 79: To A Network Or File Location
6. If the folder is password protected, enter the user name and password you use to log on to your computer. 7. Do one of the following: • Press Export Selected History Now to immediately export the files to the network location. The File Copied message displays. Press OK. Rapiscan Systems Proprietary and Confidential... -
Page 80: Purge History
The device Status screen provides current and calculated values. This screen is useful for ( see "Technical Support" on troubleshooting purposes when calling Rapiscan Systems Technical Support. page 152 ) To check the status of the device, select Menu > Status. -
Page 81: Advanced Menu
Adjust Date & Time Sets the device date and time. (see "Adjust Date & Time" on page 66) Advanced Provides options to configure/adjust the data view, primary mode of operation, sample pump, and Configuration* trigger mode. Rapiscan Systems Proprietary and Confidential... - Page 82 Resets the count for alarm and signal files, which are saved with numbered file names. Restore Default Restores the substance and/or device configuration to the default for the current software version. Config NOTE: Contact Rapiscan Systems for support with this function. Rapiscan Systems Proprietary and Confidential...
-
Page 83: Adjust Date & Time
NOTE: To view the Help screen, select Menu > Help or press the status bar in the main window. * This function is only available to Rapiscan Systems. Adjust Date & Time 1. Select Menu > Advanced Menu. 2. Press Adjust Date & Time. -
Page 84: Calibrate Flows
1. Select Menu > Advanced Menu > Page 2. 2. Press Calibrate Flows. A message displays verifying you want to calibrate flows. 3. Press Yes. Figure 4-22 Flow Calibration 4. Modify the fields, as necessary. Rapiscan Systems Proprietary and Confidential... -
Page 85: Calibrate Touchscreen
CHAPTER 4 │ User's Guide NOTE: These fields should be modified with support from Rapiscan Systems’s Technical Support. ( see "Technical Support" on page 152 ) 5. Press Calibrate. A message displays the calibration was saved. 6. Press OK. Calibrate Touchscreen 1. Select Menu > Advanced Menu. -
Page 86: Copy Alarm Files To External Media
® Below is an example of a user database where column (in Microsoft Excel): • A is the user name • B is the 4-digit password • C is the privilege level (1=Operator, 2=Maintenance, 3=Administrator) Rapiscan Systems Proprietary and Confidential... - Page 87 6. Verify the path is correct, where Hard Disk is the Root level of the external media, or enter a new path for the user database filename and location. 7. Press OK. A warning message displays that all users are removed and states how the database file should be formatted. Rapiscan Systems Proprietary and Confidential...
-
Page 88: Open Alarms Folder
The software restarts, and you must log back into the device. Open Alarms Folder Copy Files to USB Storage Device 1. Select Menu > Advanced Menu > Open Alarms Folder. Figure 4-27 Open alarms folder 2. Select the file (or files) you want to copy. Rapiscan Systems Proprietary and Confidential... -
Page 89: Copy Files To A Shared Network Drive
8. Select Edit > Paste to copy the file onto the USB storage device. Once you copy the file(s) to the USB storage device, Rapiscan Systems recommends you delete the files from the device. For more information, see Delete Alarm Files in ( see "Advanced Menu functions"... -
Page 90: Pic Diagnostics
7. Select Edit > Paste. Once you copy the file(s) to the USB storage device, Rapiscan Systems recommends you delete the files from the device. For more information, see Delete Alarm Files in ( see "Advanced Menu functions" on page 64... -
Page 91: Restore Default Config
4. Using the keyboard, modify the fields, as necessary. NOTE: These fields should be modified with support from Rapiscan Systems Technical Support. Any changes made to the PIC diagnostics are not saved. Once the ITMS™ software is restarted, the default values are used. -
Page 92: Set User Privileges
You can cancel a Device Burn at any time. When a Device Burn is canceled, it is logged into the history file. Set User Privileges 1. Select Menu > Advanced Menu. 2. Press Set User Privileges. A screen with the privilege level options displays. Rapiscan Systems Proprietary and Confidential... -
Page 93: Upgrade Software
6. Log on to the ITMS™ software. 7. Record any changes made to the Rapiscan Systems default substance library. a. Press <Ctrl+D> to display any custom changes made to the Rapiscan Systems default substance library. b. Record the custom changes made to your substance configuration. -
Page 94: User Defined Warnings
Check the Warning/Alarm button for which you want to modify its message. The current message displays. Press Default to return the warnings and alarms to their default. A message displays verifying you want the warnings and alarms set to their default. Press Yes. Rapiscan Systems Proprietary and Confidential... -
Page 95: Export
The device copies the file from the MobileTrace Data directory on the USB storage device and updates all the User Defined Warnings . The File Copied message displays. 6. Press OK. Manual Calibrate ( see "Calibration and Verification" on page 23 ) Rapiscan Systems Proprietary and Confidential... -
Page 96: Burn In Membrane
Hibernate saves approximately 20–30% of the battery life. 3. Press Yes to confirm the mode. To exit Standby or Hibernation mode, touch the touchscreen, or press one of the control buttons. Rapiscan Systems Proprietary and Confidential... -
Page 97: Change Mode
( see "Removing the Desorber and Installing the Vapor Plate" on page 94 ) When Vapor Optimized mode is selected, both explosive and narcotics substances are selected for analysis. The ITMS™ software sets the detector temperature at 205ºC, which is the ideal temperature setting for the detection Rapiscan Systems Proprietary and Confidential... -
Page 98: Print
If you are printing to a network printer, the Logon to Network Server screen displays. Enter your information in the User Name , Password , and Domain fields. Press OK. • If you checked Show Printer Options, the Print screen displays. Rapiscan Systems Proprietary and Confidential... -
Page 99: Change Language
2. Select the language. 3. Press OK. Logoff and Power Down Enables you to log off of the ITMS™ software. Rapiscan Systems recommends you log off the ITMS™ software when not in use. 1. Select Menu > Logoff. If you are powering down the device, continue with ( see Step 2 2. -
Page 100: Live Mode
Enables you to view any warnings that display on the device and provides steps to perform routine calibration, verification, and sampling. 1. Do one of the following: • Select Menu > Help. • Press the status bar in the main window. Rapiscan Systems Proprietary and Confidential... -
Page 101: Cancel
CHAPTER 4 │ User's Guide Figure 4-39 Help screen 2. Press Close. Cancel Closes the Menu and brings you back to the Main screen. Rapiscan Systems Proprietary and Confidential... - Page 102 Analyzing Samples Sampling Matrix Sampling Areas Sampling Procedure Sampling Sequence Clearing an Alarm Selecting View Modes...
-
Page 103: Sampling Matrix
Default Substance List Recommended Detection Probability for Particle Mode Vapor Mode Collection Recommended Substances Substances Method Collection Method Particle Vapor High Moderate Selected Selected Explosives Mode ü (Both) ü ü RDX/HMX ü ü RDX-H ü ü Rapiscan Systems Proprietary and Confidential... - Page 104 HMTD ü ü Black Powder (Various Gun ü ü Powders) TAGGANTS • p-MNT ü (Vapor) ü (Particle) ü • DMNB ü (Vapor) ü (Particle) ü Narcotics Mode COCAINE ü ü HEROIN ü ü ü ü Rapiscan Systems Proprietary and Confidential...
-
Page 105: Sampling Areas
ü ü ü ü Ketamine ü ü EDME ü ü Sampling Areas Baggage or Containers To sample baggage and containers, wipe the following: • Outside of item: Zipper tabs Closure flaps Latches Handles and straps Rapiscan Systems Proprietary and Confidential... -
Page 106: Electronic Devices
Battery compartments • Disk drives • Edges • Latches • Touch pads CAUTION: Do not wipe sample traps across surfaces such as computer screens, cell phone displays, camera lenses, as it may damage the surface. Rapiscan Systems Proprietary and Confidential... -
Page 107: Vehicles
• Door handle • Gas cap • Steering wheel • Knobs • Seat belts • Luggage • Wherever there may be a fingerprint NOTE: Use a separate clean sample trap for each vehicle being sampled. Rapiscan Systems Proprietary and Confidential... -
Page 108: Sampling Procedure
2. If you obtained a sample trap from the package, close the cover immediately to avoid contamination. 3. Hold the sample trap by the wide end. 4. Use firm contact. 5. Sample in one direction, one time. 6. Sample the most-touched area last. Rapiscan Systems Proprietary and Confidential... -
Page 109: By Hand Using A Sample Trap In A Sample Wand
3. Press the button on the sample wand, and insert the narrow end of the trap into the slot. Avoid touching the sampling area of the sample trap when inserting it into or removing it from the sample wand. Rapiscan Systems Proprietary and Confidential... - Page 110 The device automatically analyzes the sample. • If an alarm is detected, a message displays in the status bar. (see "Alarm" on page 97) Discard the sample trap immediately, and follow your organization’s alarm resolution protocol. Rapiscan Systems Proprietary and Confidential...
-
Page 111: By Vapor Sampling Using The Device
Removing desorber cover 3. Unscrew the retaining ring to remove the desorber. Leave the white seal disc in place. Figure 5-8 Removing retaining ring and desorber 4. Place the vapor plate inside the locking ring. Rapiscan Systems Proprietary and Confidential... - Page 112 6. Screw on the locking ring to hold on the vapor plate. Do not overtighten. Figure 5-11 Vapor plate installed 7. Press the power switch on the rear of the device to turn the device ON . Rapiscan Systems Proprietary and Confidential...
-
Page 113: Taking A Vapor Sample
Vapor sampling 2. Press Trig, the green button on the navigation pad, or the green button on the device handle. 3. Collect a vapor sample for 8-10 seconds. 4. Press Stop to stop the collection process. Rapiscan Systems Proprietary and Confidential... -
Page 114: Sampling Sequence
2. Follow the messages to clear the device. Clearing Sampling NOTE: For some substances, additional steps may be needed. For more information, ( see "Performing Additional Clearing Steps" on the next page Insert Clean Trap Rapiscan Systems Proprietary and Confidential... -
Page 115: Performing Additional Clearing Steps
To change the View mode, press View, and select the mode. NOTE: In the Plasmagram , Intensity Map , and 3-D views, you can scroll through the plasmagram using the arrows on the navigation pad. Rapiscan Systems Proprietary and Confidential... -
Page 116: Peaks View
The plasmagram highlights the detected substance peak with a yellow line and substance name in either the negative ions window or the positive ions window. To access the Plasmagram view, select View/Plasmagram. To view the Plasmagram for the positive, negative, or both modes, select Data/+/-ION, +ION, or -ION. Rapiscan Systems Proprietary and Confidential... -
Page 117: Navigating The Plasmagram
To access the Select Scan view, select View > Select Scan. The Explosives Detected or Drugs Detected message displays in red in the status bar if a substance from the library is detected. Also, the substances detected display with a red bar. Rapiscan Systems Proprietary and Confidential... -
Page 118: Intensity Map View
Data/+/-ION, +ION, or -ION. Figure 5-17 Intensity Map view For information about how to navigate the plasmagram in the Intensity Map view, ( see "Navigating the Plasmagram" on the previous page Rapiscan Systems Proprietary and Confidential... -
Page 119: 3-D View
Data > +/-ION, +ION, or -ION on the Main screen. Processed 3-D view Figure 5-18 For information about how to navigate the plasmagram in 3-D view, ( see "Navigating the Plasmagram" on page 100 Rapiscan Systems Proprietary and Confidential... -
Page 120: Warnings
Warnings Introduction to Warnings Detector Flow Warning Sample Flow Warning Calibration Warning Heater Warning Battery Operation Indicators Low Battery and Backup Battery in Use Stabilizing Temperature Change the Dryer Material Reminder Replace the Membrane Reminder... -
Page 121: Introduction To Warnings
The Detector Flow Warning indicates the detector flow is outside the calibrated range or the desorber is not connected properly. Figure 6-1 Detector Flow Warning Resolution 1. Touch the warning on the status bar to display the warning details. Figure 6-2 Detector Flow Warning details Rapiscan Systems Proprietary and Confidential... -
Page 122: Sample Flow Warning
2. Press Close. 3. Verify the desorber is connected securely. 4. Verify the sample filter connections are secure. 5. If the warning is not resolved, contact your technical support person or Rapiscan Systems Technical Support. ( see "Technical Support" on page 152 ) Sample Flow Warning The Sample Flow Warning indicates the device is outside the calibrated range. -
Page 123: Calibration Warning
3. Select Menu > Manual Calibrate, or press Cal to calibrate the device. on page 23 ) Heater Warning The Heater Warning indicates there could be a problem with the internal heater due to a short circuit in the temperature sensor wiring or open wiring. Rapiscan Systems Proprietary and Confidential... -
Page 124: Resolution
Figure 6-8 2. Press Close. 3. Check the history file to note the frequency of the warning. 4. If the warning is not resolved, contact your technical support person or Rapiscan Systems Technical Support. ( see "Technical Support" on page 152 ) -
Page 125: Resolution
The red battery icon and Backup Battery in Use warning indicate the main battery power has been switched to the backup battery. Figure 6-11 Battery Backup in Use icon If the backup battery is low and the external battery is removed, the Backup Battery Low warning displays. Figure 6-12 Backup Battery Low Rapiscan Systems Proprietary and Confidential... -
Page 126: Resolution
3. Swap the low battery with a fully charged battery, plug in the AC power supply, or shut down the device. Stabilizing Temperature The Stabilizing Temperature warning indicates the temperatures are stabilizing. This warning displays when the device is warming up or the detection mode has been changed. Rapiscan Systems Proprietary and Confidential... -
Page 127: Resolution
3. If this warning displays for more than 40 minutes, or if the temperatures differ more than the limits indicated on the Status screen, contact your technical support person or Rapiscan Systems Technical ( see "Technical Support" on page 152 ) Support. -
Page 128: Resolution
The membrane is cleaned and inspected weekly as part of the weekly maintenance and should be replaced monthly as part of monthly maintenance. If it is torn, punctured, incorrectly aligned, dirty or damaged, it must be replaced sooner. Figure 6-18 Replace membrane reminder Rapiscan Systems Proprietary and Confidential... -
Page 129: Resolution
CHAPTER 6 │ User's Guide Resolution Replace the membrane. ( see "Replace the Membrane " on page 124 ) Rapiscan Systems Proprietary and Confidential... - Page 130 Maintenance Introduction to Maintenance Shift Maintenance Weekly Maintenance Monthly Maintenance As-Needed Maintenance Maintenance Logs...
-
Page 131: Introduction To Maintenance
NOTE: Rapiscan Systems defines a shift as every 8 hours. CAUTION: When maintaining the device, you must wear clean cotton gloves and use only Rapiscan Systems-supplied consumables, parts, and supplies. NOTE: The ability to perform some maintenance procedures may depend upon the privilege levels assigned. -
Page 132: Check The Supplies
4. If necessary, contact Customer Service to replenish consumables. Perform a Calibration and Verification 1. Log onto the ITMS™ software. 2. Perform a calibration and verification. ( see "Calibration and Verification" on page 23 ) 3. Ensure there are no alarms or warnings. Rapiscan Systems Proprietary and Confidential... -
Page 133: Return To Operation
To keep the device operating at peak performance, the procedures listed in this section should be performed weekly in the step-by-step order listed. Also, you must verify shift maintenance has been performed. CAUTION: When maintaining the device, you must wear clean cotton gloves and use only Rapiscan Systems-supplied consumables, parts, and supplies. NOTE: The ability to perform some maintenance procedures may depend upon the privilege levels assigned. - Page 134 Remove desorber 3. Remove the white seal disc to expose the membrane and set aside. Remove white seal disc Figure 7-5 4. Using a Rapiscan Systems-supplied alcohol swab, gently wipe the membrane. Figure 7-6 Wipe membrane Rapiscan Systems Proprietary and Confidential...
-
Page 135: Clean The Desorber Or Vapor Plate
Clean the Desorber or Vapor Plate 1. Using the Rapiscan Systems supplied canned air, blow air into the center hole on the back of the desorber and blow air through the slot on the front of the desorber. - Page 136 Reinstall white seal disc 4. Do one of the following: • If you are installing the desorber, align the desorber pins with the white seal disc, and screw on the desorber’s retaining ring. Continue with (see Step Rapiscan Systems Proprietary and Confidential...
-
Page 137: Replace The Dryer Material
1. Remove the dryer tube at the rear of the device by unscrewing and pulling it straight out. CAUTION: DO NOT handle the dryer tube with bare hands as it may contaminate the device. Figure 7-11 Remove dryer cylinder Rapiscan Systems Proprietary and Confidential... -
Page 138: Clean The Fan Air Filter
7. Inspect the two O-rings on the dryer tube, and replace if needed. Figure 7-13 Dryer tube O-rings 8. Reinsert the dryer tube. Clean the Fan Air Filter 1. Gently remove (without unscrewing) the fan guard on the rear of the device to access the filter. Rapiscan Systems Proprietary and Confidential... -
Page 139: Power Up The Device
Press the power button so the device is ON , and allow it to warm up. Perform a Calibration and Verification 1. Log onto the ITMS™ software. 2. Perform a calibration and verification. ( see "Calibration and Verification" on page 23 ) 3. Ensure there are no alarms or warnings. Rapiscan Systems Proprietary and Confidential... -
Page 140: Return To Operation
To keep the device operating at peak performance, the procedures listed in this section should be performed monthly in the step-by-step order listed. Also, you must verify weekly maintenance has been performed. CAUTION: When maintaining the device, you must wear clean cotton gloves and use only Rapiscan Systems-supplied consumables, parts, and supplies. NOTE: The ability to perform some maintenance procedures may depend upon the privilege levels assigned. -
Page 141: Replace The Membrane
2. Gently tip the device, or using a pair of needle nose pliers, pull out the dopant tubes. 3. Inspect the substance level in the dopant tubes, and replace when empty. Order new dopants if there is less than 1/8" (3 mm) of substance visible. Rapiscan Systems recommends always having spare dopants on site. - Page 142 The new membrane installs easier if first wiped with an alcohol swab. 8. Carefully reinstall the white seal disc over the membrane, ensuring that it is aligned and seated properly. 9. Do one of the following: Rapiscan Systems Proprietary and Confidential...
-
Page 143: Check The Sample Filter
If the sample filter is visibly dirty, it must be replaced. Continue with (see Step • If the sample filter is not visibly dirty, insert the sample filter back into the cylinder. Go to (see Step Rapiscan Systems Proprietary and Confidential... -
Page 144: Power Up The Device
To keep the device operating at peak performance, the procedures listed in this section should be performed as- needed. CAUTION: When maintaining the device, you must wear clean cotton gloves and use only Rapiscan Systems-supplied consumables, parts, and supplies. NOTE: The ability to perform some maintenance procedures may depend upon the privilege levels assigned. -
Page 145: Calibrate The Touchscreen
4. Turn the fuse holder 1/4 turn with a flathead screwdriver to access the fuse. Remove old fuse Figure 7-21 5. Pull the fuse out and replace with a new one by pushing it in and turning it clockwise. 6. Replace the power cord. Figure 7-22 Replace fuse Rapiscan Systems Proprietary and Confidential... -
Page 146: Calibrate The Battery
Recalibration consists of a calibration charge, followed by a calibration discharge. Finally the battery is given a regular charge. A calibration cycle will be faster if the battery is fully charged to begin with. Recalibration time for the device main battery could be up to 14 hours. Rapiscan Systems Proprietary and Confidential... -
Page 147: Maintenance Logs
______________________________________ ______________________________________ Wear clean cotton gloves during all maintenance procedures. Maintenance frequency may require adjustment based on environmental and operational conditions. Shift TUES THUR Clean the Touchscreen Check the Supplies Perform a Calibration and Verification Rapiscan Systems Proprietary and Confidential... - Page 148 THUR Return to Operation NOTE: Shift maintenance must be performed a minimum of once a day. 1. Date and initial when action is performed. 2. It is recommended you print and save the plasmagram data. Rapiscan Systems Proprietary and Confidential...
-
Page 149: Weekly Maintenance Schedule
Perform a Calibration and Verification Return to Operation NOTE: Fifth week column used for a 5-week month. 1. Date and initial when action is performed. 2. It is recommended you print and save the plasmagram data. Rapiscan Systems Proprietary and Confidential... -
Page 150: Monthly Maintenance Schedule
Return to Operation 1. Verify that shift maintenance and weekly maintenance have been performed before monthly maintenance. 2. Date and initial when action is performed. 3. It is recommended you print and save the plasmagram data. Rapiscan Systems Proprietary and Confidential... -
Page 151: As-Needed Maintenance Schedule
Date/Initial Date/Initial Date/Initial Date/Initial Date/Initial Date/Initial Calibrate the Touchscreen Replace the Fuse Calibrate the Main Battery 1. Date and initial when action is performed. 2. It is recommended you print and save the plasmagram data. Rapiscan Systems Proprietary and Confidential... -
Page 152: Desktop Application
Desktop Application Connecting to the Device Desktop Application Main Screen Desktop Application Menu Functions... -
Page 153: Connecting To The Device
To resize the desktop application Main screen, place the cursor on the corner of the window and drag to the desired size. NOTE: To toggle between words and icon buttons, press I on the keyboard. Rapiscan Systems Proprietary and Confidential... -
Page 154: Desktop Application Menu Functions
The following sections describe the functionality in the desktop application that is slightly different from or in addition to the device software. Recall ® NOTE: It is recommended that all the MobileTrace alarm files be copied before recalling any data. Rapiscan Systems Proprietary and Confidential... - Page 155 "Warning: This data file is from an older software version and may not display the same results as when it was saved. Recall the file with the original software version to ensure the same results.” Press G to recall the next file in the alarms folder. Rapiscan Systems Proprietary and Confidential...
-
Page 156: Options
Determines how the strength of the detected substance displays in Select Scan view. Alarm Str. in • When this box is checked, the strength of the detected substance displays. S Scan • When this box is not checked, only Detected displays. Rapiscan Systems Proprietary and Confidential... -
Page 157: Users
It is based on the software defaults that are shipped from the factory. Table 8-2 Default user privileges Function Shortcut Key Operator Maintenance Administrator Desktop Application Main Screen Clear ü ü ü Trig Menu Alt+M ü ü ü View ü ü ü Rapiscan Systems Proprietary and Confidential... - Page 158 Configuration Substances ü Users ü ü Action Advanced Menu ü Manual Calibrate Burn In Membrane Exit/Standby Alt+X Cancel only Cancel only Exit ITMS/Cancel Change Mode ü Print ü ü ü Change Language Alt+L ü ü Rapiscan Systems Proprietary and Confidential...
-
Page 159: Advanced Menu
( see "Advanced Menu" on page 64 Get/View Device History File 1. Verify you are connected to the device. ( see "Connecting to the Device" on page 136 ) 2. Select Menu > Get/View Device History File. Rapiscan Systems Proprietary and Confidential... -
Page 160: Copy Alarm Files From The Device
Press Print Statistics to print the data collected since the last time someone logged onto the device. Copy Alarm Files From The Device NOTE: This function only copies the alarm files in the alarms folder from the device. It does not copy the archived files in the Alarms-Archive-mm-dd-yyyy folder. Rapiscan Systems Proprietary and Confidential... -
Page 161: Delete Alarm Files On The Device
For example: C:\Documents and Settings\Webcast User\Desktop\MT Desktop Software\Alarms\ NOTE: Once you copy the file(s), Rapiscan Systems recommends you delete the files from the device. ( see "Delete Alarm Files On The Device" below )( see "Advanced Menu For more information, functions"... -
Page 162: Upgrade Software From The Device Application
Once the upgrade is complete, the default substance configuration for that version of ITMS™ software in restored. Therefore, you must record any changes made to the substance library. a. Press <Ctrl+D> to display any custom changes made to the Rapiscan Systems default substance library. - Page 163 If the main screen does not display the updated software version, verify the computer is properly connected to the device and repeat the upgrade procedure. If the device software does not successfully upgrade, contact Rapiscan Systems Technical Support. ( see "Technical Support" on page 152 )
-
Page 164: Parts And Accessories
Parts and Accessories Device and Replacement Part Numbers... -
Page 165: Device And Replacement Part Numbers
CHAPTER 9 │ User's Guide Device and Replacement Part Numbers CAUTION: Rapiscan Systems strongly recommends that you use only Rapiscan Systems-supplied and approved consumables, parts, and supplies. The detection system, consumables, and replacement parts are standard items that are included with the default ®... - Page 166 E0002088 Hard shipping case M0001705 Keyboard assembly PA005224 Shoulder strap MP055110 Main battery (li-Ion) 14.4V EP008029 Battery charger assembly E0002549 Sample wand M0001240 Optional accessories Table 9-3 Part Description Number Hurricane Canless Air System MP100325 Rapiscan Systems Proprietary and Confidential...
- Page 167 This page intentionally left blank to ensure new chapters start on right (odd number) pages.
-
Page 168: Service And Support
Service and Support Technical Support Customer Service Rapiscan Systems Locations Rapiscan Systems International Locations Warranty Information Consumables... -
Page 169: Technical Support
CHAPTER 10 │ User's Guide Technical Support For comprehensive support, contact Rapiscan Systems Technical Support 24 hours a day, 7 days a week, unless otherwise noted. Table 10-1 Technical Support Other Region/Country Toll-free number E-mail address number RapCSCallCenter@rapiscansystems.com 1 888 258 6684 1 310 349 2477 Canada RapCSCallCenter@rapiscansystems.com... -
Page 170: Rapiscan Systems Locations
Unit C3, 57 Rothschild Avenue Rosebery NSW 2018 Australia Tel: +61 2 9424 3500 Fax: +61 2 9424 3540 Warranty Information For information on your Warranty, refer to the Terms and Conditions of your equipment purchase order. Rapiscan Systems Proprietary and Confidential... -
Page 171: Consumables
CHAPTER 10 │ User's Guide Consumables Consumables can be ordered from Rapiscan Systems Customer Service or by shopping online at store.rapiscantrace.com. Rapiscan Systems strongly recommends that you use only Rapiscan Systems- ® supplied and -approved consumables in the MobileTrace MobileTrace device. Rapiscan Systems shall not be liable for damage to or malfunction of the device that it deems was caused by the use of unauthorized materials. - Page 172 restore default users set default cal factors action set privileges advanced menu show network name and IP change mode startup options exit itms system burn manual calibrate upgrade software adding user defined warnings substance air filter users clean and replace advanced menu alarm adjust date &...
- Page 173 USB desorber customer cleaning service desorber cover removing INDEX│User's Guide Rapiscan Systems Proprietary and Confidential...
- Page 174 device dual peak calibrate components logging on overview edit powering up configuration shipping users storing elastomeric membrane weight and dimensions replace display options audible alarm auto logon as operator auto save rear display alarm str. in s scan filter pump and cover full screen view in s scan flows report level...
- Page 175 PIC diagnostics configuration modifying exit itms power button help history print items print config live mode print data logoff print data and config manual calibrate INDEX│User's Guide Rapiscan Systems Proprietary and Confidential...
- Page 176 Printer paper shift maintenance install clean desorber printing shipping processed 3-D view damage software requirements standby stylus and stylus holder rear panel substance replace adding fuses deleting Replace modifying printer paper requirements hardware software technical support temperature calibrating touchscreen safety terms and symbols calibrate sampling calibrating...
- Page 177 BHT calibration tube vapor plate cleaning removing view config notes history intensity map processed 3-D status view mode peaks plasmagram select scan selecting warnings and cautions INDEX│User's Guide Rapiscan Systems Proprietary and Confidential...
- Page 178 For P0007027 MA001133 Revision C...
Need help?
Do you have a question about the Mobile Trace and is the answer not in the manual?
Questions and answers