Table of Contents
Advertisement
Available languages
Available languages
Advertisement
Table of Contents

Related Manuals for amzchef ZM5003


Summary of Contents for amzchef ZM5003
- Page 1 GEBRUIKERSHANDLEIDING – PROFESSIONELE BLENDER 1800W USER MANUAL – PROFESSIONAL BLENDER 1800W MANUEL D'UTILISATION – BLENDER PROFESSIONNEL 1800W MODEL NO.: ZM5003 LEES DE INSTRUCTIES VOOR GEBRUIK PLEASE READ THE MANUAL VEUILLEZ LIRE LE MANUEL...
-
Page 2: Table Of Contents
NEDERLANDS Inhoudsopgave HOOFDSTUK 1: BELANGRIJKE VEILIGHEIDSVOORSCHRIFTEN ..............1 HOOFDSTUK 2: ONDERDELEN & KENMERKEN ....................6 HOOFDSTUK 3: BEDIENINGSPANEEL ......................7 HOOFDSTUK 4: FUNCTIES ..........................8 HOOFDSTUK 5: BEDIENINGSINSTRUCTIES ....................9 HOOFDSTUK 6: REINIGING & ONDERHOUD ....................14 HOOFDSTUK 7: PROBLEEM - OPLOSSING ....................16 HOOFDSTUK 8: GARANTIE .......................... - Page 3 Bedankt dat je hebt gekozen voor één van onze Amzchef producten! Mochten er nog vragen zijn over het product, neem dan contact op via: info@iamzchef.com (EN). Of neem voor Nederlandse klantenservice contact op met onze Nederlandse importeur via: info@the-brand-center.com. HOOFDSTUK 1: BELANGRIJKE VEILIGHEIDSVOORSCHRIFTEN WAARSCHUWING: Dit apparaat bevat elektrische aansluitingen en bewegende onderdelen die mogelijk een risico vormen voor de gebruiker.
- Page 4 16. Het gebruik van hulpstukken die niet uitdrukkelijk zijn geautoriseerd of verkocht door amzchef voor gebruik met deze blender kan brand, elektrische schokken of letsel veroorzaken. 17. Niet buitenshuis gebruiken.
- Page 5 19. Controleer of het voltage dat u gebruikt overeenkomt met het voltage dat op de machine staat vermeld. 20. Laat het netsnoer niet over de rand van tafel of aanrecht hangen. 21. Laat het netsnoer niet in contact komen met hete oppervlakken, zoals een kachel.
- Page 6 33. Wees voorzichtig bij het mengen van hete vloeistoffen of ingrediënten; spuitnevel of ontsnappende stoom kan brandwonden en brandwonden veroorzaken. Vul de schenkkan niet voor meer dan de helft van de capaciteit. Begin altijd met verwerken op de laagste snelheidsinstelling, variabele snelheid 0 en verhoog langzaam de snelheid.
- Page 7 50. Dit apparaat kan worden gebruikt door kinderen van 8 jaar en ouder als ze onder toezicht staan of instructies hebben gekregen over het veilige gebruik van het apparaat en als ze de gevaren begrijpen. Reiniging en gebruikersonderhoud mogen niet door kinderen worden uitgevoerd, tenzij ze ouder zijn dan 8 jaar en onder toezicht staan.
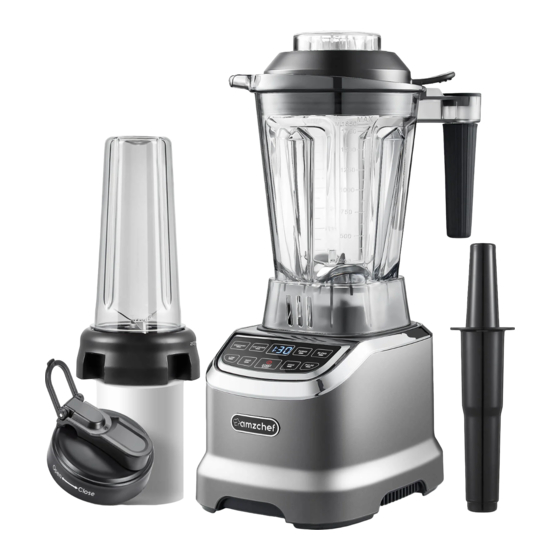
- Page 8 HOOFDSTUK 2: ONDERDELEN & KENMERKEN Navullingsdeksel Stamper Deksel Schenkkan Centreerkussen Reisfles Bedieningspaneel Messenset Motorbehuizing Reisfles dop Navullingsdeksel: Steek door de opening van de navullingsdeksel en zet vast door met de klok mee te draaien. Draai tegen de klok in en til hem op om de navullingsdeksel te verwijderen voor het gebruik van de stamper of het toevoegen van ingrediënten.
- Page 9 Centreerkussen: De schenkkan of messenset moet over het centreerkussen worden uitgelijnd. Probeer nooit te werken als het centreerkussen is verwijderd. Bedieningspaneel: De motor is ontworpen met dubbele beveiligingscircuits om oververhitting en overbelasting te voorkomen. Stamper: Wordt gebruikt om dikkere mengsels te verwerken en ingrediënten naar de messen te laten bewegen.
- Page 10 Klik in de standby-stand op de knop "START/STOP" om SMOOTHIES / de selectie-interface te openen, klik op de gewenste ICE CRUSH functie, zoals "SMOOTHIES/ BLEND", enz. Na het PUREE / LOW / selecteren van de functie, klik op de knop MED / HIGH "START/STOP"...
- Page 11 Mix op hoge snelheid voor het blenden van hard HIGH fruit en groenten en droog malen. (Voorbeeld: (180s) wortelen, geraspte droge sojabonen) Start en stopt het momenteel geselecteerde START/ STOP functieprogramma. WAARSCHUWING: 1. Als u ingrediënten of ingrediënten moet toevoegen tijdens het gebruik, kunt u gerelateerde handelingen uitvoeren door de navullingsdeksel te openen (giet geen heet water om brandwonden te voorkomen);...
- Page 12 Giet de afgewogen ingrediënten in de schenkkan. Voeg een geschikte hoeveelheid water toe aan de schenkkan. Schroef de navullingsdeksel op de deksel en lijn de deksel aan de zijkant uit met de schenkkan. Plaats de schenkkan op het hoofdgedeelte in de juiste positie en het hoofdgedeelte moet op een vlakke ondergrond worden geplaatst.
- Page 13 Sluit het netsnoer aan op het stopcontact, wanneer de stroom is ingeschakeld, knipperen alle achtergrondverlichtingslampjes één keer, klinkt de zoemer één keer en knippert de START/STOP-knop (als de mengbeker niet op zijn plaats staat, wordt deze niet ingeschakeld ). Selecteer de bijbehorende functietoets. (bijv.: BLEND, enz.) Druk op de "START/STOP"-knop en begin met werken (Het is normaal dat...
- Page 14 Verwijder de schenkkan, giet het sap eruit en voeg kruiden naar smaak toe. (Wees niet te haastig bij het uitgieten van het sap om te voorkomen dat het sap gaat spatten). Maak de binnenkant van de schenkkan op tijd schoon en maak de buitenkant schoon met een uitgewrongen, vochtige doek.
- Page 15 Plaats de reisbeker met de meshouder op het hoofdgedeelte in de juiste positie. Het hoofdgedeelte moet op een vlak werkoppervlak worden geplaatst. (Opmerking: wanneer u de bijbehorende beker gebruikt, moet u met uw hand op het bekerlichaam drukken om te voorkomen dat het bekerlichaam met hoge snelheid stuitert).
- Page 16 HOOFDSTUK 6: REINIGING & ONDERHOUD LET OP: * Om onbedoelde activering te voorkomen, moet u de stekker uit het stopcontact halen voordat u onderdelen monteert of demonteert en voordat u gaat schoonmaken. * Dompel de motorbasis NIET onder in water of andere vloeistoffen. * Laat GEEN vloeistof in de motor komen.
- Page 17 LET OP: Messen voorzichtig schoonmaken om snijwonden door contact met scherpe randen te voorkomen. 2. Om de meshouder, reisfles en bijbehorende deksel te reinigen: Zelfreinigend: (zonder de deksel en de meshouder te verwijderen): (1) Vul de reisfles halfvol met warm water en voeg een paar druppels afwasmiddel toe.
- Page 18 HOOFDSTUK 7: PROBLEEM - OPLOSSING LET OP: Om het risico op schokken en onbedoelde bediening te verminderen, schakelt u de stroom uit en haalt u de stekker uit het stopcontact voordat u problemen gaat oplossen. Fouttype Reden Oplossingsmethode Controleer het netsnoer Het netsnoer is niet en zorg ervoor dat de goed aangesloten...
- Page 19 Er zijn te veel Verhoog het water ingrediënten of te volgens de werkelijke weinig water situatie De ingrediënten kunnen Verkeerde selectie van Kies een andere niet worden gebroken functietoetsen selectie Neem contact op met Machinefout de klantenservice voor onderhoud De afdichtring van de Monteer de afdichtring messenas is niet goed correct...
- Page 20 Specifications Product Model Spanning Frequentie Vermogen Capaciteit Max. Snelheid ZM5003 220V- 50/ 60Hz 1800W 1.850L 22000RPM 240V Beveiligingsklasse: 1 Deze markering geeft aan dat dit product in de hele EU niet met ander huishoudelijk afval mag worden weggegooid. Om mogelijke schade aan...
-
Page 21: Section 1: Important Safeguards
Thank you for choosing one of our Amzchef products! For customer support, please contact our email: info@iamzchef.com. SECTION 1: IMPORTANT SAFEGUARDS WARNING: This units contains electrical connections and moving parts that potentially present risk to the user. To avoid risk of serious injury when using your blender. - Page 22 15. Avoid touching moving parts. 16. Alteration or modification of any part of the blender base or container, including the use of any part or parts that are not genuine authorized amzchef parts, may cause fire, electric shock, or injury.
- Page 23 26. Do not leave foreign objects, such as spoons, forks, knives or the lid plug, in the container as this will damage the blades and other components when starting the machine and may cause injury. 27. Never attempt to operate with damaged blades. 28.
- Page 24 47. DO NOT store ingredients before or after blending them in the container with the blades attached. Some foods may contain active ingredients or release gases that will expand if left in a sealed container, resulting in excessive pressure buildup that can pose a risk of injury. 48.
-
Page 25: Section 2: Parts & Features
product Don’t put the product into household use only. water other liquids. To ensure safety, please don’t disassemble the product privately. If there is abnormal situation, please contact customer service which contact information is printed on the manual. It must be repaired by manufacturer or special technician of after-sale service center appointed by manufacturer. - Page 26 Lid Plug: Insert through the lid plug opening and secure by turning clockwise. Turn counterclockwise and lift it to remove the lid plug for using the tamper or adding ingredients. Part Lid: Always use the lid when mixing, especially when mixing hot ingredients (unless the pusher is inserted through the opening of the lid plug).
-
Page 27: Section 3: Panel Control
SECTION 3: CONTROL PANEL SMOOTHIES / In the standby mode, click the "START/STOP" button to ICE CRUSH enter the selection interface, click the desired function, PUREE / LOW / such as "SMOOTHIES/BLEND", etc. After selecting the MED / HIGH function, click the "START" button /STOP" to enter the BLEND running state. -
Page 28: Section 4: Functions
SECTION 4: FUNCTIONS Mode Function SMOOTHIES Soft fruits and vegetables can be mixed with milk to (120s) make a smoothie. ICE CRUSH The production is mainly crushed ice, and no more (60s) than 13 ice cubes are placed in the mixing glass. PUREE Smash the chopped fruits and vegetables into (120s) -
Page 29: Section 5: Operating Instructions
SECTION 5: OPERATING INSTRUCTIONS Cut the ingredients into pieces about 2 cm in size (meat diced and tendon removed). Use lid plug (or electronic scale) and measure out the right amount of ingredients according to personal taste. Pour the weighed ingredients into the jar. - Page 30 Place the jar on the main body in the correct position and the main body should be placed on a flat surface. Connect the power cord to the socket, when the power is turned on, all the backlight lights flash once, the buzzer sounds once, and the START/STOP button flashes (if the mixing jar is not in place, it will not be powered on).
- Page 31 When using crushed ice or dry-grinding ingredients, remove the lid of the small cup and add the tamper to stir the ingredients. Remove the jar, pour out the juice, and add seasonings to taste. (Do not be too hasty when pouring the juice to prevent the juice from splashing).
- Page 32 Align the accompanying blade holder with the mouth of the cup, and then tighten the cup holder to the right. Place the travel cup with the blade holder on the main body in the correct position. The main body should be placed on a flat work surface.
-
Page 33: Section 6: Cleaning & Maintenance
After tightening the lid of the corresponding cup, check that the lid is tight (if the lid is not tight, there are problems with water seepage) and pull the shaft up to take it with you. SECTION 6: CLEANING & MAINTENANCE CAUTION: * To avoid inadvertent activation, unplug from outlet before assembling or disassembling parts, and before cleaning. - Page 34 Hand wash: (remove the jar, lid, and lid plug) a. Wash the jar, lid, and blades in warm soapy water. Rinse clean under running water and dry thoroughly. Centering pad can be removed for more thorough cleaning. Dishwasher: (remove the jar, lid and lid plug) a.
-
Page 35: Section 7: Troubleshooting
HOW TO STORE? 1. Unplug the appliance. 2. Make sure all parts are clean & dry and placed in a dean and dry place. 3. Store the blender upright with the lid secured on top. Any other servicing should be performed by an authorized service representative. - Page 36 There are too many Increase the water ingredients or too little according to the actual water situation The ingredients cannot Wrong selection of Choose another be broken function keys selection Contact customer Machine failure service for maintenance The sealing ring of the Install the sealing ring blade shaft is not correctly...
-
Page 37: Section 8: Warranty
Specifications Product Model Voltage Frequency Power Capacity Max. speed ZM5003 220V- 50/ 60Hz 1800W 1.850L 22000RPM 240V Security class: 1 This marking indicates that this product should not be disposed with other household wastes throughout the EU. To prevent possible harm to the environment or human health from uncontrolled waste disposal, recycle it responsibly to promote the sustainable reuse of material resources. -
Page 38: Section 1: Mesures De Protection Importantes
Merci d'avoir choisi l'un de nos produits Amzchef ! Pour le support client, veuillez contacter notre e-mail : info@iamzchef.com. SECTION 1 : MESURES DE PROTECTION IMPORTANTES AVERTISSEMENT : Cet appareil contient des connexions électriques et des pièces mobiles qui présentent potentiellement un risque pour l'utilisateur. Pour éviter tout risque de blessure grave lors de l'utilisation de votre mixeur. - Page 39 électrique ou des blessures. 17. L'utilisation d'accessoires, y compris les bocaux de conserve, non expressément autorisés ou vendus par amzchef pour une utilisation avec ce...
- Page 40 mélangeur, y compris le récipient, peut provoquer un incendie, un choc électrique ou des blessures. 18. Ne pas utiliser à l'extérieur 19. CE PRODUIT EST DESTINÉ UNIQUEMENT À UN USAGE DOMESTIQUE. N'utilisez pas le mélangeur pour un usage autre que celui prévu.
- Page 41 33. Ajoutez les ingrédients dans le récipient. REMARQUE Ne pas trop remplir ! Pour éviter de renverser, n'ajoutez pas d'ingrédients au-delà de la ligne de remplissage "MAX". 34. Lorsque vous préparez des beurres de noix ou des aliments à base d'huile, ne mélangez pas plus d'une minute après que le mélange commence à...
- Page 42 en toute sécurité et s'ils comprennent les risques encourus. Le nettoyage et l'entretien par l'utilisateur ne doivent pas être effectués par des enfants, sauf s'ils sont âgés de 8 ans et plus et surveillés. Gardez l'appareil et son cordon hors de portée des enfants de moins de 8 ans 52.
-
Page 43: Section 2: Pièces Et Caractéristiques
SECTION 2: PIÈCES ET CARACTÉRISTIQUES Bouchon de couvercle Altérer Partie couvercle Patin de centrage Boutteille de voyage Panneau de commande Porte-lame Corps principal Bouchon de bouteille de voyage Bouchon du couvercle : insérez-le dans l'ouverture du bouchon du couvercle et fixez-le en tournant dans le sens des aiguilles d'une montre. Tournez dans le sens antihoraire et soulevez-le pour retirer le bouchon du couvercle pour utiliser le pilon ou ajouter des ingrédients. -
Page 44: Section 3: Contôle Du Panneau
Panneau de commande : le moteur est conçu avec des circuits de protection doubles pour éviter la surchauffe et la surcharge. Altérer : utilisé pour traiter des mélanges plus épais et maintenir les ingrédients en mouvement vers et à travers les lames. ATTENTION 1 : Le pilon ne peut être utilisé... -
Page 45: Section 4: Les Fonctions
En mode veille, cliquez sur le bouton "START/STOP" pour entrer dans l'interface de sélection, appuyez directement sur le bouton "PULSE", le produit PULSE fonctionnera à la vitesse la plus élevée, l'affichage commencera à compter en secondes et le travail standard est de 2 minutes. Relâchez le bouton et le produit cessera de fonctionner, l'écran affichera "0:00". -
Page 46: Section 5: Mode D'emploi
ATTENTION : 1. Si vous devez ajouter des ingrédients ou des ingrédients pendant le fonctionnement, vous pouvez effectuer des opérations connexes en ouvrant le bouchon du couvercle (petit ensemble de couvercle) (ne versez pas d'eau chaude pour éviter les brûlures). 2. - Page 47 Ajouter une quantité appropriée d'eau dans le pot. Vissez le bouchon du couvercle sur le couvercle et alignez le couvercle sur le côté avec le bocal. Placez le bocal sur le corps principal dans la bonne position et le corps principal doit être placé...
- Page 48 Sélectionnez la touche de fonction correspondante. (par exemple : BLEND, etc.) Appuyez sur le bouton "START/STOP" et commencez à travailler (il est normal que le son soit rapide et lent au travail). Lorsque le travail est terminé, le buzzer sonne 3 fois et revient à l'état de veille. Lorsque vous utilisez de la glace pilée ou des ingrédients broyés à...
- Page 49 Nettoyez l'intérieur du bocal à temps et nettoyez l'extérieur du bocal avec un chiffon humide et essoré. Après avoir essuyé les taches d'eau sur la surface de la machine, séparez le corps principal et le pot de mélange dans un endroit frais et ventilé pour sécher à...
-
Page 50: Section 6: Nettoyage Et Entretien
Sélectionnez la touche de fonction correspondante. (ex: MÉLANGER, etc.) Appuyez sur le bouton "START/STOP" et commencez à travailler (il est normal que le son au travail soit rapide et lent). Lorsque le travail est terminé, le buzzer retentira 3 fois et reviendra en mode veille. - Page 51 1. Pour nettoyer le bocal, le couvercle, le bouchon du couvercle, le pilon et le tampon de centrage : Autonettoyant : (sans retirer le pot, le couvercle et le bouchon du couvercle) : (1) Remplissez le bocal à moitié avec de l'eau tiède et ajoutez quelques gouttes de liquide vaisselle.
- Page 52 2. Pour nettoyer le porte-lame, la bouteille de voyage et le couvercle associé : Autonettoyant : (sans enlever le couvercle et le porte-lame) : (1) Remplissez la bouteille de voyage à moitié avec de l'eau tiède et ajoutez quelques gouttes de liquide vaisselle. (2) Vissez fermement le porte-lame sur la bouteille de voyage et effectuez l'une des opérations suivantes : a.
-
Page 53: Section 7: Dépannage
SECTION 7: DÉPANNAGE ATTENTION: Pour réduire le risque d'électrocution et de fonctionnement involontaire, coupez l'alimentation et débranchez l'appareil avant le dépannage. Type de défaut Raison Méthode de résolution Vérifiez le cordon Le cordon d'alimentation et d'alimentation n'est pas assurez-vous qu'il est correctement branché... - Page 54 client pour l'entretien La bague d'étanchéité du l'arbre de la lame Installez correctement n'est installé la bague d'étanchéité correctement La bague d'étanchéité porte-gobelet Installez correctement Fuite d'eau correspondant n'est pas la bague d'étanchéité installée correctement Vérifiez que le couvercle du couvercle Couvrir à...
-
Page 55: Section 8: Garantie
Caractéristiques Product Model Tension Fréquence Pouvoir Capacité Max. rapidité ZM5003 220V- 50/ 60Hz 1800W 1.850L 22000 tr/min 240V Classe de sécurité: 1 Ce marquage indique que ce produit ne doit pas être jeté avec les autres déchets ménagers dans toute l'UE. Pour éviter d'éventuels dommages à... - Page 56 The Brand Center Dieselstraat 5 7903AR Hoogeveen Netherlands 09/2022 – V1...
Need help?
Do you have a question about the ZM5003 and is the answer not in the manual?
Questions and answers