
Related Manuals for Tellur TLL331461

Summary of Contents for Tellur TLL331461
- Page 1 Smart Wi-Fi Pet Feeder, UltraHD Camera, 4L TLL331461 User manual Manual de utilizare Manual del usuario Manuel d’utilisation Manuale d'uso Benutzerhandbuch...
-
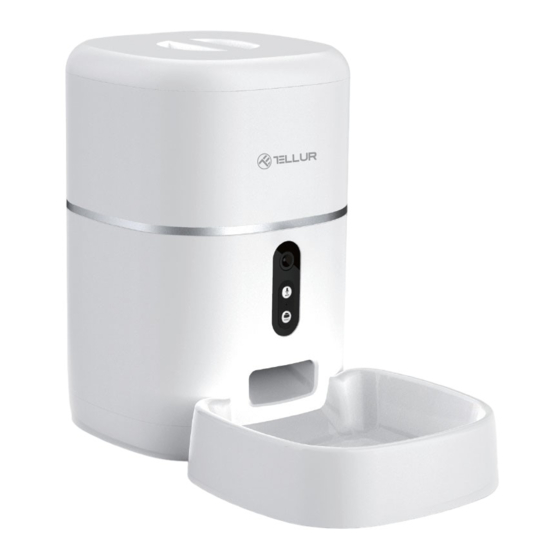
Page 2: Product Diagram
Thank you for choosing Tellur! To ensure an optimum performance and safety, please, read this user manual carefully before using the product. Keep this user manual safe for future references. 1. What's in the box Cable Manual Desiccant Pet feeder... - Page 3 Cloud storage: Yes, compatible Google Home: Compatible Amazon Alexa: Compatible APP Name: Tellur Smart APP Pairing Name: Tellur Pet Feeder Wi-Fi standard: IEEE 802.11b/g/n Supported Wi-Fi network: 2.4GHz Suitable for: Indoor use Working condition temperature: -10°C ~ +55°C Working condition humidity: 10% ~ 95% RH...
-
Page 4: Product Installation
6. The battery compartment can be installed with 3 x D (LR20) battery (not included) for manual feeding when there is no elec- tricity. 7. Pair with Tellur Smart APP to set up the feeding schedule and use all functions including the camera. - Page 5 3. Play button – Plays the recorded audio message. 4. Feeding and low food notification – Notifications will be sent via Tellur Smart APP when food is released or when there is not enough food in the device. 5. Camera functions – motion detection, night vision and two-way audio communication via Tellur Smart APP.
- Page 6 2.Once downloaded, the app will ask you to create an account (if you don’t have any already). Enter your email, select the country you live in and create a password for your Tellur Smart account ***Set up router This device only supports 2.4GHz frequency band router, does not support 5GHz frequency band router.
- Page 7 1.Open the Tellur Smart app and click “Add device” or “+” and then select “Video Surveillance” -> “Pet Feeder with Camera (Wi-Fi)”. 2.When connecting, make sure your router, smartphone and the device are as close as possible. 3.Power on and reset the device until the status indicator is flash- ing quickly or a prompt tone is heard, and then click "Next".
- Page 8 4.With the camera lens, scan the QR code that appeared on your phone. When the device makes a sound, click “I heard a Prompt” and the configuration will be complete. 6. Storage Installing microSD card 1. The storage card slot is located inside the food bucket as seen in the diagram below.
- Page 9 "Sharing sent", tap "Add sharing" and share the device with the added family members. Notice - users must install the Tellur Smart app on their device in order to see shared devices. How can I manage the devices shared by others? Open App, go to "Profile"...
- Page 10 5. Enter your Tellur Smart account and password. Now you have finished the integration with Alexa. Tellur Smart app is now skilled with Alexa, and you can vocally control the devices added in Tellur Smart. Remember - if you rename your smart devices, use a simple name that Alexa can recognize.
- Page 11 Tellur Smart account. Make sure your devices' names are easily recognizable. 2. Hit the "Add new" button, enter Tellur Smart in the search bar, and select the app from the list. Next, select your Tellur Smart account's region, enter your Tellur Smart account and password, and tap "Link now".
- Page 12 Now you can control your smart devices through Google Home. Take bedroom light as example – the supported voice commands are as below: • Ok Google, turn on/off bedroom light. • Ok Google, set bedroom light to 50 percent. • Ok Google, brighten bedroom light. •...
Need help?
Do you have a question about the TLL331461 and is the answer not in the manual?
Questions and answers