
Related Manuals for nannyVac BL-01

Summary of Contents for nannyVac BL-01
- Page 1 Robot Vacuum Cleaner Instruction Manual Thank you for purchasing this product. Please Read all the instructions carefully before attempting to operate this product and save this instruction manual for future reference.
-
Page 2: Safety Instruction
1. SAFETY INSTRUCTION Caution No one small disassemble, repair or transform the unit Don’t use other charger but the equipped one of the unit, except the maintenance technicians designated by our It may cause product damage, electric shock or fire. company, it may cause fire, electric shock or personal injury. -
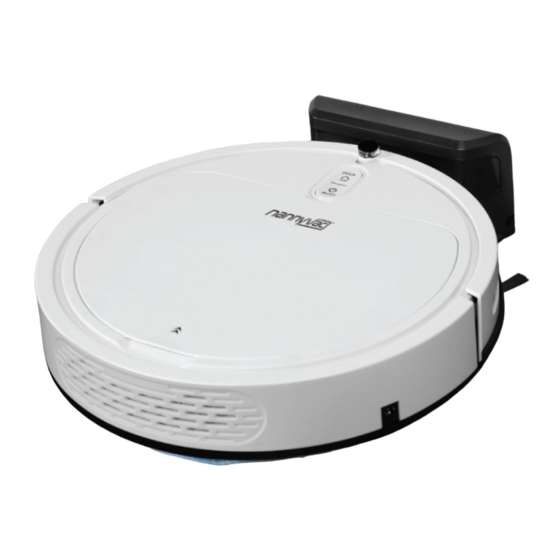
Page 3: Parts Name
2.COMPONENTS 2.1 PARTS NAME Infrared Receiver Infront bumper / Mechanical bumper Auto - charging button Infrared sensors ON / OFF & Auto - cleaning button Top cover Ground sensor Universal wheel Charging contactor Main body Right side brush Left side brush Ground sensor Ground sensor Suction channel... -
Page 4: Functional Keys
2.COMPONENTS Functional keys Indicator light: 1.Start working:related function key blue light flashing. 2.Error:2 buttons bule light flashing and with notify sound. 3.Charging:2 buttons blue light flashing. 4.Full charging: 2 buttons blue light keep lighting. Remote controller 1. ON/OFF & Cancell key 2. - Page 5 3.OPERATION INSTRUCTION 3.1 QUICK USER GUIDE 1.Position the charging base Install the charging base on the flat ground firmly and against the vertical wall (fixed on the wall with the charging base sticker). Ensure no obstacles or hollow areas 2M away from the charging base in front and 1M on left and right.
- Page 6 3.OPERATION INSTRUCTION Long press the “ ” button for 3 seconds to turn on the unit, blue flashing. *Under stand-by mode, long press the “ ” button for 3 seconds after “Di” sound to turn off the unit. 3.2 CLEAN/PAUSE/RECHARGE/STAND-BY/TURN OFF 1.
-
Page 7: Auto-Cleaning
3.OPERATION INSTRUCTION 3.3 AUTO-CLEANING Clear up the garbages or obstacles in the cleaning area before cleaning. Press the “Auto” button on unit or “Auto” button on remote controller, depend on the room environment it will clean by spiral, linear, zigzag, follows the wall modes automatically. -
Page 8: Cleaning Side Brushes
4. MAINTENACE 4.1 CLEANING SIDE BRUSHES 1. Please install the side brush at first use, align side brush and fixed shaft and then press them. 2. Please clean side brush regularly and replace it if necessary. *NOTE When replacing the side brush, please grasp the soft rubber and pull out.When installing, align the square hole of the side brush with the side brush to fix the convex shaft, and press it gently to install it. -
Page 9: Maintenance
4. MAINTENANCE 4.3 CLEANING THE INFRARED SENSOR AND CHARGING CONNECTOR Please use a dry and soft cloth to clean the infrared receiver and charging connector as following figures. *NOTE 1. Please clean the charging electrode on time to avoid charging issues. 2. -
Page 10: Replacement Of Battery
4.MAINTENACE 4.4 INSTALLING AND USING MOP CLOTH 1. Place the bottom of the unit upward, place the magic strap on suits position. 2pcs of Magic strap Suggest magic straps position 2. Put the mop coth stickup on magic straps, mop coth can be reusabled. *NOTE Please take down the mop cloth after clean, wash in water and stickup on it after dry thoroughly. -
Page 11: Failure Checking
5. FAILURE CHECKING FAILURE TABLE Under fault state, the unit stops working,blue flashing and buzzer with alarm sound at the same time. Please be noted that the unit is idle for 5 minutes no any opertion, it will be turn off automatically. This failure table for users to solve the trobles that may occurred in use process. -
Page 12: Accessories List
6. ACCESSORIES LIST Accessories Q’ty Robot Cleaner(included battery) Docking Station Adaptor Remote controller (battery not included) HEPA filter(1pc installed in dustbin box) Side brushes Magic strap Mopping cloth Instruction manual Warranty card *NOTE 1.This Instruction Manual may be modified or revised from time to time without prior notice. 2.To proide innovative products to users, this product way be updated or modified by our company without prior notice.