Table of Contents
Advertisement
Available languages
Available languages
Quick Links
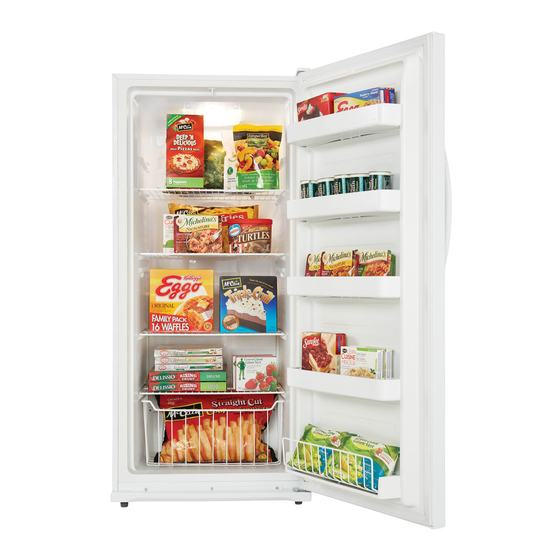
UPRIGHT FREEZER
CONGÉLATEUR VERTICAL
CONGELADOR VERTICAL
OWNER'S USE AND CARE GUIDE
GUIDE D'UTILISATION ET D'ENTRETIEN
GUÍA DEL PROPRIETARIO DE UTILIZACION Y CUIDADO
MODEL • MODÈLE • MODELO
DUF138E1WDD
DANBY PRODUCTS LIMITED, ONTARIO, CANADA N1H 6Z9
DANBY PRODUCTS INC., FINDLAY, OHIO, USA 45840
2016.11.02
Advertisement
Table of Contents

Related Manuals for Danby DUF138E1


Summary of Contents for Danby DUF138E1
- Page 1 CONGÉLATEUR VERTICAL CONGELADOR VERTICAL OWNER’S USE AND CARE GUIDE GUIDE D’UTILISATION ET D'ENTRETIEN GUÍA DEL PROPRIETARIO DE UTILIZACION Y CUIDADO MODEL • MODÈLE • MODELO DUF138E1WDD DANBY PRODUCTS LIMITED, ONTARIO, CANADA N1H 6Z9 2016.11.02 DANBY PRODUCTS INC., FINDLAY, OHIO, USA 45840...
-
Page 2: Table Of Contents
CONTENTS TABLE DES MATIÈRES ÍNDICE UPRIGHT FREEZER Owner’s Use and Care Guide..........1-10 • Welcome • Safety Instructions CAUTION: • Installation • Operation Read and follow all safety rules and oper- • Care and Maintenance ating instructions before fi rst use of this •... -
Page 3: Owner's Use And Care Guide
Welcome Welcome to the Danby family. We are proud of our quality products, and we believe in dependable service, like you will find in this Owner’s Use and Care Guide, and like you will receive from our friendly customer service department. Best of all, you will experience these values each and every time you use your Danby appliance. - Page 4 Important Safety Information READ AND FOLLOW ALL SAFETY INSTRUCTIONS This appliance must be grounded. In the event of an electrical short circuit, grounding reduces the risk of electrical shock by providing an escape wire for the electrical current. ELECTRICAL REQUIREMENTS WARNING ELECTRICAL RATING: The serial rating plate indicates the voltage and frequency the freezer is designed for.
- Page 5 Important Safety Information READ AND FOLLOW ALL SAFETY INSTRUCTIONS • This appliance is not intended for use by persons (including children) whose physical, sensory or mental capabilities may be different or reduced, or who lack experience or knowledge, unless such persons receive supervision or train- ing to operate the appliance by a person responsible for their safety.
- Page 6 Installation Instructions LOCATION Remove exterior and interior packaging, wipe the outside thoroughly with a soft dry cloth and the inside with a wet, luke- warm cloth. Avoid placing the unit in a narrow recess or near any heat source, direct sunlight, or moisture. Let air circulate freely around the unit.
- Page 7 Installation Instructions LEVELLING LEGS If the unit is not level, the doors and seal may not function correctly, causing the unit to operate ineffi ciently. To level the unit turn the levelling leg(s) clockwise to rise or counter-clockwise to lower. DECORATIVE COVER To install the decorative cover, please follow the steps in the below diagram.
- Page 8 Operating Instructions STARTING THE FREEZER The freezer is ready to operate as received, when connected to the power supply. After connecting to the power supply, close the door and allow the freezer to operate. The unit will run from 1 to 2 hours (possibly longer, depending on condi- tions) before operating temperature is reached.
-
Page 9: Care And Maintenance
Operating Instructions TEMPERATURE CONTROL Switching Between °C and °F: • To switch between °C and °F, press the °C/°F key (6). Freezer Alarm: • Press the alarm button (5) to stop the alarm from sounding. The alarm will sound when the freezer has reached a warmer temperature. - Page 10 Care and Maintenance VACATION TIME For short vacation periods, leave the control knob at its normal setting. During longer absences, 1. remove all food, 2. disconnect power cord from electrical outlet, 3. defrost and clean the freezer thoroughly, 4. leave lid open to avoid possible formations of condensation, mold or odors. ELECTRICAL AND MECHANICAL FAILURE In the event of mechanical or electrical failure of the freezer, contact a service agent immediately and give complete infor- mation of your freezer, the model number and serial number.
-
Page 11: Troubleshooting
Occasionally, a minor problem may arise, and a service call may not be necessary - use this troubleshooting guide for a possible solution. If the unit continues to operate improperly, call an authorized service depot or Danby’s Toll Free Number for assistance. - Page 12 Nothing within this warranty shall imply that Danby will be responsible or liable for any spoilage or damage to food or other Nothing within this warranty shall imply that Danby will be responsible or liable for any spoilage or damage to food or other c ontents of this appliance, whether due contents of this appliance, whether due to any defect of the appliance, or its use, whether proper or improper.
-
Page 13: Bienvenue
Bienvenue Bienvenue dans la famille Danby. Nous sommes fiers de la qualité de nos produits et nous croyons fermement au serv- ice par une assistance fiable. Vous le découvrirez à la lecture de ce guide facile d’utilisation et vous en aurez la confir- mation par notre service d’assistance à... -
Page 14: Consignes De Sécurité Importantes
Consignes de sécurité importantes PRENDRE CONNAISSANCE DE TOUTES LES INFORMATIONS RELATIVES À LA SÉCURITÉ AVANT D’UTILISER LE PRODUIT Cet appareil doit être mis à la terre. En cas de courtcircuit, la mise à la terre réduit les risques de décharge électrique en fournissant un échappatoire au courant électrique. - Page 15 Consignes de sécurité importantes PRENDRE CONNAISSANCE DE TOUTES LES INFORMATIONS RELATIVES À LA SÉCURITÉ AVANT D’UTILISER LE PRODUIT • Ce dispositif n’est pas désigné d’être utilisé par des personnes (y compris enfants) dont le développement et capacité physique, sensoriel ou mental est différente ou réduite, ou par les personnes qui manquent expérience ou connais- sance sauf si ces personnes sont surveillés ou formés par une personne responsable de leur sécurité.
-
Page 16: Instructions D'installation
Instructions d’installation EMPLACEMENT Enlevez les emballages extérieurs et intérieurs. Essuyez complètement l’extérieur avec un linge doux sec et l’intérieur avec un linge humide tiède. Il ne faut jamais situer l’appareil dans un recoin étroit, proche d’une source d’air chaud. L’air doit circuler à l’entour de l’appareil. Gardez le dos de l’appareil à une distance de 10,6 cm / 4 pouces du mur, as- surez-vous qu’il est de 20,3 cm / 8 pouce d’espace entre chaque murs et assurez-vous qu’il est de 30,5 cm / 12 pouces d’espace entre l’appareil et les armoires ou le plafond. - Page 17 Instructions d’installation PIEDS DE MIVELLEMENT Si l’appareil n’est pas niveau, les portes et les joint ne pourraient pas fonctionner correctement, ce qui rend l’appareil de fonctionner d’un manière ineffi cace. Pour niveler l’appareil tourner la jambe nivellement vers la droite pour augmenter ou dans le sens antihoraire pour abaisser.
-
Page 18: Consignes D'utilisation
Consignes d’utilisation MISE EN MARCHE DU CONGÉLATEUR Le congélateur est prêt à opérer des qu’il à été branché sur une prise de courant électrique. Après le démarrage, fermez la porte et laissez le congélateur fonctionner. L’unité motrice marchera d’une à deux heures avant que la température d’opération soit atteinte. -
Page 19: Soins Et Entretien
Consignes d’utilisation CONTRÔLE DE LA TEMPÉRATURE Changer entre °C et °F : • Pour changer entre °C et °F, appuyez sur la touche °C/°F (6). Alarme du congélateur : • Appuyez sur le bouton d’alarme (5) pour arrêter l’alarme sonore. L’alarme commencera lorsque le congélateur atteint une température trop chaude. - Page 20 Soins et entretien PENDANT LE VACANCES Si vous prenez des vacances de courte durée, laissez le bouton de commande à son réglage normal. Si l’absence doit durer longtemps, 1. enlever tous les aliments, 2. débranchez l’appareil de la prise murale, 3.
-
Page 21: Dépannage
De temps en temps, un problème est mineur et un appel de service peut ne pas être nécessaire. Utilisez ce guide de dépannage pour trouver une solution possible. Si l’unité continue de fonctionner incorrectement, appelez un dépôt de service autorisé ou le numéro sans frais de Danby pour obtenir de l’assistance. Tel: 1-800-26- (1-800-263-2629) PROBLÈME... - Page 22 Aucune partie de la garantie ne prévoit implicitement que le fabricant sera tenu responsable des dommages subis par les Nothing within this warranty shall imply that Danby will be responsible or liable for any spoilage or damage to food or other c ontents of this appliance, whether due aliments ou d’autres types de contenu, qu’ils soient causés par la défectuosité...
-
Page 23: Bienvenido
Bienvenido Bienvenido a la familia Danby. Estamos orgullosos de nuestros productos de alta calidad y creemos en el servicio confi- able. Usted lo podrá apreciar en este manual fácil de usar, y lo escuchará enlas voces amistosas de nuestro departa- mento de servicio al consumidor. -
Page 24: Instrucciones De Seguridad Importantes
Instrucciones de seguridad importantes LEA TODA LA INFORMACIÓN SOBRE SEGURIDAD ANTES DE UTILIZAR EL EQUIPO Este artefacto debe ser conectado a tierra. En caso de un corto circuito eléctrico, la conexión a tierra reduce el riesgo de una descarga eléctrica proporcionando un cable de retorno para la corriente eléctrica. REQUISITOS ELÉCTRICOS ADVERTENCIA POTENCIAS ELÉCTRICAS: La placa de serie indica el vol-... - Page 25 Instrucciones de seguridad importantes LEA TODA LA INFORMACIÓN SOBRE SEGURIDAD ANTES DE UTILIZAR EL EQUIPO • Este aparato no se destina para utilizarse por personas (incluyendo niños) cuyas capacidades físicas, sensoriales o mentales sean diferentes o estén reducidas, o carezcan de experiencia o conocimiento, a menos que dichas perso- nas reciban una supervisión o capacitación para el funcionamiento del aparato por una persona responsable de su seguridad.
-
Page 26: Instrucciones De Instalacón
Instrucciones de instalación UBICACIÓN Saque los embalajes exteriores e interiores, limpie elexterior bien con un paño suave seco y el interior conun pano húmedo y tibio. Evite colocar la caja en un hueco estrecho o cerca de una fuente de calor, luz desol directa, o lugar húmedo. - Page 27 Instrucciones de instalación PATAS NIVELADORA Si la unidad no está nivelada, las puertas y el sello no podrían funcionar correct- amente, provocando que la unidad funcione de manera inefi ciente. Para nivelar la unidad gire la pata niveladora en sentido de las manecillas del reloj (derecha) para aumentar o en sentido contrario a las manecillas del reloj (izquierda) para disminuir.
-
Page 28: Instrucciones Operadoras
Instrucciones operadoras MARCHA DEL CONGELADOR El congelador está listo para funcionar cuando se conecta con una fuente de alimentación de electricidad. Luego de conectarlo a la fuente de alimentación, cierre la puerta y deje funcionando el congelador. La unidad funcionará una a dos horas hasta alcanzar la temperatura de funcionamiento. - Page 29 Instrucciones operadoras CONTROL DE TEMPERATURA Cambio entre °C y °F: • Para cambiar entre °C y °F, pulse la tecla °C/°F (6). Alarma del Congelador: • Pulse el botón de alarma (5) para detener el sonido de la alarma. La alarma sonará cuando el congelador ha alca- nzado una temperatura cálida.
- Page 30 Cuidado y mantenimiento VACACIONES Si se va de vacaciones por unos días, deje la perilla de control en su graduación habitual. Durante ausencias más largas, 1. retire todos los alimentos, 2. desconecte el cordón eléctrico del tomacorriente, 3. descongele y limpie el congelador por completo, 4.
-
Page 31: Solución Sugerida
A menudo, los problemas son sencillos y no es necesario hacer una llamada de reparación, use esta guía de resolución de problemas para encontrar una posible solución. Si la unidad sigue funcionando mal, llame a los números gratuitos de un centro Danby de servicio autorizado. Tel: 1-800-26-... - Page 32 Nothing within this warranty shall imply that Danby will be responsible or liable for any spoilage or damage to food or other c ontents of this appliance, whether due Nada dentro de esta garantía implica que Danby será...
- Page 33 NOTES / REMARQUES / NOTAS : __________________________________________________________________________________________ __________________________________________________________________________________________ __________________________________________________________________________________________ __________________________________________________________________________________________ __________________________________________________________________________________________ __________________________________________________________________________________________ __________________________________________________________________________________________ __________________________________________________________________________________________ __________________________________________________________________________________________ __________________________________________________________________________________________ __________________________________________________________________________________________ __________________________________________________________________________________________ __________________________________________________________________________________________ __________________________________________________________________________________________ __________________________________________________________________________________________ __________________________________________________________________________________________ __________________________________________________________________________________________ __________________________________________________________________________________________ __________________________________________________________________________________________ __________________________________________________________________________________________ __________________________________________________________________________________________ __________________________________________________________________________________________...
- Page 34 NOTES / REMARQUES / NOTAS : __________________________________________________________________________________________ __________________________________________________________________________________________ __________________________________________________________________________________________ __________________________________________________________________________________________ __________________________________________________________________________________________ __________________________________________________________________________________________ __________________________________________________________________________________________ __________________________________________________________________________________________ __________________________________________________________________________________________ __________________________________________________________________________________________ __________________________________________________________________________________________ __________________________________________________________________________________________ __________________________________________________________________________________________ __________________________________________________________________________________________ __________________________________________________________________________________________ __________________________________________________________________________________________ __________________________________________________________________________________________ __________________________________________________________________________________________ __________________________________________________________________________________________ __________________________________________________________________________________________ __________________________________________________________________________________________ __________________________________________________________________________________________...
- Page 35 NOTES / REMARQUES / NOTAS : __________________________________________________________________________________________ __________________________________________________________________________________________ __________________________________________________________________________________________ __________________________________________________________________________________________ __________________________________________________________________________________________ __________________________________________________________________________________________ __________________________________________________________________________________________ __________________________________________________________________________________________ __________________________________________________________________________________________ __________________________________________________________________________________________ __________________________________________________________________________________________ __________________________________________________________________________________________ __________________________________________________________________________________________ __________________________________________________________________________________________ __________________________________________________________________________________________ __________________________________________________________________________________________ __________________________________________________________________________________________ __________________________________________________________________________________________ __________________________________________________________________________________________ __________________________________________________________________________________________ __________________________________________________________________________________________ __________________________________________________________________________________________...
-
Page 36: Duf138E1Wdd
Para pedir servicio y/o la localización del depósito del servicio lo más cerca posible usted, llama Danby gratis. Al pedir servicio o pidiendo piezas, proporcione 1-800-26- siempre la información siguiente:...
Need help?
Do you have a question about the DUF138E1 and is the answer not in the manual?
Questions and answers