
Related Manuals for Eickemeyer ORTHOVET PRO

Summary of Contents for Eickemeyer ORTHOVET PRO
- Page 1 ORTHOVET PRO BATTERY POWERED DRILL SYSTEM USER MANUAL USER MANUAL USER MANUAL Item no. 195000 Item no. 195000 Item no. 195000 TELEPHONE +49 7461 96 580 0 www.eickemeyer.com...
- Page 2 USER MANUAL ORTHOVET PRO BATTERY POWERED DRILL SYSTEM T +49 7461 96 580 0 | F +49 7461 96 580 90 | export@eickemeyer.com | www.eickemeyer.com...
-
Page 3: Table Of Contents
This description alone does not provide suffi cient background for the direct use of the product. Instruction in handling this product is highly recommended. T +49 7461 96 580 0 | F +49 7461 96 580 90 | export@eickemeyer.com | www.eickemeyer.com... -
Page 4: Introduction
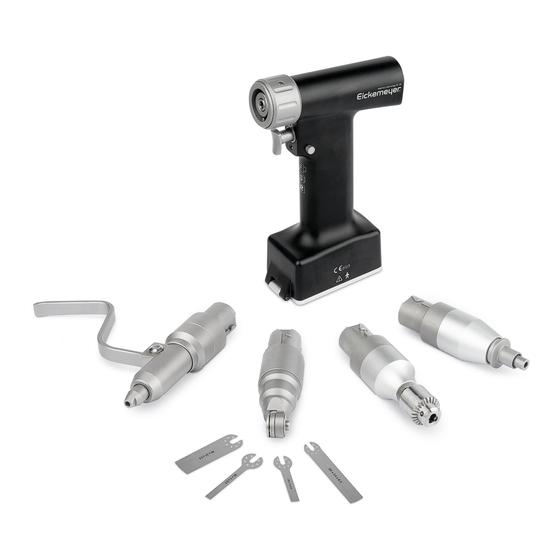
Please read the corresponding “surgical techniques” of the used implant system. The OrthoVet PRO is only to be used for patient treatment after careful consultation of the instructions for use. It is recommended that an alternative system is available to use during application, as technical problems can never be completely ruled out. - Page 5 The batteries may never be sterilized, washed or dipped. Sterilization would destroy the battery with possible secondary damage. • Should the machine drop on the fl oor and have visible defects, do not use it anymore and send it to the EICKEMEYER® service center. Accessories / Scope of Delivery The OrthoVet PRO Battery Drill System consists of a handpiece, one battery loading station two batteries and a range of attachments and accessories designed for the system.
-
Page 6: Orthovet Pro
5 Release ring for attachment 6 Release slide for battery housing 7 F = FORWARD 8 S = STOP 9 R = REVERSE Figure 1 Figure 2 T +49 7461 96 580 0 | F +49 7461 96 580 90 | export@eickemeyer.com | www.eickemeyer.com... -
Page 7: Use
(Fig. 9). The same person presses it completely into the battery casing to ensure a correct seat (Fig. 10). This person may not contact the outside of the battery casing. Figure 9 Figure 10 T +49 7461 96 580 0 | F +49 7461 96 580 90 | export@eickemeyer.com | www.eickemeyer.com... - Page 8 Storing When not in use, always store the battery in the OrthoVet PRO charging station and switch it on. This prevents the battery from being discharged and keeps it ready for use with full charge. Never load batteries in another charging station. This would damage the batteries.
-
Page 9: Attachments / Chucks
USER MANUAL ORTHOVET PRO BATTERY POWERED DRILL SYSTEM Notes For more information, see the “Care and Maintenance” section on page 15. Please read the guidelines for the transport of Lithium-ion battery (Li-ion), for the return transport to the EICKEMEYER® Service Center. 3. ATTACHMENTS / CHUCKS General Information The OrthoVet PRO System offers a broad range of attachments. - Page 10 To prevent injury, the power tool must be switched to “S = STOP” with the safety system during each manipulation. • Only use original attachments and tools from EICKEMEYER®. Damage that arises from using attachments and tools made by other manufacturers is not covered by the warranty.
-
Page 11: Jacobs Chuck
Use the Jacobs Chuck with Reverse motion only with tools that are approved for such use. Otherwise, the tool may break with subsequent damage. T +49 7461 96 580 0 | F +49 7461 96 580 90 | export@eickemeyer.com | www.eickemeyer.com... -
Page 12: Quick Chuck For Kirschner-Wires
5. To adjust the grip on the wire, reduce the clamping force and move the tool to the desired length. Reclamp the wire by pulling on the tension lever. Figure 17 Oscillating Saw-Chuck For saw blades with AESCULAP Connection (Item no. 195005). Figure 18 T +49 7461 96 580 0 | F +49 7461 96 580 90 | export@eickemeyer.com | www.eickemeyer.com... - Page 13 fi t in the pins of the holder. Release the locking knob. Figure 21 Precaution To prevent injury, always grip the saw attachment with the inserted saw blade from the direction of the machine. T +49 7461 96 580 0 | F +49 7461 96 580 90 | export@eickemeyer.com | www.eickemeyer.com...
- Page 14 Very precise cuts can be made when the saw blade is guided steadily. Imprecise cuts arise due to used blades, excess pressure or jamming the saw blade. T +49 7461 96 580 0 | F +49 7461 96 580 90 | export@eickemeyer.com | www.eickemeyer.com...
-
Page 15: Ao-Quick Chuck
Warning! Do not use solvents to disinfect the batteries. Battery poles must not contact water or solvents: danger of short circuiting! T +49 7461 96 580 0 | F +49 7461 96 580 90 | export@eickemeyer.com | www.eickemeyer.com... -
Page 16: Manual Cleaning Instruction
Final rinse with de-ionized or purifi ed water for a minimum of 2 minutes. 6. Dry Dry device using a soft lint-free cloth or clean compressed air. T +49 7461 96 580 0 | F +49 7461 96 580 90 | export@eickemeyer.com | www.eickemeyer.com... -
Page 17: Lubrication
Lubricate the attachment release buttons and then press the buttons several times. • Lubricate the mode selector switch and then move it several times. • Lubricate the attachment coupling. Figure 25 T +49 7461 96 580 0 | F +49 7461 96 580 90 | export@eickemeyer.com | www.eickemeyer.com... - Page 18 Attachments / Chucks Lubricate all moving parts of all the attachments. Jacobs Chuck (Item no. 195002) Lubricate the jaws and toothed rim. Figure 28 T +49 7461 96 580 0 | F +49 7461 96 580 90 | export@eickemeyer.com | www.eickemeyer.com...
- Page 19 Hold the Quick Coupling up and add one drop of oil into the attachment hole (Fig. 31) and on the holder of the lever (Fig. 29 + 30). Move the tension lever several times. Figure 29 Figure 30 Figure 31 AO-Quick Chuck (Item No. 195004) Figure 32 Figure 33 T +49 7461 96 580 0 | F +49 7461 96 580 90 | export@eickemeyer.com | www.eickemeyer.com...
- Page 20 To ensure a long service life and reduce repairs the power tool and all attachments must be lubricated after each use. • Only lubricate the power tool and attachments when clean. T +49 7461 96 580 0 | F +49 7461 96 580 90 | export@eickemeyer.com | www.eickemeyer.com...
-
Page 21: Sterilisation
Sterilisation Sterilisation Tray Place devices in the specially designed Sterilisation Tray for machine washing supplied by EICKEMEYER® (Item no. 195087). Dimensions load Sterilisation Tray (in mm): L 260 x W 170 x H 110 Ensure that all cannulations (handpiece and attachments), if applicable, are positioned as shown (Figure 36 + 37). -
Page 22: Function Control
Packaging Put cleaned, dry products into the proper places in the EICKEMEYER® Sterilisation Tray (Item no. 195087) and put the Sterilisation Tray into the container (Item no. 185555). Care should be taken in order to protect implants as well as pointed or sharp instruments from contact with other objects that may damage the surface or the Sterile Barrier System. -
Page 23: Repairs And Technical Service
Repairs and Technical Service • The tool should be sent to the EICKEMEYER®s offi ce for repair if it is faulty or malfunctions. • Contaminated products have to run through the complete reprocessing procedure before being sent to the EICKEMEYER®... -
Page 24: Troubleshooting
If the recommended solutions do not work, send the power tool back to EICKEMEYER® service center. For further technical questions or information on our services, please contact your EICKEMEYER® representative. T +49 7461 96 580 0 | F +49 7461 96 580 90 | export@eickemeyer.com | www.eickemeyer.com... -
Page 25: System Specifications
Depending on the cutting tool used and on the load applied, the heat generation of the handpiece, attachment and / or cutting tool can vary. Always control the temperature of the system to prevent overheating and possibly harming the patient or user. T +49 7461 96 580 0 | F +49 7461 96 580 90 | export@eickemeyer.com | www.eickemeyer.com... -
Page 26: Ordering Information
195002 OrthoVet PRO Jacobs Chuck Adapter, clamping range Ø 0.6 – 2.5 mm 195003 OrthoVet PRO Quick Coupling Adapter for Pins / KIRSCHNER-Wires, clamping range Ø 0.6 – 2.5 mm 195004 OrthoVet PRO Quick Coupling Adapter for AO Tools 195005... - Page 27 USER MANUAL ORTHOVET PRO BATTERY POWERED DRILL SYSTEM NOTES T +49 7461 96 580 0 | F +49 7461 96 580 90 | export@eickemeyer.com | www.eickemeyer.com...
- Page 28 GERMANY SWITZERLAND POLAND EICKEMEYER KG EICKEMEYER AG EICKEMEYER Sp. z o.o. Eltastraße 8 Sandgrube 29 Al. Jana Pawła II 27 78532 Tuttlingen 9050 Appenzell 00-867 Warszawa T +49 7461 96 580 0 T +41 71 788 23 13 T +48 22 185 55 76...
Need help?
Do you have a question about the ORTHOVET PRO and is the answer not in the manual?
Questions and answers