Table of Contents
Advertisement
Available languages
Available languages
Quick Links
Advertisement
Chapters
Table of Contents

Summary of Contents for ROVARY RV2000P
- Page 1 RV2000P CO2 monitor Manual/Betriebsanleitung English Deutsch...
- Page 2 We're here to help! QR CODE Thank you for purchasing the RV2000P CO2 monitor. This product can be used to monitor the CO2 value, the humidity (RH) and the temperature. Questions? We will be happy to assist you. Send an email to support@rovary.com.
-
Page 3: Table Of Contents
Table of contents What is a good CO2 value? Overview and Features Getting started: Using the CO2 monitor for the first time LCD Display General Controls and Settings Trend chart display Operating the main menu Activating or deactivating alarm function Turn on/off human and plant modes Log function Calibrate the CO2 monitor manually (CALI) -
Page 4: What Is A Good Co2 Value
What is a good CO2 value? A CO2 monitor gives an accurate indication of CO2 values in PPM (Parts per million). The CO2 monitor will sound an alarm if the CO2 concentration reaches a dangerously high level. Healthy outdoor air level Healthy indoor climate Acceptable 1000... -
Page 5: Overview And Features
Overview and Features Item Description Item Description Front panel Acceptable level Home Screen Good level Up button USB port Down button Opening for cord Menu Button Wall mount Enter button On-off switch Power indicator Label High level Sensors... -
Page 6: Getting Started: Using The Co2 Monitor For The First Time
Getting started: Using the CO2 monitor for the first time Connect the charger To switch on the CO2 monitor, the device must be connected to the charger when using for the first time. Press pin Press the pin on the back of the CO2 meter, the monitor will now turn on. Attention: The pin must be pushed in all the way or the monitor will not work. -
Page 7: Lcd Display
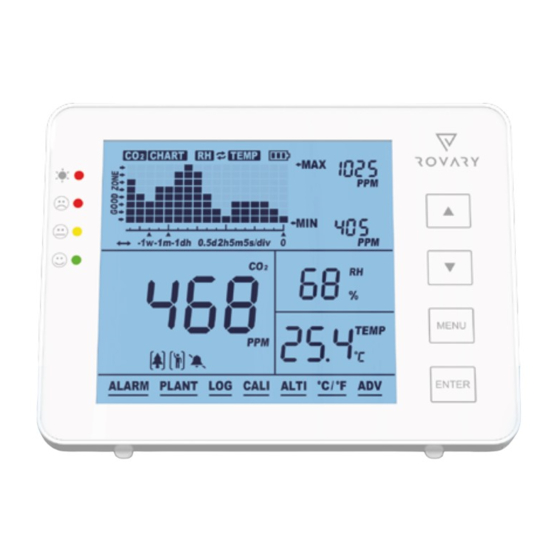
LCD Display Item Description Item Description CO2/RH/TEMP chart Plant mode Time per division Max. and min. value CO2 measurement RH value Audible alarm on/off Temperature measurement Human mode Main Menu... -
Page 8: General Controls And Settings
General Controls and Settings Control buttons The main menu functions can be activated by clicking MENU. The bar below the function indicates which choice is currently selected. To change the function,you can use the arrows. To select the function, press the ENTER button. Note that if nothing is pressed after 1 minute, the main menu will disappear and the unit will return to normal state. -
Page 9: Trend Chart Display
Trend chart display The trend chart graph shows the past measurements for one of the three parameters (CO2/RH/TEMP). There are 4 modes that can be switched using the arrows: CO2, TEMP, RH and CYCLE (CYCLE automatically switches between CO2/TEMP/RH). How does the trend chart view work? 1. -
Page 10: Operating The Main Menu
Operating the main menu The main menu functions can be activated by clicking The bar below the function indicates which choice is currently selected. To change the function, you can use To select the function, press the button Activating or deactivating alarm function To enable the alarm function, use the following the steps below: 1. -
Page 11: Turn On/Off Human And Plant Modes
Turn on/off human and plant modes The human mode is actually the 'normal' mode and can be used when the PPM value in a room needs to be measured. This functionality is the default setting in the monitor so, in principle, nothing needs to be adjusted as soon as the monitor has been received. The plant mode can be used when there is a need to grow plants or vegetables. -
Page 12: Log Function
Log function With the LOG function it is possible to view historical data records. The datalog is visible by following the steps below: 1. Click 2. Click twice to go to 3. Click when underlined. 4. Click arrow to select time intervals. 5. -
Page 13: Adjust Celsius Or Fahrenheit
Adjust Celsius or Fahrenheit The meter can be set to Celsius and Fahrenheit. The following steps can be performed to switch from Celsius to Fahrenheit: 1. Click 2. Click 4 times on to go to 3. Click when icon is underlined. 4. -
Page 14: Battery
Battery The CO2 monitor can be charged by connecting the USB cable when the device is ON. When should the monitor be charged? Empty battery: The top red light is on continuously, which means it’s important to charge the monitor within 20 minutes to prevent damage to the battery. -
Page 15: Specifications
Specifications Typical test conditions: Ambient temperature 23 ± 3°C, RH= 50%-70%, Height = 0~10 meters Measurement Specifications Operating temperature 0°C - 50°C (32°F - 122°F) Storage temperature -20°C - 60°C (-4°F - 140°F) Operation & storage RV 0 - 95% (non-condensing) CO2 measurement Measurement range 0-5000 ppm... - Page 16 Temperature measurement Operating Temperature 0°C - 90°C (32°F - 195°F) Display resolution 0,1°C (0.1°F) Response Time <20 minutes (63%) Humidity measurement (RH) Measurement range 5-95% Precision ±5% Display resolution 1% Main Interface Display, 0.1% Max/Min Display Other information Working voltage DC (5 ±0.25)V Dimensions 120*90*35mm...
-
Page 17: Troubleshooting
In this case, a sensor has become detached and the monitor is no longer functioning properly. The advice is to contact Rovary customer service by emailing to support@rovary.com. What to do in case of a red It is possible that the light of the CO2 monitor lights up red, while light, but a good the PPM value is correctly displayed. - Page 18 Is it possible to It is not possible to have the screen of the RV2000P constantly lit. continuously illuminate To check whether the CO2 value is too high, use the visual colours the screen of the CO2 or auditory warning.
-
Page 19: Annex
Annex Number Refers to Low/High alarm Customizable For humans 800-1200ppm For custom installation 600 - 900ppm For beans 600 - 900ppm For chilis 800-1000ppm For cucumbers 1000-1500ppm For grapes 800-1400 ppm For orchids 800-1400 ppm For potatoes 1200-1800 ppm For strawberries 800-1200 ppm For tomatoes 800-1200 ppm... - Page 20 Deutsche Anleitung Wir sind hier, um zu helfen Vielen Dank für den Kauf des CO2-Messgeräts QR CODE RV2000P. Das Produkt kann zur Überwachung des CO2-Wertes, der Luftfeuchtigkeit (RH) und der Temperatur verwendet werden. Können Sie sich nicht entscheiden? Wir helfen Ihnen gerne persönlich weiter.
- Page 21 Inhaltsverzeichniss Was ist ein guter CO2-Wert? Überblick und Eigenschaften Am Anfang: Das CO2-Messgerät vor dem ersten Einsatz LCD-Bildschirm Allgemeine Bedienung und Einstellungen Anzeige des Trenddiagramms Bedienung des Hauptmenüs Alarm ein-/ausschalten Ein- und Ausschalten der Modi Mensch und Pflanze Protokollfunktion Manuelle Kalibrierung des CO2-Messgeräts (CALI) Celsius oder Fahrenheit einstellen Einstellen der Grenzwerte (ADV) Batterie...
-
Page 22: Was Ist Ein Guter Co2-Wert
Was ist ein guter CO2-Wert? Ein CO2-Messgerät liefert eine genaue Anzeige der CO2-Werte in PPM (Parts per Million). Das CO2-Messgerät löst einen Alarm aus, wenn die CO2-Konzentration gefährlich hoch wird. Gesundes Außenluftniveau Gesundes Raumklima Annehmbar 1000 Belüftung ist wünschenswert 1200 Belüftung ist notwendig 2000 Negative Auswirkungen Gesundheit... -
Page 23: Überblick Und Eigenschaften
Überblick und Eigenschaften Posit Posit Beschreibung Beschreibung Frontpaneel Annehmbares Niveau Startbildschirm Gutes Niveau Aufwärts-Taste USB-Anschluss Abwärts-Taste Öffnung für Kabel Menü-Taste Wandhalterung Eingabetaste Ein-/Ausschalter Spannungsanzeige Etikett Hohes Niveau Sensoren... - Page 24 Au travail : utiliser le détecteur de CO2 pour la première fois Am Ladegerät Um das CO2-Messgerät einzuschalten, muss das Gerät das erste Mal an das Ladegerät angeschlossen werden. Stift eindrücken Drücken Sie den Stift auf der Rückseite des CO2-Messgeräts und das Gerät schaltet sich ein.
-
Page 25: Lcd-Bildschirm
LCD-Bildschirm Posit Beschreibung Posit Beschreibung CO2/rH/TEMP-Diagramm Pflanzen-Modus Zeit pro Abschnitt Max. und min. Wert CO2-Messung rH-Wert Akustisches Alarmsignal Temperaturmessung °C/°F Menschlicher Modus Hauptmenü... -
Page 26: Allgemeine Bedienung Und Einstellungen
Allgemeine Bedienung und Einstellungen Bedientasten Die Funktionen des Hauptmenüs können durch Anklicken von MENÜ aktiviert werden. Der Balken unter der Funktion zeigt an, welche Option gerade ausgewählt ist. Um die Funktion zu ändern, verwenden Sie die Pfeile. Um die Funktion auszuwählen, drücken Sie die Eingabetaste. Beachten Sie, dass das Hauptmenü... -
Page 27: Anzeige Des Trenddiagramms
Anzeige des Trenddiagramms Das Trenddiagramm zeigt die früheren Messungen für einen der drei Parameter (CO2/rH/TEMP). Es gibt 4 Modi, die mit den Pfeiltasten umgeschaltet werden können: CO2, TEMP, rH und CYCLE (CYCLE (Zyklus) schaltet automatisch zwischen CO2/TEMP/rH um). Wie funktioniert das Trenddiagramms? 1. -
Page 28: Bedienung Des Hauptmenüs
Bedienung des Hauptmenüs Die Funktionen des Hauptmenüs aktiviert man durch Klick auf Der Balken unter der Funktion zeigt an, welche Option gerade ausgewählt ist. Um die Funktion zu ändern, verwenden Sie Um die Funktion auszuwählen, müssen Sie die Taste drücken. Alarm ein-/ausschalten Es ist möglich, die Alarmfunktion einzuschalten, indem Sie die folgenden Schritte ausführen: 1. -
Page 29: Ein- Und Ausschalten Der Modi Mensch Und Pflanze
Ein- und Ausschalten der Modi Mensch und Pflanze Der Modus Mensch ist eigentlich der „normale“ Modus und kann verwendet werden, wenn der PPM-Wert in einem Raum gemessen werden soll. Diese Funktion wird automatisch im Messgerät eingestellt, so dass im Prinzip nichts eingestellt werden muss, wenn das Messgerät ankommt.Der Pflanzenmodus kann verwendet werden, wenn Pflanzen oder Gemüse angebaut werden sollen. -
Page 30: Protokollfunktion
Protokollfunktion Mit der Funktion LOG ist es möglich, historische Datensätze einzusehen. Das Datenprotokoll wird durch die folgenden Schritte sichtbar: 1. Klicken Sie auf 2. Klicken zweimal auf , um zu zu gelangen. 3. Klicken Sie , wenn ein Strich unter erscheint. -
Page 31: Celsius Oder Fahrenheit Einstellen
Celsius oder Fahrenheit einstellen Das Messgerät kann auf Celsius und Fahrenheit eingestellt werden. Die folgenden Schritte können durchgeführt werden, um von Celsius zu Fahrenheit zu wechseln: 1. Klicken Sie auf 2. Klicken Sie vier Mal auf , um zu zu gelangen. 3. -
Page 32: Batterie
Batterie Das CO2-Messgerät kann durch Anschluss des USB-Kabels aufgeladen werden, wenn das Gerät eingeschaltet ist. Wann sollte der Zähler aufgeladen werden? Leere Batterie: Das obere rote Licht leuchtet ununterbrochen. Es ist wichtig, das Messgerät innerhalb von 20 Minuten aufzuladen, um Schäden an der Batterie zu vermeiden. Aufladen: Blinkendes rotes Licht ist sichtbar. -
Page 33: Spezifikationen
Spezifikationen Typische Testbedingungen: Umgebungstemperatur 23 ± 3°C, rH= 50%-70%, Höhenlage = 0~10 Meter Messung Spezifikationen Betriebstemperatur 0°C - 50°C (32°F - 122°F) Lagertemperatur -20°C - 60°C (-4°F - 140°F) Betrieb & Lagerung rH 0 - 95% (nicht - kondensierend) CO2-Messung Messbereich 0-5000 ppm Anzeigeauflösung... - Page 34 Temperaturmessung Betriebstemperatur 0 °C - 90 °C (32 °F - 195 °F) Anzeigeauflösung 0,1 °C (0,1 °F) Reaktionszeit <20 minutes (63%) Messung der Luftfeuchtigkeit (rH) Messbereich 5-95% Präzision ±5% Anzeigeauflösung 1% Hauptschnittstellenanzeige, 0,1% Max/Min-Anzeige Sonstige Informationen Betriebsspannung Gleichstrom (5 ±0,25)V Maßführung 120*90*35mm Gewicht...
-
Page 35: Problembehebung
E1-Fehler an ein E1-Fehler erscheint. In diesem Fall hat sich ein Sensor gelöst und das Messgerät funktioniert nicht mehr richtig. In diesem Fall empfiehlt es sich, den Rovary-Kundendienst per E-Mail zu kontaktieren: support@rovary.com Was ist zu tun, wenn das Es kann vorkommen, dass die CO2-Anzeige rot leuchtet, während... - Page 36 Signal ertönt. Das Messgerät wurde dann auf die zurückgesetzt werden? Werkseinstellungen zurückgesetzt. Ist es möglich, das Display Es ist nicht möglich, den Bildschirm des RV2000P kontinuierlich zu des CO2-Messgeräts beleuchten. Um zu überprüfen, ob der CO2-Wert zu hoch ist, kann kontinuierlich zu die optische oder akustische Warnung verwendet werden.
-
Page 37: Anhang
Anhang Nummer Bezieht sich auf Alarmgrenzen Einstellbar Für Menschen 800-1200ppm Maßgeschneidert 600 - 900ppm Für Bohnen 600 - 900ppm NEIN Für Chilis 800-1000ppm NEIN Für Gurken 1000-1500ppm NEIN Für Weintrauben 800-1400 ppm NEIN Für Orchideen 800-1400 ppm NEIN Für Kartoffeln 1200-1800 ppm NEIN Für Erdbeeren...
Need help?
Do you have a question about the RV2000P and is the answer not in the manual?
Questions and answers