Advertisement
For Your Safety

Read the manual thoroughly and observe the information contained when using the device. Keep the manual close by for future reference.
Refer to the information sheet enclosed for important information on the subjects of safety, disposal, guarantee and product care.
Intended Use
The product is designed for use both indoors and outdoors. The product is intended purely for private use and not for commercial purposes or other usage.
The headlamp is not suitable for lighting rooms within a household.
Observe the Safety Information
Read and observe all the safety information to protect yourself and the environment from any harm. Refer to the information sheet enclosed for the relevant information on safety.
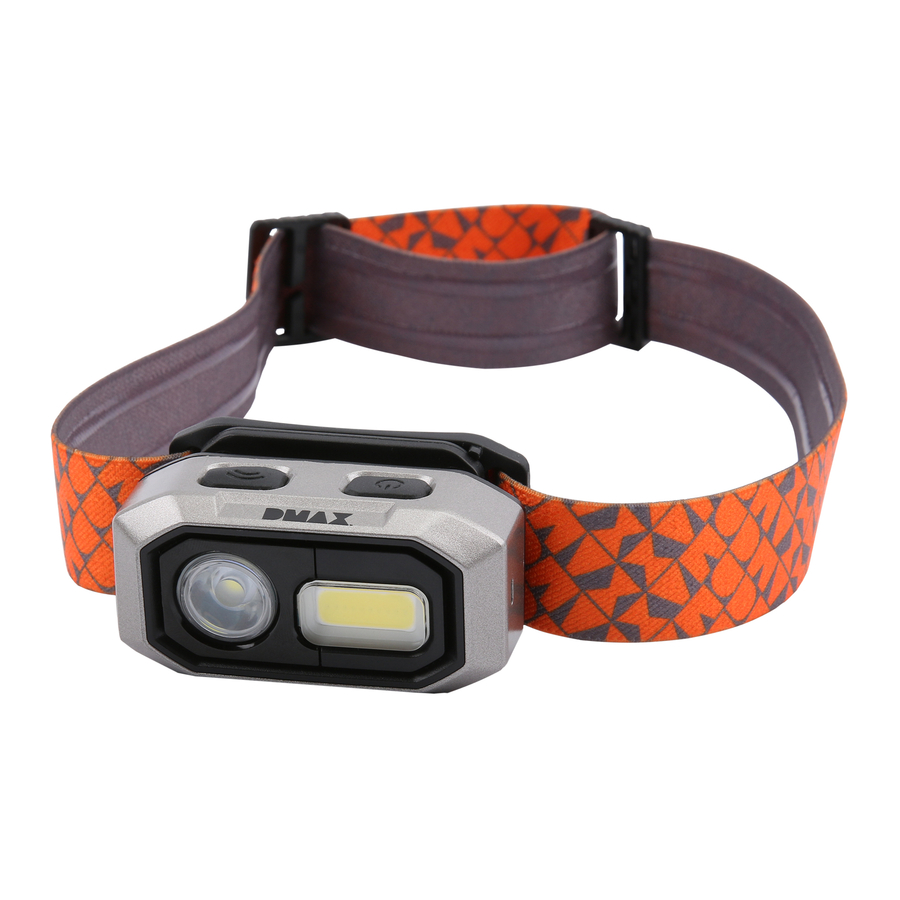
General View
The illustration depicts the headlamp in detail.

 Housing Housing
|
 Status indicator Status indicator
|
 Operating mode press switch Operating mode press switch
|
 Full beam Full beam
|
 Base (adjustable) Base (adjustable)
|
 Sensor press switch Sensor press switch
|
 Floodlight Floodlight
|
 USB port USB port
|
 Magnets Magnets
|
 Headband Headband
|
 Holder on headband Holder on headband
|
 USB cable USB cable
|
Checking the Package Contents
Check the package contents carefully before putting the device into operation. If anything is missing or damaged, please contact our Service partners.
- 1 × LED headlamp (including built-in Li-ion battery)
- 1 x removable headband
- 1 x USB cable
- 1 × gift box
- 1 × manual
Charging the Headlamp
The headlamp is equipped with a permanently built-in Li-ion battery. The battery must be fully charged before being used for the first time.
The status indicator lights up red if the headlamp is switched on and the Li-ion battery charge is low.
- Open the protective cover from the USB port
![]() .
. - Connect the USB cable
![]() to the micro USB port
to the micro USB port ![]() .
. - Connect the USB cable
![]() to a USB charger via the USB-A connector.
to a USB charger via the USB-A connector. - The status indicator
![]() lights up red during the charging process.
lights up red during the charging process. - Disconnect the USB cable
![]() from the micro USB port
from the micro USB port ![]() when the charging process has finished. The status indicator
when the charging process has finished. The status indicator ![]() lights up green when the Li-ion battery is fully charged.
lights up green when the Li-ion battery is fully charged. - Close the protective cover from the USB port
![]() .
.
The headlamp only fulfills the requirements of the type of protection specified when the protective cover of the USB port is closed.
Operating the Headlamp
The adjustable headband is used to attach the headlamp to your head. The headlamp and base can be adjusted to an angle of maximally 60° to each other.
The headlamp can be used in 4 operating modes which are selected using the operating mode press switch .
The switching cycle of the headlamp operating modes is as follows:
Operating mode 1 → Operating mode 2 → Operating mode 3 → Operating mode 4 → Off
| Operating mode 1 |  |
Full beam (100% brightness) |
| Operating mode 2 |  |
Full beam energy-save mode (50% brightness) |
| Operating mode 3 |  |
Floodlight |
| Operating mode 4 |  |
Full beam and floodlight |
Press the operating mode press switch as often as necessary until the required mode is activated.
- Press the operating mode press switch
![]() to select operating mode 1.
to select operating mode 1. - Press the operating mode press switch
![]() to select operating mode 2.
to select operating mode 2.
Use this sequence of steps to select the operating mode required for the headlamp.
Using the Motion Sensor
The headlamp is equipped with a motion sensor. When the motion sensor is switched on, you can switch the headlamp on and off with a wave of the hand.
- Press the sensor press switch
![]() to switch the motion sensor on. When the motion sensor is switched on, the status indicator
to switch the motion sensor on. When the motion sensor is switched on, the status indicator ![]() flashes green.
flashes green. - Move your hand while it is in front of the headlamp to switch the headlamp on. The headlamp lights up in the operating mode last selected.
- Move your hand while it is in front of the headlamp to switch the headlamp off.
- Press the sensor press switch
![]() to switch the motion sensor off. The status indicator
to switch the motion sensor off. The status indicator ![]() no longer flashes.
no longer flashes.
If you press the operating mode press switch while the motion sensor is switched on, the Motion sensor is switched off.
Dimming Function
The headlamp is provided with a dimming function. You can adjust the brightness in any operating mode.
- Press the operating mode press switch
![]() to switch the headlamp on.
to switch the headlamp on. - Press and hold the operating mode press switch
![]() to adjust the brightness. After a brief flash sequence, the brightness is reduced continuously. On reaching the minimum brightness, the headlamp flashes briefly again and the brightness is continuously increased.
to adjust the brightness. After a brief flash sequence, the brightness is reduced continuously. On reaching the minimum brightness, the headlamp flashes briefly again and the brightness is continuously increased. - Release the operating mode press switch
![]() on reaching the required brightness.
on reaching the required brightness.
Detaching and Attaching the Headlamp
The headlamp is provided with a removable headband . You can fix the headlamp, without the headband , to steel surfaces by means of the magnets .
- Slide the holder on the headband
![]() to the side and out of the base
to the side and out of the base ![]() in order to remove the headband
in order to remove the headband ![]() .
.

- Slide the holder on the headband
![]() to the side and into the base
to the side and into the base ![]() in order to attach the headband
in order to attach the headband ![]() .
.


Technical Data
| Designation | HLG112 LED headlamp | ||
| Weight (without batteries) | 97 g | ||
| Dimensions | 67 x 37 x 40 mm | ||
| Batteries | 1 × type 902554, 3.7 V, 1400 mAh | ||
| Illuminant (not replaceable) |
OSRAM LED COB floodlight |
||
| Lighting period (compliant with ANSI standard) |
Approx. 2.5 hours (OSRAM LED 100%) Approx. 8 hours (OSRAM LED 50%) Approx. 3.5 hours (COB floodlight) Approx. 1.45 hours (OSRAM LED and COB floodlight) |
||
| Lighting range (compliant with ANSI standard) |
Max. 55 metres (OSRAM LED) Max. 7 metres (COB floodlight) |
||
| Brightness |
Max. 250 lumen (OSRAM LED) Max. 250 lumen (COB floodlight) Max. 450 lumen (OSRAM LED and COB floodlight) |
||
| Service life (LED) | Approx. 50,000 hours | ||
| Functions |
4 operating modes (full beam (100%), full beam energy-save mode (50%), floodlight, full beam and floodlight) Motion sensor Dimming function Removable headband Magnet |
||
| Type of protection | IP 54 (dustproof and splashproof) |
Manufacturer
GO Europe GmbH
Zum Kraftwerk 1
D-45527 Hattingen
GERMANY
11 / 2020
Art.-No. 40416

Documents / ResourcesDownload manual
Here you can download full pdf version of manual, it may contain additional safety instructions, warranty information, FCC rules, etc.
Advertisement
Need help?
Do you have a question about the HLG112 and is the answer not in the manual?
Questions and answers