
Related Manuals for Sensa Core Hemo Spark

Summary of Contents for Sensa Core Hemo Spark
- Page 1 Y E A R S Y E A R S Y E A R S Blood Hemoglobin Measuring System g/dL 9001 13485 Obelis s.a., Bd General Wahis 53, 1030, Brussels, Belgium. Tel:+(32) 2 732-59-54 Fax:+(32) 2 732-60-03 mail@obelis.net...
-
Page 3: Table Of Contents
Table of Contents Section 1 Introduction..................4 Alternate Test Sites ..............5 Contents in Hemo Spark Kit............6 Section 2 Section 3 Components..................7 Meter..................... 7 Test Strips..................10 Test Strips Storage and Handling..........12 Test Strips Precautions and Instructions for Use......12 Control Strips / Control Solutions..........12... -
Page 4: Introduction
To ensure accurate results: * Read instructions carefully. Complete any necessary training before use. * Only use Hemo Spark Hemoglobin (Hb) Test Strips with the Hemo Spark Hemoglobin (Hb) Meter. * For Professional in vitro diagnostic use only. * Test only whole blood specimens. Blood samples with EDTA or heparin anticoagulants can be used. -
Page 5: Alternate Test Sites
. Avoid moles, veins, bones and tendons. Warning: We recommend that you test on your finger tips for better results. Note : Hemo Spark Blood Hemoglobin(Hb) Measuring System uses 10 µL sample. So you can test on a variety of locations shown above. -
Page 6: Contents In Hemo Spark Kit
Section 2 Contents in Hemo Spark Kit Hemo Spark kit will have the items as per CONTENTS mentioned on the kit box Before testing, read the instructions carefully and learn about all the components of the Hemo Spark Blood Hemoglobin(Hb) Measuring System. -
Page 7: Components
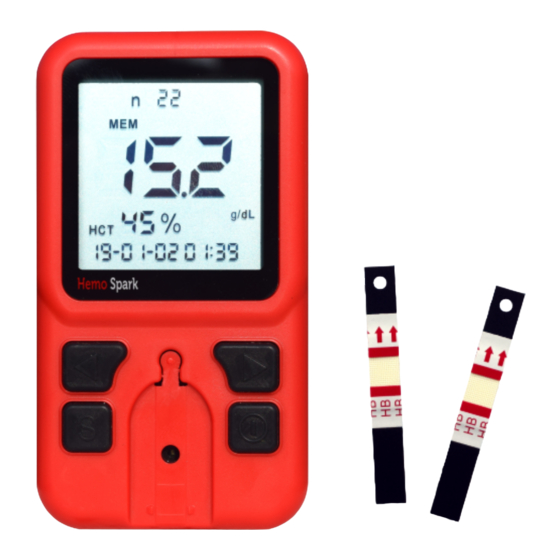
Section 3 Components The Hemo Spark Hemoglobin (Hb) Meter reads the test strips and displays the hemoglobin (Hb) concentration and hematocrit (Hct) value. Below diagram describes the parts of your meter. Meter 1. LCD (Liquid Crystal Display) 6. On/Off Button ◄... - Page 8 Meter Display During testing, the Hemo Spark Hemoglobin (Hb) Meter will display icons showing the status, options available and prompts for testing: Bluetooth Test number Printer CODE Link computer SET mode Sound Memory Blood drop symbol Test result area Test / Control strip symbol...
- Page 9 Meter Use and Precautions * Do not get water or other liquids on or inside the meter. * Keep the test strip channel clean. * Keep the meter dry. Avoid exposure to extreme temperatures or humidity. * Do not drop the meter or get it wet. If either has occurred, ensure the meter is working properly by running an Optical Check.
-
Page 10: Test Strips
Test Strips The Hemo Spark Blood Hemoglobin (Hb) Measuring Test strips are made out of plastic. A reagent layer within the test strip contains a chemical reagent system that works with the Hemo Spark Hemoglobin (Hb) Meter to measure the hemoglobin (Hb) concentration in capillary and venous whole blood or arterial whole blood. - Page 11 Sample Application For best results, fill the sample application area with approximately 10 µL of blood. Incorrect results may occur if the sample is not applied correctly or if the sample application area is not filled. After applying the sample, ensure the sample application area is completely covered as shown in the above picture.
-
Page 12: Test Strips Storage And Handling
* Do not use test strips that are damaged in any way. Do not reuse test strips. Control Strips / Control Solutions The Hemo Spark Hemoglobin (Hb) Meter Control Strip is a plastic strip containing a brown reference pad which works with the Hemo Spark Hemoglobin (Hb) Meter to ensure the optical system is working properly. - Page 13 Precautions * Store the control strips in the closed vial at temperature within 2-40°C (35.6 - 104ºF) and avoid exposing it to direct sunlight, extreme temperature or humidity. Control strip should be stored in a zip cover to keep them in good working condition (Refer to the control strip insert sheet).
-
Page 14: Initial Setup
Section 4 Initial Setup Before testing, ensure the following procedures are followed. Power Supply The meter can be operated using the certified AC Adapter (output: 5.0V DC, 1.0A) or 3 AAA rechargeable batteries (Lithium/NiMH/ZnCl/ Zinc Carbon). To use the meter with batteries, insert 3 AAA rechargeable batteries (Lithium/NiMH/ZnCl/Zinc Carbon) into the battery compartment located on the back of the meter. -
Page 15: Coding The Meter
Coding the Meter Each time a new box of test strips is used, the code chip packaged with the new box of test strips must be inserted into the meter. Take the code chip from the test strip box. Compare the code number on the code chip with the code number printed on the test strip vial label. -
Page 16: Meter Setup And Options
Section 5 Meter Setup and Options With the meter turned on, long press setup button to enter Meter Setup mode shown below. Press button to display several setup sub-modes. Press ◄ ◄ to select and press button to enter following setup sub-modes: Test number setup. -
Page 17: Test Number Setup
Test Number Setup From the No. SEt screen, press button to enter Test Number Setup mode. The test number can be set to any number from 1 - 999. Press until the correct test number is displayed. ◄ ◄ Press to save and return to No. -
Page 18: Meter Setup
Meter Setup From the SEt screen, Press ◄ or ► until the SYS is displayed . Press to enter Meter Setup mode Hour Setup The first option sets the clock to either 12 or 24 hour mode. Press ◄ or ► to switch between the two settings. - Page 19 Time Setup The hour and minutes will appear at the top of the display. They will be separated by a colon, with flashing hour. Press ◄ or ► until the correct hour is displayed. Press to save and proceed to setup minute. Note: The meter will display AM or PM if the 12H time setting is chosen.
-
Page 20: Testing
The following steps shows how to measure the hemoglobin (Hb) concentration. Sample Collection The Hemo Spark Hemoglobin (Hb) Meter requires a very small specimen. This may be obtained from fresh capillary whole blood. EDTA venous whole blood may be used as well. -
Page 21: Instructions For Use Of Lancing Device
Instructions for use of Lancing Device... -
Page 24: Instructions For Use Of Safety Lancets
Instructions for use of Safety Lancets How to use Note : It is Important to use a new safety lancet each time you obtain a blood sample. This will help to prevent from infections. Discard the used safety lancet carefully after each use to avoid untended safety lancet stick injuries. -
Page 25: Strip Test Processing
Strip Test Processing Ensure the meter is set up properly as described in previous sections. Turn the meter on. The screen will briefly display all of the LCD symbols. Observe the LCD at startup to ensure all segments and display elements are turned on, and there are no missing icons or elements. The meter will briefly show a blank display. -
Page 26: Strip Testing
Strip Testing Insert a test strip into the Strip/Device Channel in the same direction as the arrows indicate on the strip. Ensure that the test strip is inserted all the way to the end of the Strip/Device Channel. The blood drop symbol will flash when the meter is ready for the sample to be applied. Apply approximately 10 µL of venous blood or a drop of finger blood to the sample application area of the test strip. - Page 27 The meter will begin testing automatically with three dashes in a line flashing on the display indicating the test is in progress. Hb results will be displayed within 30 seconds, with Hct value displayed at the bottom of the screen g/dL If the sample is insufficient, meter display Lo.
-
Page 28: Data/Communication
Section 7 Data/Communication Data Transfer/Transmission Plug the USB cable into the USB port located on the top of the meter and connect the other end of the USB cable to a suitable PC. Note: The PC must have suitable software installed to receive and process the data being transmitted from the meter. - Page 29 Press button to enable data deletion, MEM will be displayed. Press button to returns to the Setup Menu. Memory/Database From the Initial Screen (refer to Section 5 Meter Setup), press ◄ or ► to show the first record. g/dL Press ◄ or ► to view each record in date/time sequence. Press and hold Setup button to return to the Initial Screen.
-
Page 30: Optical System Check
Section 8 Optical System Check Press Set up button and ► to find Check Control Strip mode. Note: * The control strip is intended for checking the optical system. * Allow the control strip and the meter to reach temperature 2-40°C (35.6 - 104ºF) prior to testing. - Page 31 Long Press button to start the optical check. If the meter display results based on Quality Control level ranges then the meter is normal. If the meter display results beyond the specified ranges of Quality Control levels then the meter is not functioning properly, and the meter displays no.
-
Page 32: Maintenance
Section 9 Maintenance Proper maintenance is recommended for best results. Cleaning For best results, the meter should be cleaned after each day of testing. Meter Surface A cotton cloth can be used to clean the surface of the meter. Use a damp cotton cloth if necessary. -
Page 33: Precautions
Section 10 Precautions Observe the precautions listed below to ensure accurate results and proper operation of the meter. * The warranty provided by the equipment may be impaired if used in a manner not defined in this instruction manual. * Wear gloves to avoid contact with potentially hazardous biological specimens during testing. -
Page 34: Troubleshooting
Section 11 Troubleshooting Causes Display Solution Ensure the sensor area is clean and that there The sensor area is damaged, are no objects covering the sensor area. dirty, or blocked at turn-on, Refer to Section 9 Cleaning. Restart the meter. such as a used test Contact your local distributor if the sensor strip left in the meter. -
Page 35: Appendix 1
Appendix 1 Blood Hemoglobin Measuring System Specifications Specifications Feature Reflectance Photometry Methodology Less Than 30 seconds Test Time 0 - 25.6 g/dL, 0 - 256 g/L, 0 - 15.9 mmol/L Measurement Range Whole blood (Capillary, Venous, Arterial) Sample 10 μ L Sample Volume 3 AAA rechargeable batteries (Lithium/NiMH... -
Page 36: Appendix 2 Index Of Symbols
Appendix 2 Index of Symbols Attention, see Use by instructions for use Manufacturer Code Number For In vitro diagnostic Keep Dry use only Storage or Operating Lot Number Temperature Serial Number Tests per Kit Do not discard along USB Port with household waste Keep away from Do not reuse... -
Page 37: Appendix 3 Warranty
Sensa Core. Limitations of Liability In no event shall Sensa Core be liable for indirect, special or consequential damages, even if Sensa Core has been advised of the possibility of such damages. For warranty service, please... - Page 39 Sensa Core Medical Instrumentation Pvt. Ltd. Plot No: 3, Export Promotion Industrial Park, IDA, Pashamylaram, Sangareddy (District) - 502307, Hyderabad, Telangana, INDIA. Tel: +91 8455 - 223400 www.sensacore.com Customer Care Details - For any feedback/complaints, please contact our Customer care executive at above...
Need help?
Do you have a question about the Hemo Spark and is the answer not in the manual?
Questions and answers