Table of Contents
Advertisement
Quick Links
ASSEMBLY INSTRUCTIONS
INSTRUCCIONES DE ENSAMBLE
FURNITURE
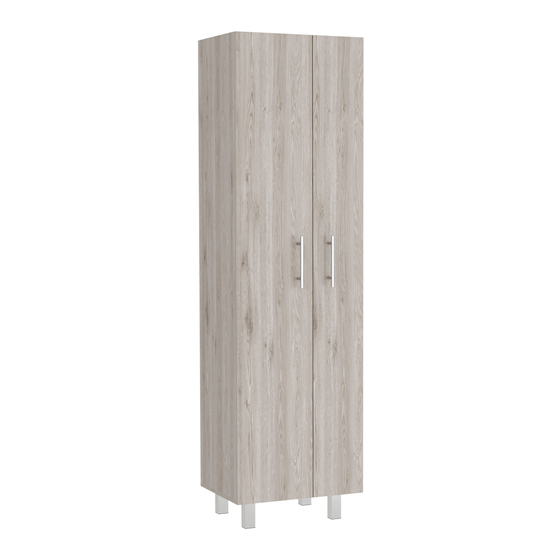
Height: 71,33 in
Alto: 181,2 cm
Width: 20,15 in
Ancho: 51,2 cm
Depth: 15,15 in
Fondo: 38,6 cm
LOT N°
REF./SKU. MLB5584
IF ANY PARTS ARE BROKEN OR MISSING PLEASE
NALA STORAGE CABINET
CONTACT US AT: 1-888-391-01-66 /
customerservicetuhome@rta.com.co
Mueble de Aseo Nala
OUR CUSTOMER SERVICE TEAM WILL PROVIDE
YOU HELP TO RESOLVE ANY ISSUES IMMEDIATELY
Advertisement
Table of Contents

Related Manuals for TUHOME Furniture NALA MLB5584


Summary of Contents for TUHOME Furniture NALA MLB5584
- Page 1 ASSEMBLY INSTRUCTIONS INSTRUCCIONES DE ENSAMBLE FURNITURE Height: 71,33 in Alto: 181,2 cm Width: 20,15 in Ancho: 51,2 cm Depth: 15,15 in Fondo: 38,6 cm LOT N° REF./SKU. MLB5584 IF ANY PARTS ARE BROKEN OR MISSING PLEASE NALA STORAGE CABINET CONTACT US AT: 1-888-391-01-66 / customerservicetuhome@rta.com.co Mueble de Aseo Nala OUR CUSTOMER SERVICE TEAM WILL PROVIDE...
-
Page 2: Important Recommendations
IMPORTANT RECOMENDACIONES RECOMMENDATIONS IMPORTANTES Do not paint the cabinet. No pintar el mueble. The cabinet MUST be used exclusively indoors, El mueble debe ser usado únicamente en interiores, do not expose to direct sun. no exponer al sol directo. Clean metallic hardware with a dry cloth. Limpiar los herrajes metálicos con un paño seco. -
Page 3: Required Tools
INDEX ÍNDICE Assembly Hardware Herrajes para Armado Assembly Parts Piezas de Armado Suggested Loads Cargas Sugeridas Assembly Recommendations Recomendaciones de Ensamble 7-17 7-17 Assembly Steps Pasos de Armado Warranty Garantía REQUIRED TOOLS* HERRAMIENTAS NECESARIAS* *No incluidas y no se muestran en tamaño real. *Not included, and not shown actual size. -
Page 4: Assembly Hardware
ASSEMBLY HARDWARE HERRAJES PARA ARMADO Please check that the hardware content is correct. Compruebe que el contenido de los herrajes sea If any item is missing, please call to our customer el correcto. En caso de que falte alguna pieza, por service line. -
Page 5: Assembly Parts
ASSEMBLY PARTS PIEZAS DE ARMADO A - x1 G - x4 M - x1 B - x1 H - x1 C - x1 I - x1 D - x1 J - x1 E - x1 K - x1 F - x1 L - x1 Page 5... -
Page 6: Assembly Recommendations
MAX SUGGESTED LOADS CARGAS MÁXIMAS SUGERIDAS 8 Kg 8 Kg 17,6 lb 17,6 lb 8 Kg 17,6 lb 8 Kg 17,6 lb 8 Kg 17,6 lb 8 Kg 17,6 lb 15 Kg 33,1 lb ASSEMBLY RECOMENDACIONES RECOMMENDATIONS DE ENSAMBLE Two people are recommended to assemble Ensamble el mueble entre dos personas. - Page 7 Gently hit to adjust. Repeat this process in the following steps Golpee suavemente para ajustar. Repita este proceso en los pasos siguientes. Rotate Voltear Page 7...
- Page 8 Rotate 180° / Gire 180° Turn minifix cams to the right to tighten. Gire las cajas minifix hacia la derecha para apretar las piezas. Gently hit the pieces with a rubber hammer to adjust the joint. Golpee suavemente la pieza con un martillo de goma para ajustar el ensamble.
- Page 9 Metal Sheet Screw Tornillo Lámina 5/8 Rotate Voltear Page 9...
- Page 10 Rotate to tighten. Gire para apretar. Page 10...
- Page 11 Rotate to tighten. Gire para apretar. Page 11...
- Page 12 Rotate to tighten. Gire para apretar. Bisagra Parche Full Overlay Hinge Page 12...
- Page 13 Rotate to tighten. Gire para apretar. Bisagra Parche Full Overlay Hinge Page 13...
- Page 14 Rotate to tighten. Gire para apretar. Slide the backpanels inside the cabinet. Deslice los fondos dentro del mueble. Page 14...
- Page 15 Rotate Voltear Rotate to tighten. Gire para apretar. Page 15...
-
Page 16: Fixing The Cabinet To The Wall
Fixing the cabinet to the wall FRONT VIEW / VISTA FRONTAL Instalación del mueble a la pared Inches / Centímetros 3,77'' 12,54'' 3,77'' 5/16 Drill bit. Broca de 5/16". Wall Anchor + Drywall Screw Chazo Mariposa + Tornillo Ensamble 68,89'' CAREFULLY FLIP THE FURNITURE / VOLTEAR EL MUEBLE CUIDADOSAMENTE Page 16... -
Page 17: Door Installation
Door Installation Instalación de las puertas Hinge adjustment Ajuste de las bisagras Depht adjustment Side adjustment Height adjustment Ajuste lateral Ajuste de altura Ajuste de profundidad After you finish the After you finish adjustment of the cams, assembling the cabinet, cover them with the take off the adhesive cover caps. -
Page 18: Warranty Policy
PÓLIZA DE GARANTÍA FURNITURE TUHOME Furniture has a 3 year warranty coverage in wooden parts and 1 year warranty coverage in hardware pieces since its manufacturing date, which you can see in the lot number printed on the product box and the assembly instructions leaflet.
Need help?
Do you have a question about the NALA MLB5584 and is the answer not in the manual?
Questions and answers