Table of Contents
Advertisement
Available languages
Available languages
Quick Links
Advertisement
Table of Contents

Subscribe to Our Youtube Channel
Related Manuals for EAS Electric EMD12I


Summary of Contents for EAS Electric EMD12I
- Page 1 Manual de instrucciones 12Servicios Función de media carga...
-
Page 2: Table Of Contents
INDICE INFORMACIÓN DE SEGURIDAD ............. 2 GUIA RÁPIDA DE USO ................4 FUNCIONAMIENTO DEL APARATO ............6 Panel de control ..................6 Características del lavavajillas ............... 7 ANTES DE UTILIZAR EL APARATO POR PRIMERA VEZ ....... 7 Descalcificador de agua................. 7 Carga de sal en el lavavajillas ............... - Page 3 Loading the salt into the softener ............49 Fill the rinse aid dispenser ..............50 Function of detergent ................52 5.LOADING THE DISHWASHER BASKETS ............. 55 Recommendation................. 55 The method loading normal dishware ..........56 STARTING A WASHING PROGRAM ............. 58 Wash cycle table .................
- Page 4 Lea este manual Estimado cliente, lea atentamente este manual antes de utilizar el lavavajillas, le ayudará a utilizar y mantener su electrodoméstico adecuadamente. Consérvelo para futuras consultas. Entréguelo a sus posibles propietarios futuros. Antes de llamar al servicio técnico El apartado de solución de problemas le ayudará a resolver algunos problemas comunes.
-
Page 5: Información De Seguridad
1. INFORMACIÓN DE SEGURIDAD ATENCIÓN! Cuando utilice el lavavajillas, siga las siguientes medidas de ¡ precaución: Este aparato está destinado al uso doméstico y otros usos similares, tales como: Áreas de cocina en tiendas, oficinas y otros ambientes laborales; Granjas Clientes en hoteles, moteles y otros ambientes de tipo residencial. - Page 6 No modifique el enchufe original, en el caso en el que no quepa en el enchufe, instale uno con la ayuda de un electricista cualificado. No haga un mal uso, no se siente o no se ponga de pie en la puerta o bandeja del lavavajillas.
-
Page 7: Guia Rápida De Uso
Por favor, utilice centros de reciclaje legales. Por favor, cuando finalice la vida útil del producto, lleve el aparato a un punto de reciclaje. El cartón está fabricado con materiales reciclados y debería ser reciclado como papel. ... - Page 8 Elimine los restos importantes de comida. Ablande los residuos Cargue las cestas de comida requemada de las cazuelas, a continuación, cargue las cestas. Siga las instrucciones de carga del lavavajillas. Cierre la puerta, pulse el botón programa hasta que se ilumine Seleccione un programa el piloto indicador del programa seleccionado (véase la sección titulada “Instrucciones de funcionamiento”).
-
Page 9: Funcionamiento Del Aparato
Cuando el aparato Si el aparato está apagado durante un ciclo de lavado, cuando se apaga durante lo vuelva a encender, seleccione de nuevo el ciclo de lavado y un ciclo de lavado utilice el lavavajillas de acuerdo con el estado de encendido original. -
Page 10: Características Del Lavavajillas
1.2 Características del lavavajillas VISTA TRASERA VISTA FRONTAL 1. Cesta superior 5. Dispensador 9. Conector de tubería interna 2. Tubería interior 6. Cesta para tazas 10. Tubería de desagüe. 3. Cesta inferior 7. Brazos aspersores 4. Compartimento de sal 8. Conjunto de filtro 1. - Page 11 AJUSTE DE CONSUMO DE SAL El lavavajillas está diseñado para que pueda ajustar la cantidad de sal consumida de acuerdo con la dureza del agua utilizada. El nivel de consumo se puede mejorar y personalizar. 1. Abra la puerta, y encienda el aparato. 2.
-
Page 12: Carga De Sal En El Lavavajillas
4.2 Carga de sal en el lavavajillas Utilice siempre sal especial para el lavavajillas. El depósito de sal se encuentra debajo de la cesta inferior y debe llenarse de la siguiente forma: ¡ATENCION! Utilice únicamente sal específica para uso en el lavavajillas. El resto de tipos de sal no destinados específicamente para uso en lavavajillas, en especial, la sal de mesa, dañaran el descalcificador de agua. -
Page 13: Llenado Del Dosificador De Abrillantador
piloto indicador puede permanecer encendido, aunque el depósito de sal esté lleno. Si el panel de control no dispone de piloto indicador (en algunos modelos), puede calcular cuándo debe llenar de sal el descalcificador en función de los ciclos realizados por el lavavajillas. - Page 14 Según disminuye la cantidad de abrillantador, el tamaño del punto negro del indicador del nivel de abrillantador cambia, como se indica a continuación. C. Indicador de la cantidad de abrillantador Lleno 3 / 4 lleno 1 / 2 lleno 1 / 4 lleno; debe rellenar para poder eliminar manchas...
-
Page 15: Función Del Detergente
AJUSTE DEL DOSIFICADOR DEL ABRILLANTADOR El dosificador de abrillantador tiene cuatro o seis Ajuste de nivel ajustes. Empiece siempre con el dosificador ajustado en “4”. Si quedan manchas y la operación (Abrillantador) de secado no es satisfactoria, aumente la cantidad de abrillantador quitando la tapa del dosificador y girando el selector hasta “5”. - Page 16 temperatura más alta. DETERGENTE CONCENTRADO Según su composición química, los detergentes para lavavajillas se pueden dividir en dos tipos básicos: Detergentes convencionales alcalinos con componentes cáusticos. Detergentes concentrados poco alcalinos con encimas naturales. DETERGENTE EN PASTILLAS Las pastillas de detergente de diferentes marcas se disuelven a velocidades distintas.
- Page 17 Cantidad de detergente Presione el botón para abrir AÑADA EL DETERGENTE Llene el dosificador con detergente. La marca indica los niveles de dosificación, tal y como muestra la imagen de la derecha: A) Compartimento para el detergente del ciclo de lavado principal. B) Compartimento para el detergente del ciclo de prelavado.
-
Page 18: Carga De Las Cestas Del Lavavajillas
CIERRE EL COMPARTIMENTO DE DETERGENTE Si tus platos no están demasiado sucios, puedes utilizar menos detergente del recomendado. Compartimento Presione hata abajo la tapa (1) hasta que encaje en el cierre (2). Si está usando detergente en pastillas, lea las recomendaciones del fabricante en el embalaje referente al lugar donde se deben colocar las pastillas, por ejemplo ( cesta de los cubiertos, compartimento del detergente,... -
Page 19: Método De Carga De Vajilla Estándar
Utensilios de fibras sintéticas ATENCION ANTES O DESPUES DE CARGAR LAS CESTAS DEL LAVAVAJILLAS Para obtener el máximo rendimiento del lavavajillas, siga estas instrucciones de carga. Las funciones y el aspecto de las bandejas y las cestas para los cubiertos pueden variar según el modelo. Elimine los restos de alimentos. - Page 20 Le recomendamos que coloque los artículos grandes La cesta superior se ha diseñado para la y difíciles de limpiar en la cesta inferior: ollas, vajilla más delicada, como vasos, tazas y cazuelas, tapas, fuentes y cuencos, tal y como platos (si no están demasiado sucios). aparece en la imagen siguiente.
-
Page 21: Inicio De Un Programa De Lavado
CESTA PARA LOS CUBIERTOS Los cubiertos se deben colocar en la cesta correspondiente con los mangos hacia abajo. Si la bandeja tiene compartimentos laterales, las cucharas deben colocarse por separado en las ranuras apropiadas; los utensilios especialmente largos se colocarán en posición horizontal en la parte frontal de la cesta superior, tal y como muestra la imagen. -
Page 22: Encendido Del Aparato
¡NOTA! *EN 50242: Este programa es un ciclo de prueba. Información para la prueba de compatibilidad de acuerdo con la norma EN 50242: Capacidad: 12 servicios Posición de la cesta superior: ruedas superiores en railes. Ajuste del abrillantador:6 ... -
Page 23: Final Del Ciclo De Lavado
NOTA: Si abre la puerta mientras se está ejecutando un ciclo de lavado, este se interrumpirá. El testigo del programa seleccionado dejará de parpadear y el avisador acústico emitirá un tono cada minuto a menos que se cierre la puerta. Una vez cerrada la puerta, el aparato reanudará el ciclo de lavado seleccionado al cabo de 10 segundos. -
Page 24: Limpieza Y Mantenimiento
¡ATENCIÓN! ES PELIGROSO ABRIR LA PUERTA EN EL PROCESO DE LIMPIEZA, EXISTE RIESGO DE QUEMARSE. 7. LIMPIEZA Y MANTENIMIENTO 7.1 Sistema de filtrado El filtro evita que los restos importantes de comida y otros objetos puedan entrar en la bomba. Los residuos pueden tapar el filtro. En este caso, deberá retirarlos. El sistema de filtros consta de un filtro grueso, un filtro plano semicircular (rejilla de filtro) y un micro filtro (filtro fino). - Page 25 ADVERTENCIA: El lavavajillas no debe utilizarse sin los filtros. Una sustitución incorrecta del filtro puede reducir el rendimiento del aparato y dañar platos y utensilios. Paso 1: gire el filtro en sentido contrario a las agujas del reloj. Abra Paso 2: extraiga tirando hacia arriba el conjunto de filtros.
-
Page 26: Cuidados Del Lavavajillas
LIMPIEZA DEL FILTRO Para limpiar el filtro grueso y fino utilice un cepillo de limpieza. Vuelva a montar las piezas de los filtros tal y como muestran las imágenes de la última página y coloque el conjunto entero en el lavavajillas, situándolo en su cavidad y presionando hacia abajo. - Page 27 agua de la válvula. 3. Vacíe el agua del tubo de entrada del agua y la válvula (utilice un recipiente para recoger el agua). 4. Vuelva a conectar el tubo de entrada del agua y la válvula del agua. 5. Extraiga el filtro de la pared inferior del tambor y utilice una esponja para secar el agua del sumidero.
-
Page 28: Instrucciones De Instalacion
8. INSTRUCCIONES DE INSTALACION ADVERTENCIA Peligro de descarga eléctrica, desconecte la energía eléctrica antes de instalar lavavajillas. No hacerlo puede provocar lesiones graves ¡ATENCIÓN! La instalación de tuberías y equipamientos eléctricos debería ser realizado por profesionales. 8.1 Requisitos de instalación La posición de instalación del lavavajillas debe estar cerca de las mangueras de entrada y desagüe existentes y cable de alimentación. -
Page 29: Instalación Y Dimensiones De Los Paneles
820mm Figura 1 580mm Eléctrica, drenaje y línea de suministro de entrada de agua Dimensiones del armario Espacio entre la parte inferior del Menos de 5 mm entre la armario y el suelo parte superior del lavavajillas y el armario y la puerta 600 mm exterior alineada con el armario. - Page 30 2. Instale el gancho en el panel de madera y ponga el gancho en la ranura de la puerta exterior del lavavajillas (véase la figura 4a). Después de la colocación del panel, fije el panel a la puerta exterior mediante tornillos y pernos (Véase la figura 4b).
-
Page 31: Ajuste De Tensión De Los Muelles De La Puerta
8.3Ajuste de tensión de los muelles de la puerta Los muelles de la puerta se fijan en la fábrica a la tensión adecuada para la puerta exterior. Si se instala el panel de madera, tendrá que ajustar la tensión del muelle de la puerta. -
Page 32: Pasos Específicos Para Instalación Del Lavavajillas
8.4 Pasos específicos para instalación del lavavajillas. Instale la puerta del mueble a la puerta exterior del lavavajillas utilizando los soportes suministrados. Consulte la plantilla para la colocación de los soportes. Ajuste la tensión de los muelles de la puerta utilizando una llave Allen de giro en un movimiento hacia la derecha para apretar los muelles de la puerta izquierda y derecha. - Page 33 A. Superficie de trabajo normal: Ponga el gancho de instalación en la ranura del plano lateral y fíjelo a la superficie de trabajo con los tornillos para madera (ilustración 6). B. Tapa de mármol o granito trabajo: Fije el lado con el tornillo. (Ilustración 7).
- Page 34 El lavavajillas debe estar nivelado para el funcionamiento adecuado del estante de plato y el rendimiento de lavado. 1. Coloque un nivel de burbuja en la puerta y la pista de cremallera en el interior de la bañera, como se muestra para comprobar que el lavavajillas está...
- Page 35 CONEXIÓN ELÉCTRICA Antes de utilizar el aparato, compruebe que está conectado a una toma de tierra Asegúrese de que el voltaje y la frecuencia de corriente corresponden con la información que aparece en la placa de características del aparato. Introduzca el enchufe exclusivamente en una toma de corriente que esté...
-
Page 36: Puesta En Marcha Del Lavavajillas
CONEXIÓN DEL SIFÓN La conexión debe situarse a una altura inferior de 1m (máximo) desde la parte inferior del lavavajillas. La manguera de desagüe debe estar sujetada. 8.5 PUESTA EN MARCHA DEL LAVAVAJILLAS Antes de poner el lavavajillas en marcha, deberá comprobar los siguientes aspectos. - Page 37 Problema Posibles causas Solución Cambie el fusible o active el disyuntor. Desenchufe El lavavajillas no Se ha fundido un fusible, otros aparatos que compartan el mismo circuito que funciona o el disyuntor ha fallado el lavavajillas La corriente eléctrica Compruebe que el lavavajillas está encendido y que no está...
- Page 38 Problema Posibles Causas Solución Los platos no se han Los platos no Véase información en "Carga de cargado correctamente quedan las cestas del lavavajillas". limpios Seleccione un programa más intensivo. El programa no era Véase " Tabla de los ciclos de lavado" suficientemente potente.
-
Page 39: Códigos De Error
9.1 CÓDIGOS DE ERROR De producirse alguna anomalía durante el funcionamiento del aparato, la pantalla mostrará códigos de error para avisarle y permitirle tomar las acciones necesarias para corregirla. CÓDIGOS SIGNIFICADOS CAUSAS POSIBLES El indicador de la función rápido comienza Aumenta el tiempo de entrada El grifo no está... - Page 40 550mm (con la puerta cerrada) ALIMENTACIÓN Véase la etiqueta de especificaciones CAPACIDAD 12 servicios DATOS TÉCNICOS Fabricante EAS ELECTRIC SMART TECHNOLOGY Tipo/Descripción EMD12I Capacidad estándar de cubiertos Clase eficiencia energética Consumo energético anual 273 kWh Consumo energético en un ciclo normal de limpieza 0.96 kWh...
- Page 41 3. Consumo de agua de 3220 litros al año, basado en 280 ciclos estándar de limpieza. El consumo real de agua dependerá del modo en que se utilice este aparato. 4. A (eficiencia máxima) a G (eficiencia mínima). 5. Este programa es adecuado para limpiar vajilla en condiciones normales de suciedad y es el programa más eficiente en función del consumo combinado de energía y agua para este tipo de vajilla.
- Page 42 Carga de las cestas de acuerdo con EN50242: 12 servicios...
-
Page 43: Garantia Comercial
10.GARANTIA COMERCIAL CONDICIONES DE LA GARANTIA COMERCIAL Este aparato tiene una garantía de reparación de dos años, a partir de la fecha de venta, contra todo defecto de funcionamiento proveniente de la fabricación, incluyendo mano de obra y piezas de recambio. - Page 45 ENGLISH Read this manual Dear Customer, Please carefully read this manual before using the dishwasher, it will help you to use and maintain the dishwasher properly. Keep it as a refer in the later days. Pass it on to any subsequent owner of the appliance Before calling for Service ...
-
Page 46: Important Safety Information
1. IMPORTANT SAFETY INFORMATION This appliance is intended to be used in household and similar applications such as: Staff kitchen areas in shops, offices and other working environments. Farm houses. By clients in hotels, motels and other residential type environments. Bed and breakfast type environments. - Page 47 Do not place any heavy objects on or stands on the door when it is open. The appliance could tip forward. When loading items to be washed: 1) Locate sharp items so that they are not likely to damage the door seal. 2) Warning: knives and other utensils with sharp points must be loaded in the basket with their points down or placed in a horizontal position.
-
Page 48: Quick Operation Guide
For more detailed information about recycling of this product, please contact your local city office and your household waste disposal service. DISPOSAL: Do not dispose this product as unsorted municipal waste. Collection of such waste separately for special treatment is necessary. 2. - Page 49 Select a programme Press the programme button until the selected programme lights up. (See the section entitled “Operation instruction). Running the dishwasher Turn on the water tap, close the door. The machine will start working right now. 1. A running cycle can only be modified if it has been running for a short time.
-
Page 50: Operation Instruction
Warning: wait a few minutes (about 15 minutes) before unloading the dishwasher to avoid handling the dishes Turn off the water tap, and utensils while they are still hot and more susceptible unload the baskets to break. They will also dry better. Unload the appliance, starting from the lower basket. -
Page 51: Prior Using For The First Time
1. Upper basket 5. Dispenser 9. Inlet pipe connector 2. Inner pipe 6. Culp shelf 10. Drain pipe 3. Lower basket 7. Spray arms 4. Salt container 8. Filter assembly 1. PRIOR USING FOR THE FIRST TIME Before using for the first time: 1. -
Page 52: Loading The Salt Into The Softener
WATER HARDNESS Salt consumption Selector position mmol/l (gram/cycle) Clarke 0~0.94 H1(Rapid Light bright) H2(90 Min Light bright) 6-11 10-20 7-14 1.0-2.0 12-17 21-30 15-21 2.1-3.0 H3(90 Min Rapid Light bright) H4(ECO Light bright) 18-22 31-40 22-28 3.1-4.0 23-34 41-60 29-42 4.1-6.0 H5(ECO Rapid Light bright) H6(ECO 90 Min Light bright) -
Page 53: Fill The Rinse Aid Dispenser
Open A. After the lower basket, has been removed, unscrew and remove the cap from the salt container. 1 B. Place the end of the funnel (supplied) into the hole and introduce about 1.5kg of dishwasher salt. C. Full fill the salt container with water, it is normal for a small amount of water to come out of the salt container. - Page 54 Function of rinse aid Rinse aid is automatically added during the last rinse, ensuring thorough rinsing, and sport and streak free drying. Attention Only use branded rinse aid for dishwasher. Never fill the rinse aid dispenser with any other substances (e.g. Dishwasher cleaning agent, liquid detergent). This would damage the appliance.
-
Page 55: Function Of Detergent
1. To open the dispenser, turn the cap to the “open” (left) arrow and lift it out. 2. Pour the rinse aid into the dispenser, being careful not to overfill. 3. Replace the cap by inserting it aligned with “open” arrow and turning it to the closed (right) arrow. - Page 56 DETERGENTS There are 3 sorts of detergents: 1. With phosphate and with chlorine 2. With phosphate and without chlorine 3. Without phosphate and without chlorine. Normally new pulverized detergent is without phosphate. Thus, the water softener function of phosphate is not given. In this case, we recommend to fill salt in the salt container even when the hardness of water is only 6º...
- Page 57 AMOUNT OF DETERGENT TO USE Detergent powder Detergent tablet FILL IN DETERGENT Fill the detergent dispenser with detergent. The marking indicates the dosing levels, as illustrated on the right. A. The place of main wash cycle detergent placed. B. The place of pre-wash cycle detergent placed.
-
Page 58: Loading The Dishwasher Baskets
CLOSE THE DETERGENT COMPARTMENT If your dishes are only moderately dirty, you may be able to use less detergent than recommended. Compartment Press down the lid (1) until it clicks shut (2). If you are using detergent in tablet form, read the manufacturer recommendations on the packaging to determine where the tablets should be placed inside the dishwasher (e.g in... -
Page 59: The Method Loading Normal Dishware
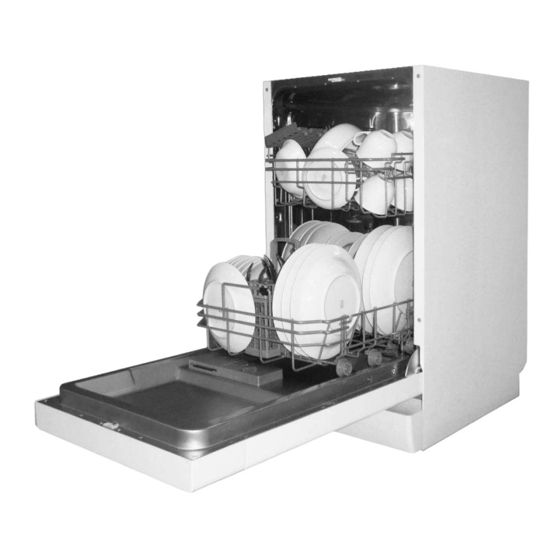
For best performance of the dishwasher, follow these loading guidelines. Features and appearance of baskets and cutlery baskets may vary from your model. Scrape off any large amounts of leftover food. Soften remnants of burnt food in pans. It is not necessary to rinse the dishes under running water. Place objects in the dishwasher in following way: 1. - Page 60 Loading the upper basket Loading the lower basket We suggest that you place large items and the most The upper baskets designed to hold more delicate difficult to clean items are to be placed into the lower and lighter dishware such as glasses, coffee and basket: such as pots, pans, lids, serving dishes and tea cups and saucers, as well as plates, small bowls, as shown in the figure below.
-
Page 61: Starting A Washing Program
Cutlery should be placed in the cutlery basket with the handles at the bottom. If the rack has side baskets, the spoons should be loaded separately into the appropriate slots, especially long utensils should be placed in the horizontal position at the front of the upper basket as shown in the picture. WARNING! ... -
Page 62: Turning On The Appliance
¡NOTE! *EN50242: This programme is the test cycle. The information for comparability test in accordance with EN 50242, as follows: Capacity: 9 setting. Position upper basket: upper wheels on rails. Rinse aid setting: 6 PI:0.49w; PO:0.45w 6.2 Turning on the appliance Starting a cycle wash 1. -
Page 63: At The End Of The Wash Cycle
NOTE: If you open the door during a wash cycle, the machine will pause. The program light will stop blinking and the buzzer will be mooing every minute unless you close the door. After you close the door, the machine will keep on working after 10 seconds. -
Page 64: Maintenance And Cleaning
7. MAINTENANCE AND CLEANING 7.1 Filtering system The filter prevents larger remnants of food or other objects from getting inside the pump. The residues may block the filter; in this case, they must be removed. The filter system consists of a coarse filter, a flat (Main filter) and a microfilter (Fine filter). -
Page 65: Caring For The Dishwasher
NOTE: When following this procedure from step 1 to step 2, the filter system will be removed. When following it from step 2 to step 1, the filter system will be installed. REMARKS Inspect the filters for blocking after every time the dishwasher has been used. - Page 66 PROTECT AGAINST FREEZING Please take frost protection measures on the dishwasher in winter. Every time after washing cycles, please operate as follows: 1. Cut off the electrical power to the dishwasher. 2. Turn off the water supply and disconnect water inlet pipe from the water valve.
-
Page 67: Installation Instruction
8. INSTALLATION INSTRUCTION WARNING Electrical shock hazard disconnects electrical power before installing dishwasher. Failure to do so can result in death or electrical shock. Attention! The installation of the pipes and electrical equipment’s should be done by professionals. 8.1 Installation preparation The installation position of dishwasher should be near the existing inlet and drain hoses and power cord. -
Page 68: Aesthetic Panel's Dimensions And Installation
8.2 Aesthetic panel’s dimensions and installation 1. The aesthetic wooden panel could be processed according to the Figure 2. Install the hook on the aesthetic wooden pane and put the hook into the slot of the outer door of dishwasher (see figure 4a). After positioning of the panel, fix the panel onto the outer door by screws and bolts (see figure 4b). -
Page 69: Tension Adjustment Of The Door Spring
8.3 Tension adjustment of the door spring The door springs are set at the factory to the proper tension for the outer door. If aesthetic wooden panel are installed, you must adjust the door spring tension. Rotate the adjusting screw to drive the adjustor to strain or relax the steel cable (see figure 5). -
Page 70: Dishwasher Installation Steps
8.4 Dishwasher installation steps 1. Install the furniture door to the outer door of the dishwasher using the brackets provided. Refer to the template for positioning of the brackets. 2. Adjust the tension of the door springs by using an Allen key turning in a clockwise motion to tighten the left and right door springs. - Page 71 Dishwasher must be level for proper dish rack operation and wash performance. 1. Place a spirit level on door and rack track inside the tub as shown to check that the dishwasher is level. 2. Level the dishwasher by adjusting the three levelling legs individually. 3.
- Page 72 Figure 8 Illustration of feet adjustment NOTE: The maximum adjustment height of the feet is 50 mm. ABOUT ELECTRICITY CONNECTING WARNING! For personal safety: Do not use an extension cord or an adapter plug with this appliance. Do not, under any circumstances, cut or remove the earthing. ...
-
Page 73: Start Of Dishwasher
Please close the hydrant after using. POSITIONING THE APPLIANCE Position the appliance in the desired location. The back should rest against the wall behind it, and the sides, along the adjacent cabinets or walls. The dishwasher is equipped with water supply and drain hoses that can be positioned either to the right or the left sides to facilitate proper installation. -
Page 74: Troubleshooting Tips
9.TROUBLESHOOTING TIPS Problem Possible CausesWhat To Do Dishwasher doesn't Fuse blown, or the Replace fuse or reset circuit breaker. Remove any other start circuit breaker acted appliances sharing the same circuit with the dishwasher Power supply is not Make sure the dishwasher is turned on and the door is turned on closed securely. -
Page 75: Error Codes
Problem Possible Causes What To Do The dishes The dishes were not See notes in " Loading the Dishwasher Baskets ". are not clean loaded correctly. The programme was Select a more intensive programme. not powerful enough. See" Wash Cycle Table ". Not enough detergent Use more detergent, or change your detergent. -
Page 76: Technical Information
WARNING If overflow occurs, turn off the main water supply before calling a service. If there is water in the base pan because of an overfill or small leak, the water should be removed before restarting the dishwasher. 9.2 Technical Information With the door closed 1150... - Page 77 TECHNICAL DATA SHEET Manufacturer EAS ELECTRIC SMART TECHNOLOGY Type / Description EMD12I Standard place settings Energy efficiency class Annual energy consumption 273 kWh Energy consumption of the standard cleaning cycle 0.96 kWh Power consumption of off-mode 0.45 W Power consumption of left-on mode 0.49 W...
- Page 78 LVD 2014/35/EU EMC 2014/30/EU ERP 2009/125/EC The above values have been measured in accordance with standards under specified operating conditions. Results may vary greatly according to quantity and pollution of the dishes, water hardness, amount of detergent, etc… The manual is based on the European Union’s standards and rules.
-
Page 80: Commercial Warranty
10.COMMERCIAL WARRANTY CONDITIONS OF COMMERCIAL WARRANTY This appliance has a repair warranty of two years from the date of sale, against any malfunction from the manufacture, including labor and spare parts. To justify the purchase date will be required to submit the invoice or receipt.
Need help?
Do you have a question about the EMD12I and is the answer not in the manual?
Questions and answers
Donde comprar cesta ? Codigo de cesta sup et inf ? Gracias. EMD12L