Table of Contents
Advertisement
Quick Links
Advertisement
Table of Contents

Related Manuals for HYGEAR GEAR 1


Summary of Contents for HYGEAR GEAR 1
- Page 1 GEAR 1 User manual...
-
Page 2: Product Specification
Product Specification Function Connected fitness system Band mate 1 band 13lbs - 22lbs 2 bands 26lbs - 44lbs Resistance band material 100% pure latex Max user weight 330 lbs Capacity 3.7V 300mAh Li-ion Safeguards Over-discahrge protection Overheat protection Over-current protection Overcharge protection Short circuit protection Water resistance... - Page 3 Developed by childhood friends, Guy Bar, Dan Strik, and Elad Elkalai, GEAR 1 was born out of a need for smart, motivational fitness gear that was easy to transport and use anywhere. It’s the full home gym that hits every muscle and gives real-time feedback, so you always know where you stand, and what to do next.
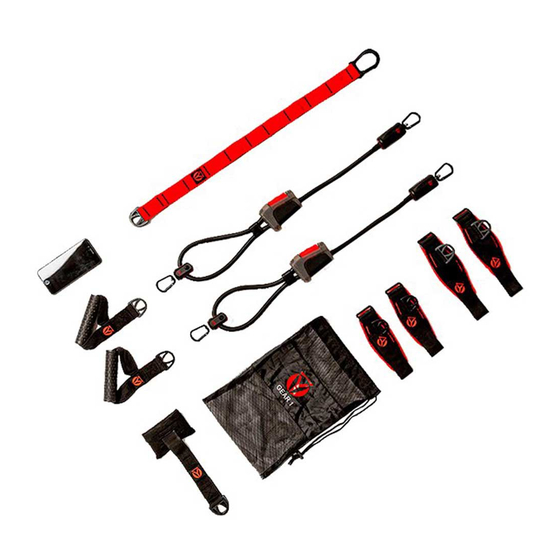
- Page 4 What’s in the box GEAR 1 A. Band 1 B. Band 2 1. Carabiner C. Cuffs 2. Pulley D. Door anchor 3. Band Holder E. Object anchor 4. Resistance Adjuster F. Handles 5. Resistance Band G. Double USB cable 6. Smart fitness sensor...
- Page 5 How to Set Up Your GEAR 1 1. Open the GEAR 1 Package. You should find: A. Band 1 B. Band 2 C. Cuffs D. Door anchor E. Object anchor F. Handles G. Double USB cable H. Door hanger «Workout in progress»...
- Page 6 ILED Indications and Sensor State LED Indications ▶ Red-blue blinking: Not paired, not connected (never used) ▶ Blue blinking (slow): Connect ▶ Red blinking (fast): Low battery ▶ Green-red blinking: Charging ▶ Green steady: Fully charged LED Indications ▶ Active: While the app is connected ▶...
- Page 7 GEAR 1 adjuster The adjuster changes the Working Length of the GEAR 1 bands. By moving the adjuster, you can: 1. Increase or decrease the band’s tension (shorter for more tension, longer for less tension). 2. Change the length of the bands to suit your workout space and your exercise needs.
- Page 8 GEAR 1 adjuster Make sure not to stretch the bands more than 3 times their original length to prevent them from snapping or breaking.
- Page 9 For a middle anchor, place the Door Anchor above the door lock For a low anchor, place the Door Anchor under the door Clip the carabiner on the GEAR 1 to the Door Anchor Always close the door securely.
- Page 10 To avoid injury, always place the door sign, ‘Workout in Progress - Do Not Open’ on the opposite side of the door before starting your workout. DO NOT use GEAR 1 on glass doors, sliding doors, or any lightweight doors such as closets or kitchen cabinets.
-
Page 11: How To Use
How to use The handles Connect the D-rings on the handles to the carabiners on the Gear 1 bands. Grip the handle or slip your foot through the loop as illustrated, according to the exercise instructions. You may adjust the size of the loop as needed. - Page 12 How to use GEAR 1 with the Object Anchor Warp the Object Anchor strap around a sturdy object that can support the weight. Clip the carabiner on the anchor through the tightest loop on the strap so that it’s secure. You may need to...
- Page 13 Insure that the carabiner is securely attached to the loop on the Object Anchor before attaching the Gear 1 bands. Test that the Object Anchor is safely secured by firmly pulling the bottom D-ring downward.
- Page 14 Examples of Exercises Using GEAR 1 Straight body pullover GEAR 1 butterfly 1 Leg deadfit...
- Page 15 Examples of Exercises Using GEAR 1 GEAR 1 Pull Over Bicep Curls to Chest Side Plank L Row...
-
Page 16: Safety: Do's And Dont's
Do make sure the floor is not wet or slipppery to avoid minor or even severe injuries. Do use GEAR 1 only for its intended use, as described in this manual. Do inspect your GEAR 1 and all its components before each use. - Page 17 Safety: do’s and dont’s Don’t continue exercising you feel pain or discomfort. Don’t use GEAR 1 if your hands are greasy, wet or overly sweaty. Don’t push yourself too far beyond your comfort zone. Don’t use GEAR 1 if a band or any other element is damaged.
-
Page 18: Fcc Statement
FCC Statement This device complies with Part 15 of the FCC Rules. Operation is subject to the following two conditions: (1) this device may not cause harmful interference, and (2) this device must accept any interference received, including interference that may cause undesired operation. FCC Сaution Any Changes or modifications not expressly approved by the part responsible for compliance could void the user’s... -
Page 19: Fcc Caution
FCC Caution Reorient or relocate the receiving antenna. Increase the separation between the equipment and receiver. Connect the equipment into an outlet on a circuit different from that to which the receiver is connected. Consult the dealer or an experienced radio/TV technician for help.
Need help?
Do you have a question about the GEAR 1 and is the answer not in the manual?
Questions and answers