Table of Contents
Advertisement
Quick Links
Advertisement
Table of Contents

Summary of Contents for Well Straler 3003EU
- Page 1 User Guide 3003EU info@wellstraler.be...
-
Page 2: Table Of Contents
Index 1.Introduction ..............................3 1.1. Welcome ....................Error! Bookmark not defined. 1.2. Warranty ....................Error! Bookmark not defined. 1.3. Security..............................3 1.3.1. Built-in safeties in the control system ..................3 1.3.2. Thermo safety - transmitter ......................3 1.3.3. Communication safety - transmitter ....................4 1.3.4. Thermo safety - receiver.......................4 1.3.5. -
Page 3: Introduction
1. Introduction 1.1. Welcome Thank you for buying your Well Straler gas heater. We are glad to have you as a customer. With this quality product you will enjoy the cosy warmth and unique flame dance for many years. Before using the heater, please read the instructions carefully and keep them in a safe place. -
Page 4: Communication Safety - Transmitter
1.3.3. Communication safety - transmitter The communication-safety operates in all operation modes (ON-THERMO-PROGRAM): At all times and in all operating modes, the transmitter sends an RF-signal every 15 minutes to the receiver, signaling that the transmitter is within the normal operating range of ± 6 m. Should the receiver not receive a transmitter signal, the IC-software in the receiver will begin a 1 hour countdown timing function. -
Page 5: Commands Of Your Appliance
2. Commands of your appliance Some advantages of the new generation of Well Straler. Automatic ignition without steady pilot; Precise digital temperature control in a range of ± 6 m from the heater; Wireless RF remote control of all the functions of your heater in a range of ± 6m;... -
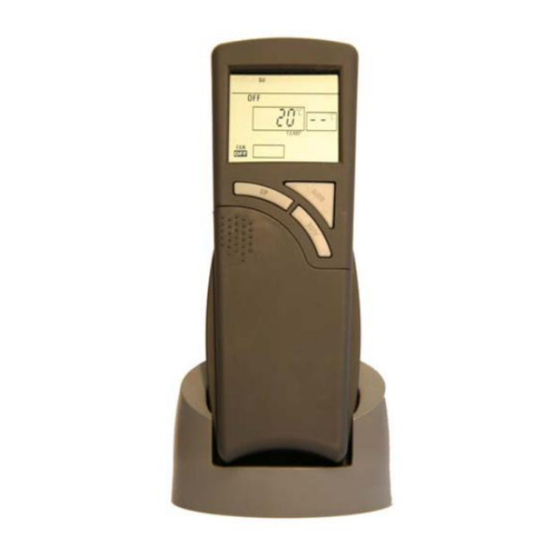
Page 6: Transmitter
2.1. Transmitter The transmitter operates on 2 AAA-size 1,5V batteries. We recommend the use of ALKALINE BATTERIES for maximum operation performance. Insert batteries into the battery compartment on the back of the transmitter, positioning the (+) and (-) ends of the batteries as indicated. Once batteries are inserted, the temperature will display. -
Page 7: Initial Set-Up Programming Of Transmitter
2.3. Initial set-up programming of transmitter Follow the procedure below before first use Temperature setting (°C of °F) - preset for °F Setting current day of the week Setting current time Batteries must be inserted in order to be able to do the initial set up. Now press the small SET button on the top left in the battery compartment. -
Page 8: Additional Program Options: Swing (Temperature Differential)
2.4. Additional program options: SWING (temperature differential) The thermostatic function starts your appliance as soon as the room temperature drops beneath a certain amount of degrees under the SET temperature. This variatiin is called ‘SWING’ or temperature differential. A small SWING switches on your appliance quicker and keeps the room temperature more stable. - Page 9 You may change the built-in time and temperature programs to suit your personal schedule. Each day is divided into four periods: MORNING, DAY, EVENING and NIGHT. A blank programming chart is provided above to record your customized time and temperature settings If desired, you may change a single day or all seven days that have the built-in factory program.
-
Page 10: Program Overview
2.5.2. Program overview If you want to review the settings for either the factory program and/or your customized program, you may do so by pressing the PROGRAM/ REVIEW button for 1 second. By pushing this button repeatedly you can review the complete program. If you press the PROGRAM/REVIEW button for 4 seconds you enter the programming process. -
Page 11: Thermo Operation (On/Off Based On Set Temp Setting)
2.6.2. Thermo operation (ON/OFF BASED ON SET TEMP SETTING) The system can control your appliance thermostatically when operating in THERMO mode. 1. Press MODE until LCD-screen displays THERMO. 2. Press UP/DOWN to set the desired room temperature. The highest SET temperature is 32°C (99°F), the lowest SET temperature is 6°C (45°F). -
Page 12: Adjusting Ventilator Speed
2.6.5. Adjusting ventilator speed The speed of the FAN can be adjusted only in the following modes: ON - THERMO – PROGRAM. Press FAN to select the speed of the ventilator: LOW – HI. The transmitter always remembers the last setting of the FAN speed, and this for the entire mode of operation (ON - THERMO and PROGRAM mode). -
Page 13: Setting The Countdown Timer
2.6.8. Setting the countdown timer This system can operate with a built-in COUNTDOWN timer when the transmitter is in the ON or THERMO mode (THERMO or ON must be displayed on the LCD-screen). When the set time period has elapsed, the device will automatically switch off. 1. -
Page 14: Receiver
2.7. Receiver The receiver is built-in in your appliance and has a 3-position slide button: LEFT: OFF (the system is OFF) MIDDLE: REMOTE (the system only operates if the receiver receives commands from the transmitter) RIGHT: ON (the system remains ON in low flame until the slide switch is placed in the OFF or REMOTE position) We advise you to put the slide switch in the OFF position if you will be away from your home for an extended period of time or during summer. -
Page 15: Problem Solver
2.8. Problem solver PROBLEM CAUSE SOLUTION The appliance does not The receiver is in ‘OFF’ Place the receiver button in ‘REMOTE’ position react when the MODE- position button is pressed. The receiver does not match Execute the ‘LEARN’ procedure. to the transmitter. The transmitter does not The transmitter is too far Move the antenna to a free space (the outside...
Need help?
Do you have a question about the 3003EU and is the answer not in the manual?
Questions and answers