Table of Contents
Troubleshooting

Summary of Contents for Janich & Klass XINO S700 Series
- Page 1 Translation of the Original Operating Instructions microform scanner series ® XINO S700 Rev. 1.01 S700 microform GmbH Anton-Schmidt-Straße 31/1 71332 Waiblingen Internet: www.microform.de GERMANY www.janichklass.com...
- Page 2 All rights reserved. Without prior written consent any reproduction, adaptation or translation going beyond the legal framework provided by copyright law is prohibited. The user of the scanner described in this manual is granted a licence for the following purposes: •...
-
Page 3: Table Of Contents
® XINO S700 Table of contents Table of contents General information ........................1-1 Validity of the operating instructions .................. 1-1 Legal information ....................... 1-2 1.2.1 Copyright and licence ..................1-2 1.2.2 Liability limitations ....................1-2 Used symbols ........................1-3 1.3.1 Danger symbols .................... - Page 4 ® Table of contents XINO S700 Configuration........................6-15 6.3.1 Paper transport ....................6-15 6.3.1.1 Feeding mode ................6-16 6.3.1.2 Feed separation ................6-18 6.3.1.3 Double feed detection ..............6-19 6.3.1.4 Paper output .................. 6-22 6.3.1.5 Sorting run ..................6-27 6.3.2 Management ....................
- Page 5 ® XINO S700 Table of contents Errors and faults ..........................7-1 Safety information for troubleshooting ................7-1 Troubleshooting table ......................7-1 7.2.1 Clearing a paper jam ..................7-2 7.2.1.1 Access to the scanning area ............7-3 7.2.1.2 Access to the turning drum .............. 7-7 7.2.1.3 Access to the paper output ..............
- Page 7 ® XINO S700 Table of figures Table of figures Technical information Fig. 2-1 Top paper stacker ......................2-3 Fig. 2-2 Rear paper stacker ...................... 2-4 Fig. 2-3 Rear paper tray (optional) .................... 2-5 Fig. 2-4 Patch code dimensions ....................2-6 Fig.
- Page 8 ® Table of figures XINO S700 Fig. 6-32 User administration – account selection ..............6-43 Fig. 6-33 User administration – edit account ................6-45 Fig. 6-34 User administration 2 ....................6-46 Fig. 6-35 User administration – account creation ..............6-47 Fig.
- Page 9 ® XINO S700 Table of figures Errors and faults Fig. 7-1 Opening the scanning area 1 ..................7-3 Fig. 7-2 Opening the scanning area 2 ..................7-3 Fig. 7-3 Opening the scanning area 3 ..................7-4 Fig. 7-4 Closing the scanning area 1 ..................7-5 Fig.
-
Page 11: General Information
® XINO S700 Chapter General information General information These operating instructions describe the scanner's basic operation. This includes the operation of the scanner as well as operations to be performed by the user in case of a fault and for maintenance. Since the scanner's user interface can be individually adjusted, the arrangement of the symbols on your scanner may differ from that described in this manual. -
Page 12: Legal Information
® Chapter XINO S700 General information Legal information 1.2.1 Copyright and licence Copyright Janich & Klass Computertechnik GmbH. All rights reserved. Without prior written consent any reproduction, adaptation or translation going beyond the legal framework provided by copyright law is prohibited. The user of the scanner described in this manual is granted a licence for the following purposes: •... -
Page 13: Used Symbols
® XINO S700 Chapter General information Used symbols 1.3.1 Danger symbols This sign combined with the signal word "DANGER!" indicates a hazardous situation which, if not avoided, will result in death or serious injury. This sign combined with the signal word "WARNING!" indicates a hazardous situation which, if not avoided, could result in death or serious injury. -
Page 15: Technical Information
® XINO S700 Chapter Technical information Technical information Functional description Especially sophisticated digitization solutions require efficient scanning systems meeting the highly diverse requirements in terms of document quality and quantity also in the long run. The newly developed high-performance scanning system ®... - Page 16 ® Chapter XINO S700 Technical information ® The paper transport system of the XINO S700 scanner series offers maximum Paper transport flexibility regarding the paper quality to be processed. The roller ball system handles almost any type of document ranging from airmail paper to thick cardboard. Naturally also papers with additionally affixed information.
-
Page 17: Paper Transport
® XINO S700 Chapter Technical information 2.1.1 Paper transport 2.1.1.1 Top paper stacker Fig. 2-1 Top paper stacker Operation with the paper output at the top is the normal operating mode for most application cases. This operating mode comes with the following advantages: •... -
Page 18: Rear Paper Stacker
® Chapter XINO S700 Technical information 2.1.1.2 Rear paper stacker Fig. 2-2 Rear paper stacker If the paper output is at the rear, the sheets are not turned during transport. This means that, depending on the perspective, the stacked paper stack is either sorted in reverse order or after turning it around each page is facing the other way. -
Page 19: Fig. 2-3 Rear Paper Tray (Optional)
® XINO S700 Chapter Technical information PLEASE Many customers are not dependent on a paper tray at the rear, for they NOTE: do not use it or have an alternative solution. An additional rear paper tray is however optionally available. Using this rear paper tray entails the following advantages: •... -
Page 20: Patch Sorter Mode (Optional)
® Chapter XINO S700 Technical information 2.1.1.3 Patch sorter mode (optional) ® The patch sorter mode is optionally available for the XINO S700. It allows the switch-over between rear and front (top) paper stacker during operation. This enables further sorting functions: •... - Page 21 ® XINO S700 Chapter Technical information Coloured sheets are possible when using very bright colours. Before producing a larger quantity of patch code sheets, it would be wise to first check the recognition within the scanner by means of test samples. As the sensor operates in the infrared range, a pure visual inspection of the sheets is often insufficient.
-
Page 22: Components And Operating Elements
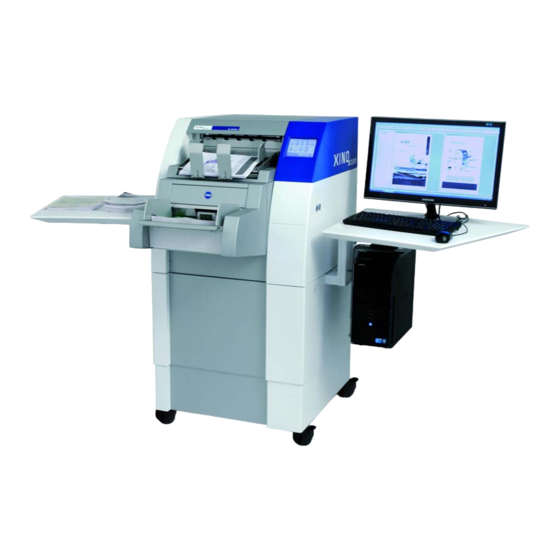
® Chapter XINO S700 Technical information Components and operating elements Fig. 2-5 Components of the high-performance scanner control panel worktop (optional) PC (optional) workbench (optional) with castors (optional) feeder paper output at the top Rev. 1.01 Technical changes reserved. page 2-8 ©... -
Page 23: Fig. 2-6 Operating Elements At The High-Performance Scanner
® XINO S700 Chapter Technical information Fig. 2-6 Operating elements at the high-performance scanner control panel power button USB port button to raise/lower the worktop (optional) stop button mains switch Rev. 1.01 Technical changes reserved. © Janich & Klass Computertechnik GmbH, Wuppertal, 2015 page 2-9... -
Page 24: Technical Data
® Chapter XINO S700 Technical information Technical data Dimensions Width 695 mm Height 643 mm Depth 726 mm Dimensions with worktop see chapter 2.3.1, page 2-11 Weight Scanner approx. 85 kg Scanner incl. transport packaging approx. 173 kg Feeder approx. 16 kg Ambient conditions Temperature +15 °C to +35 °C... -
Page 25: Space Requirements
® XINO S700 Chapter Technical information Feeder up to 500 sheets, turn-off automatic separation three ultrasound double feed sensors which can be switched on individually feeder versions: document withdrawal on the left and centrally Printer • pre-scan imprinter (Inkjet) • after-scan endorser (Inkjet) Options •... -
Page 26: Nameplate
® Chapter XINO S700 Technical information Nameplate The nameplate is located outside at the right side wall of the upper scanner mechanism. Fig. 2-8 Nameplate The nameplate contains the following information: Manufacturer Janich & Klass Computertechnik GmbH ® Type XINO S700 Serial no. -
Page 27: Safety
® XINO S700 Chapter Safety Safety Intended use The scanner is to be used for scanning papers according to the specifications provided in the chapter Technical data. Improper use Any other use of the machine possibly exceeding the intended purpose is prohibited and regarded as improper use. -
Page 28: Personnel Qualifications
® Chapter XINO S700 Safety Personnel qualifications The individual activities at the scanner demand different personnel qualifications, which are listed in the table below. The user is to ensure that no unauthorized person works at or with the scanner. The user is obliged to report any changes in the operating behaviour of the scanner possibly compromising the safety to the operating company. -
Page 29: Safety Devices
® XINO S700 Chapter Safety Safety devices Actuating the stop button stops the scanner. This is for instance useful to prevent Stop button clothes from being pulled in accidentally or the creasing/tearing of paper. Fig. 3-1 Stop button The cover panels keep you from reaching into moving parts and protect the scanner's Covers mechanical and optical components from dirt. -
Page 30: Safety Signs And Labels
® Chapter XINO S700 Safety Safety signs and labels The following safety signs and labels are attached to the scanner. Check these on a regular basis. If the safety signs are illegible, they must be replaced. Fig. 3-3 Safety signs and labels at the upper outlet Fig. -
Page 31: Fig. 3-5 Safety Signs And Labels At The Rear
® XINO S700 Chapter Safety 115-240VAC 50/60Hz Vor Öffnen des Gehäuses Netzstecker ziehen Before opening disconnect mains Avant d’ouvrir I’appareil retirez la fiche male Antes de abrir el aparato sacar el enchufe Fig. 3-5 Safety signs and labels at the rear Rev. -
Page 32: Residual Risks
® Chapter XINO S700 Safety Residual risks WARNING! Risk of injury from falling worktops. The improper attachment or detachment of the worktops can lead to injuries due to falling or breaking. The worktops may break due to overload. • Have both assembly and disassembly carried out by service technicians! •... -
Page 33: Scope Of Delivery And Transportation
® XINO S700 Chapter Scope of delivery and transportation Scope of delivery and transportation Scope of delivery ® • XINO S700 • software DpuScan, XINOcapture • manual • power cable • driver disc (TWAIN/ISIS) • USB cable • 4 feet (not mounted) •... -
Page 35: Assembly And Installation
® XINO S700 Chapter Assembly and installation Assembly and installation Assembly The assembly may only be performed by personnel certified and trained by microform GmbH. Set-up Only set up the scanner in rooms meeting the requirements in chapter 2.3, page 2-10 regarding ambient conditions and space requirements. -
Page 36: Installation
® Chapter XINO S700 Assembly and installation Installation Connect the following cables at the back of the scanner to: 115V - 240V mains voltage SCSI 3 LVD or USB 2.0 PC connection Fig. 5-1 Connections at the scanner CAUTION! Trip hazard. Make sure not to create trip hazards when laying cables! NOTICE! •... -
Page 37: Operation
® XINO S700 Chapter Operation Operation Switch-on/off 6.1.1 Switch-on PLEASE If scanner and PC are connected via SCSI, do not start the PC until NOTE: the scanner is ready for operation! If scanner and PC are connected via USB, both can be started in any order you choose. -
Page 38: User Interface
® Chapter XINO S700 Operation User interface The screen surface can be individually adjusted and saved in different profiles. These profiles can be saved on an external storage device and restored automatically. There are 2 different profile groups: • profiles stored locally on the PC •... - Page 39 ® XINO S700 Chapter Operation Buttons Designation X cancel button X single sheet feeder X feeder batch size X double feed detection on/off X double feed detection off for one sheet X accept double sheet and continue X discard double sheet and continue X discard double sheet and pause X feed separation on/off X feed separation off for one sheet...
- Page 40 ® Chapter XINO S700 Operation Buttons Designation X feeder up X feeder down scanner profiles user profiles X scan speed X function keys change language Rev. 1.01 Technical changes reserved. page 6-4 © Janich & Klass Computertechnik GmbH, Wuppertal, 2015...
- Page 41 ® XINO S700 Chapter Operation Buttons Designation system information sorting run X shutter function (paper output) X clear paper transport counter endorser / imprinter image: error The error is visualized by an image. image: front side The previously scanned paper front is displayed. image: rear side The previously scanned reverse side of a page is displayed.
-
Page 42: Screen Layout
® Chapter XINO S700 Operation 6.2.2 Screen layout The screen content can be divided into three sections: Located in the upper section is the status bar. Displayed in the status bar is the name Upper section of the current screen and the status of important operational settings in form of icons. The colour of the status bar indicates the scanner's current status: grey = the scanner is ready... -
Page 43: Fig. 6-1 Exemplary Screen Layouts
® XINO S700 Chapter Operation Scanner ready Error message paper jam Warning confirmed Error message confirmed Pause Scanning Fig. 6-1 Exemplary screen layouts Rev. 1.01 Technical changes reserved. © Janich & Klass Computertechnik GmbH, Wuppertal, 2015 page 6-7... -
Page 44: Softkeys
® Chapter XINO S700 Operation 6.2.3 Softkeys There are two types of keys or buttons: • Action buttons trigger an action. Pressing the button again during execution aborts this action. • Status buttons change an operating state variable of the scanner. These can be recognized by their blue frame when active. - Page 45 ® XINO S700 Chapter Operation Actuating the button separation off for one sheet deactivates the feed separation for the next sheet. The status of this setting is indicated in the upper status bar for exactly one sheet by means of the following icon: Then the icon changes into: The feeder comes equipped with an ultrasonic double feed detection for the reliable control of...
- Page 46 ® Chapter XINO S700 Operation Discard double sheet and continue This button is displayed, when the double feed detection is set to Inquire. Upon actuation the image of the sheet is discarded and scanning continues. If the sheet should be scanned again, it needs to be reinserted in the feeder before pressing the button.
- Page 47 ® XINO S700 Chapter Operation The profile buttons are for the direct selection of the individual scanner profiles (up to 8 profiles). The button of the profile currently in use is edged in blue. The used profile is also displayed in the status bar with the corresponding icon: If changes to a profile have not yet been saved, this is indicated by a red mark in the icon in the...
- Page 48 ® Chapter XINO S700 Operation User profile By means of these buttons you can switch between two possible user profiles. User profiles are individual profiles assigned to the signed in user. In it one can save e.g. a personalized screen configuration or scanner setting.
- Page 49 ® XINO S700 Chapter Operation Pressing the start button at the scanner display starts the scanning process. A condition is that you use the scan software DpuScan, XINOCapture included in the scope of delivery. Pressing the stop button at the scanner display stops the scanning process.
- Page 50 ® Chapter XINO S700 Operation With this button you can access the configuration screen. In order to avoid errors resulting from inappropriate changes, the configuration must only be changed by trained personnel. This section can be protected by a password. The sorting run is only available if the sorter option is activated on the scanner.
-
Page 51: Configuration
® XINO S700 Chapter Operation Configuration PLEASE The functions described in this chapter are only available with NOTE: administrator rights. Press the configuration button in the lower section of the screen to access the configuration screen. Here settings regarding paper transport, management, settings, maintenance and system settings can be made. -
Page 52: Fig. 6-3 Feeding Mode
® Chapter XINO S700 Operation 6.3.1.1 Feeding mode Upon actuation of the feeder mode button the feeding mode batch size screen appears (in fig. 6-3 on the left) which displays the current batch size (height of the paper stack). Pressing the sheet batch button prompts a batch size selection dialogue (in fig. - Page 53 ® XINO S700 Chapter Operation Small Generates a preferably small, dynamically regulated distance between the sheets during sheet feeding. This setting achieves the maximum sheet throughput. A small gap cannot be set for the sorting mode of the paper output screen (see chapter 6.3.1.4, page 6-22). In sorting mode the gap is automatically set to large.
-
Page 54: Feed Separation
® Chapter XINO S700 Operation 6.3.1.2 Feed separation Pressing the sheet separation button opens the feed separation screen, in which the separation can be switched on or off within the current profile. Fig. 6-5 Feed separation Rev. 1.01 Technical changes reserved. page 6-18 ©... -
Page 55: Double Feed Detection
® XINO S700 Chapter Operation 6.3.1.3 Double feed detection Actuating the double feed detection button opens the double feed detection 1 screen, in which the double feed settings can be made. Fig. 6-6 Double feed detection 1 Active Switches the ultrasonic double feed detection on. Switches the ultrasonic double feed detection off. - Page 56 ® Chapter XINO S700 Operation Press the screen level button to change the screen level. The following screen appears: Fig. 6-7 Double feed detection 2 Sensor left Activates the selected sensor. Sensor middle Deactivates the selected sensor. Sensor right Detection Fast Immediate response to a double feed detection signal.
- Page 57 ® XINO S700 Chapter Operation Press the screen level button to change the screen level. The following screen appears: In this screen you can determine the sheet section in which the double feed detection is active. Fig. 6-8 Double feed detection 3 Area Entire sheet The double sheet detection is active for the...
-
Page 58: Paper Output
® Chapter XINO S700 Operation 6.3.1.4 Paper output Pressing the shutter function (paper output) button opens the paper output 1 screen. In this screen you can determine, whether the sheets are stacked into the upper paper tray or via the sorter flap at the back. If the patch code sorter option is installed, this screen also serves to define which sheets are to be sorted out and how. - Page 59 ® XINO S700 Chapter Operation Double feed A detected double sheet is deposited in the upper paper tray. Rear A detected double sheet is deposited in the rear paper tray. Rev. 1.01 Technical changes reserved. © Janich & Klass Computertechnik GmbH, Wuppertal, 2015 page 6-23...
- Page 60 ® Chapter XINO S700 Operation Press the screen level button to change the screen level. The following screen appears: Fig. 6-10 Paper output 2 Patch code 1 If the selected patch code is detected, it is deposited in Patch code 2 the upper paper tray.
- Page 61 ® XINO S700 Chapter Operation Press the screen level button to change the screen level. The following screen appears: Fig. 6-11 Paper output 3 To be determined in this screen is whether a detected patch code triggers an extended sorting function. For instance: sheets following a patch code can be stacked either to the top or to the rear.
- Page 62 ® Chapter XINO S700 Operation Press the screen level button to change the screen level. The following screen appears: Fig. 6-12 Paper output 4 To be determined in this screen is whether a certain sheet size triggers an extended sorting function. This way, e.g. smaller documents (snippets) can be stacked specifically either towards the top or rear.
-
Page 63: Sorting Run
® XINO S700 Chapter Operation 6.3.1.5 Sorting run To be defined here is which sheets will be sorted out of processed batches during a sorting cycle. The sorting run is started by means of the button on the display. By use of this function it is possible to separate the patch code sheets sorted out during scanning going by the individual patch code types. -
Page 64: Management
® Chapter XINO S700 Operation 6.3.2 Management Select the management menu in the configuration menu. The following screen appears: Fig. 6-13 Main menu management Rev. 1.01 Technical changes reserved. page 6-28 © Janich & Klass Computertechnik GmbH, Wuppertal, 2015... -
Page 65: Display Layout
® XINO S700 Chapter Operation 6.3.2.1 Display layout Pressing the display button opens the edit layout screen. This screen serves for the configuration of the buttons and screen levels of the current profile. Fig. 6-14 Edit layout 1/2 Pressing one of the buttons opens the edit layout dialogue (in fig. 6-14 on the right). The buttons in this screen have the following functions: Change opens the edit layout dialogue for the selected status: ready –... -
Page 66: Ready Display
® Chapter XINO S700 Operation 6.3.2.1.1 Ready display The screen content to be displayed with the status ready can be defined in this screen. Various functions can be set and adjusted at the scanner prior to scanning, provided the status is ready. The following illustrations are examples only and may differ from the actual displays. -
Page 67: Fig. 6-17 Button Position Invisible
® XINO S700 Chapter Operation PLEASE In order to remove functions from the screen or to leave button NOTE: positions blank, select the "Invisible" function. Fig. 6-17 Button position invisible PLEASE If the only assigned button positions are the topmost three on the left, NOTE: these will later be displayed enlarged. -
Page 68: Scanning Display
® Chapter XINO S700 Operation 6.3.2.1.2 Scanning display This screen serves to define the screen content to be displayed during scanning. The configuration is carried out as described in chapter 6.3.2.1.1, page 6-30. 6.3.2.1.3 Pause display This screen serves to define the screen content to be displayed during a pause. The configuration is carried out as described in chapter 6.3.2.1.1, page 6-30. -
Page 69: Error Display
® XINO S700 Chapter Operation 6.3.2.1.4 Error display Individual displays for various error messages can be created in this screen. Fig. 6-19 Editing the error screen layout The buttons in this screen have the following functions: Change opens the screen for editing. Error code assigns the screen to different error messages. -
Page 70: Fig. 6-20 Select Error Screen
® Chapter XINO S700 Operation In order to edit or create a new error screen, please proceed as follows: Press the display button (fig. 6-13). • The following screen opens: Fig. 6-20 Select error screen Select the error screen you want to edit. <... -
Page 71: Fig. 6-22 Select Error Screen
® XINO S700 Chapter Operation Confirm your selection by pressing the confirm button. • The screen for editing the layout of the selected error screen opens: Fig. 6-22 Select error screen PLEASE Preview images can be assigned to the button positions. NOTE: To do so, please proceed as follows: Select one of the button positions edged in red. -
Page 72: Fig. 6-24 Selecting The Preview Image
® Chapter XINO S700 Operation Select which images are to be displayed as preview. Fig. 6-24 Selecting the preview image Confirm your selection by pressing the confirm button. • The screen is now structured as follows: Fig. 6-25 Exemplary display preview screen Rev. -
Page 73: Foot Switches (Optional)
® XINO S700 Chapter Operation 6.3.2.2 Foot switches (optional) In this screen you can determine which functions should be started with the optional foot switch. The foot switch is available with 1, 2 and 3 buttons and connected to the scanner via the USB port (11 in fig. -
Page 74: Patch Code Event
® Chapter XINO S700 Operation 6.3.2.3 Patch code event In this screen you can determine which functions should be started when scanning a patch code. Fig. 6-27 Patch code event Select the patch code to which a function is to be assigned. •... -
Page 75: Profile Management
® XINO S700 Chapter Operation 6.3.2.4 Profile management Pressing the profile management button opens the profile management screen. In this screen you can save the changes made in the profiles and change existing profile names. Fig. 6-29 Profile management The buttons in this screen have the following functions: Change opens the edit profile dialogue (fig. -
Page 76: Fig. 6-30 Select Profile
® Chapter XINO S700 Operation Press the actual profile button (current). • The following screen opens: Fig. 6-30 Select profile Select the profile you want to edit. Confirm your selection by pressing the confirm button. • The profile management screen opens (see fig. 6-29). Press the change button. - Page 77 ® XINO S700 Chapter Operation Copy serves to create a copy of the existing profile. Undo last change discards the latest unsaved changes. Factory default resets the profile settings to the factory default. Rev. 1.01 Technical changes reserved. © Janich & Klass Computertechnik GmbH, Wuppertal, 2015 page 6-41...
-
Page 78: User Administration
® Chapter XINO S700 Operation 6.3.2.5 User administration ® The user administration of the XINO scanner series makes use of 3 user levels: Basic user Rights severely limited, can only handle the scanner, not make any configurations. Login/logout not possible. Standard user Like the basic user. -
Page 79: Fig. 6-32 User Administration - Account Selection
® XINO S700 Chapter Operation Administrator system account Name Administrator Password **** Rights Administrator rights System profiles (1-8) Always default, cannot be changed User profiles (1-2) Always default, cannot be changed Configuration Everything permitted by the rights, since however the saving of profiles is not permitted, the configuration options are also limited. - Page 80 ® Chapter XINO S700 Operation The buttons in this screen have the following functions: Change opens the dialogue for editing the selected user account (chapter 6.3.2.5.1, page 6-45). New opens the dialogue for creating a new user account (chapter 6.3.2.5.2, page 6-47). Delete removes the selected account from the list, followed by a prompt inquiring whether the account should really be deleted (chapter 6.3.2.5.3, page 6-48).
-
Page 81: Editing An Account
® XINO S700 Chapter Operation 6.3.2.5.1 Editing an account Select the account you want to edit from the user administration (chapter 6.3.2.5, page 6-42). Press the change button • The following screen opens: Fig. 6-33 User administration – edit account Determine the account settings in the following menus: Account Basic user... - Page 82 ® Chapter XINO S700 Operation Press the screen level button to change the screen level. The following screen appears: Fig. 6-34 User administration 2 Login required Activates user login. Users have to sign in with the account name and password. Deactivates user login.
-
Page 83: Creating A New User Account
® XINO S700 Chapter Operation 6.3.2.5.2 Creating a new user account In order to create a new user account, press the button new in the user administration screen (chapter 6.3.2.5, page 6-42). • The following screen opens: New user Select base account Fig. -
Page 84: Deleting An Account
® Chapter XINO S700 Operation 6.3.2.5.3 Deleting an account In order to delete a user account, press the button delete in the user administration screen (chapter 6.3.2.5, page 6-42). • The following screen opens: Fig. 6-36 User administration – account deletion Delete the account by means of the confirm button or use the cancel action button to cancel the delete operation. -
Page 85: Preparation Of A Usb Flash Drive
® XINO S700 Chapter Operation 6.3.2.5.4 Preparation of a USB flash drive Starting from the scanner's user administration screen the user can sign in in two ways: • Manual user login by entering the user name and password. • Automatic login using a USB flash drive. How to configure a USB flash drive in order to be used for user login is described below. - Page 86 ® Chapter XINO S700 Operation Press the screen level button to change the screen level. The following screen appears: Fig. 6-38 User USB stick: user profiles Activates both user profiles on the USB flash drive for the user. The user profiles on the USB flash drive are not available for this account.
-
Page 87: Login Using The Usb Flash Drive
® XINO S700 Chapter Operation 6.3.2.6 Login using the USB flash drive In order to use a USB flash drive for login, please proceed as follows: • Wait until you receive a confirmation that the user profiles have been loaded completely. -
Page 88: Set-Up
® Chapter XINO S700 Operation 6.3.3 Set-up Select the settings menu in the configuration menu. The following screen appears: Fig. 6-40 Main menu – settings Language Opens a dialogue for language selection. Available languages are German, English and Chinese. Measurement Serves to switch between US customary and metric measuring units. -
Page 89: Language Setting
® XINO S700 Chapter Operation 6.3.3.1 Language setting Pressing the language button opens the language screen. Via this screen you can change the menu language: available are German, English and Chinese. Fig. 6-41 Setting the language 6.3.3.2 Setting measurement units Pressing the measurement button opens the measurement screen. -
Page 90: Setting The Date / Time
® Chapter XINO S700 Operation 6.3.3.3 Setting the date / time Pressing the date / time button opens the date / time screen. In this screen it is possible to change the system time. Fig. 6-43 Setting the date / time Rev. -
Page 91: Energy Management
® XINO S700 Chapter Operation 6.3.3.4 Energy management Pressing the energy management button opens the energy management screen. Energy saving functions, such as automatic switch-off, can be configured in this screen. Fig. 6-44 Energy management Automatic When not in use for more than the defined switch-off power off time, the scanner automatically switches to stand-by. -
Page 92: Fig. 6-45 Main Menu - Maintenance
® Chapter XINO S700 Operation 6.3.4 Maintenance Select the maintenance menu in the configuration menu. The following screen appears: Fig. 6-45 Main menu – maintenance Ink level Opens the ink level screen, in which one can reset the ink level and determine the behaviour in case of a low ink level (chapter 6.3.4.1, page 6-57). - Page 93 ® XINO S700 Chapter Operation 6.3.4.1 Ink level After having replaced an ink cartridge, one can reset the displayed filling level in this screen. Fig. 6-46 Ink level 1 New cartridge Resets the displayed filling level of the ink replaced cartridge.
-
Page 94: Fig. 6-48 Error Message Ink Level
® Chapter XINO S700 Operation Press the screen level button to change the screen level. The following screen appears: Fig. 6-47 Ink level 2 In this screen you can determine the scanner behaviour in case of an empty ink cartridge. The following options are available: Prohibit Scanning with an empty ink cartridge is not possible. -
Page 95: Maintenance
® XINO S700 Chapter Operation 6.3.4.2 Maintenance Displayed in this screen are the current maintenance messages. Fig. 6-49 Maintenance messages Rev. 1.01 Technical changes reserved. © Janich & Klass Computertechnik GmbH, Wuppertal, 2015 page 6-59... -
Page 96: System
® Chapter XINO S700 Operation 6.3.5 System Select the system menu in the configuration menu. The following screen appears: Fig. 6-50 Main menu – system Info Opens a screen containing system information such as operating hours, scan counter and information about the installed hardware and software versions (chapter 6.3.5.1, page 6-61). -
Page 97: System Information
® XINO S700 Chapter Operation 6.3.5.1 System information Pressing the info button opens the information screen. This screen contains system information such as operating hours, scan counter and information about the installed hardware and software versions. Fig. 6-51 Information 6.3.5.2 Identification Pressing the ID button opens the identification screen. - Page 98 ® Chapter XINO S700 Operation 6.3.5.3 Options Pressing the options button opens the options screen. Displayed in this screen are the installed options or else option codes for additionally purchased options. Fig. 6-53 Options symbol indicates temporarily installed options. The remaining runtime or capacity of these options can be found at the bottom of the screen.
-
Page 99: White Balance
® XINO S700 Chapter Operation 6.3.5.4 White balance Pressing the white balance button opens the white balance screen. This screen serves for the white balance. The white balance needs to be performed after adjustment work at optical components (e.g. the camera). Therefore, as a rule, the white balance is only carried out by a service technician. -
Page 100: Settings
® Chapter XINO S700 Operation Settings 6.4.1 Exchanging the feeder A feeder with a central or left-hand paper feed may be mounted to the scanner as needed. To exchange the feeder, please proceed as follows: Switch off the scanner according to chapter 6.1.3, page 6-1. Removing the feeder First pull the feeder out towards the front until the snap-fit retaining bracket (20) latches on the left-hand side. - Page 101 ® XINO S700 Chapter Operation Hold the feeder on both sides and insert it evenly. Check the contact surface Mounting the feeder of feeder and feeder drawer. The feeder must be positioned parallel to the drawer. The electrical connection plugs must be aligned without tilting. Then carefully lower the feeder.
-
Page 102: Setting The Paper Guide Of The Feeder
® Chapter XINO S700 Operation 6.4.2 Setting the paper guide of the feeder In order to scan the pages as evenly as possible and to deposit them in the paper outlet in a neat stack, the sheets should already be guided at the sides when fed. For this purpose the feeder is equipped with 2 lateral paper guides. -
Page 103: Fig. 6-61 Feeder Paper Contact Surface A3
® XINO S700 Chapter Operation Additionally, the paper contact surface can be increased to become fit for paper of format A3. Fig. 6-61 Feeder paper contact surface A3 Rev. 1.01 Technical changes reserved. © Janich & Klass Computertechnik GmbH, Wuppertal, 2015 page 6-67... -
Page 104: Setting The Paper Guide Of The Paper Trays
® Chapter XINO S700 Operation 6.4.3 Setting the paper guide of the paper trays In order for the sheets to be piled up neatly upon stacking, the drawer, lateral end stops and the angle of the paper tray can be individually adjusted: Adjusting the height of the paper tray Adjusting the position of the strip for pressing down the paper... -
Page 105: Changing The Scanning Background
® XINO S700 Chapter Operation 6.4.4 Changing the scanning background The scanner comes with an exchangeable scanning background in order to process very thin, transparent sheets as well. The scanning background is the surface at which the front-side scanner "looks". The scanning background can be changed from black to white. - Page 106 ® Chapter XINO S700 Operation Then insert the scanning background again. Exchanging the scanning background 4 Fig. 6-66 Press the scanning background into place and make sure there is no protrusion. Exchanging the scanning background 5 Fig. 6-67 Afterwards close the scanning area as described in chapter 7.2.1.1, page 7-3.
-
Page 107: Setting The Sheet Former
® XINO S700 Chapter Operation 6.4.5 Setting the sheet former 6.4.5.1 Sheet former Folded paper can easily fold back or over upon stacking and so interfere with the orderly stacking of the subsequent sheets. To prevent this a sheet former is located in the upper paper output, which stabilizes the sheets by slightly bending them. -
Page 108: Setting Imprinter And Endorser
® Chapter XINO S700 Operation 6.4.6 Setting imprinter and endorser The scanner comes equipped with imprinter and endorser. • As pre-scan printer the imprinter prints on the front side prior to scanning. It is located underneath the front paper tray. •... -
Page 109: Changing The Print Position
® XINO S700 Chapter Operation 6.4.6.1 Changing the print position For different print positions the print head can be placed at 5 different positions. In order to change the position of the print head, please proceed as follows: Press the two rear plates of the clip together. Remove the print head holder by pulling it diagonally upwards. -
Page 110: Starting The Scanning Process
® Chapter XINO S700 Operation Starting the scanning process The scanning process is usually accomplished as follows: Start the scanner as described in chapter 6.1.1, page 6-1. • If the user administration is deactivated, the following screen appears and scanning can be started: Fig. -
Page 111: User Login (Manual)
® XINO S700 Chapter Operation 6.5.1 User login (manual) Press the button. • The following screen appears: Fig. 6-75 Login user 1 Select the corresponding user account. • If the user account is not password-protected, you will be logged on to the scanner. -
Page 112: User Login (With Usb Flash Drive)
® Chapter XINO S700 Operation Enter the password and confirm it by means of the confirm button. You will be logged on to the scanner. • The "ready" screen will be displayed. Select another profile if required Insert the paper. Start scanning by use of the scan software. -
Page 113: User Logout
® XINO S700 Chapter Operation 6.5.3 User logout Press the button. • The following screen appears: Fig. 6-78 User logout Confirm the prompt by pressing the confirm button. • You will be logged off from the scanner. Rev. 1.01 Technical changes reserved. ©... -
Page 114: Aborting The Scanning Process
® Chapter XINO S700 Operation Aborting the scanning process Interrupting the scanning process can be effected both in form of a regular user interruption and an interruption via stop button. 6.6.1 User interruption The user interruption constitutes the norm for interrupting a scanning process. It is either brought about by means of the scan software or the button at the scanner's display. -
Page 115: Errors And Faults
® XINO S700 Chapter Errors and faults Errors and faults Safety information for troubleshooting During all activities requiring the covers to be opened it is prohibited to wear ties, jewellery (necklaces, pendants etc.) and long, untied hair! WARNING! Crush hazard. Hand crush hazard when closing covers. -
Page 116: Clearing A Paper Jam
® Chapter XINO S700 Errors and faults 7.2.1 Clearing a paper jam In case of a paper jam the paper needs to be removed from the paper transport by hand and then refed. If the scanner is operated with an active "rear paper output", paper jams can only occur in the scanning area or at the outlet slide. -
Page 117: Access To The Scanning Area
® XINO S700 Chapter Errors and faults 7.2.1.1 Access to the scanning area In order to access the scanning area, please proceed as follows: First pull the feeder out towards the front until the snap-fit retaining Open the scanning area bracket (20) latches on the left-hand side. - Page 118 ® Chapter XINO S700 Errors and faults Open the scanning area to a degree that the release lever on the right-hand side clicks into place. Fig. 7-3 Opening the scanning area 3 Rev. 1.01 Technical changes reserved. page 7-4 © Janich & Klass Computertechnik GmbH, Wuppertal, 2015...
- Page 119 ® XINO S700 Chapter Errors and faults Closing the scanning area WARNING! Crush hazard. Hand crush hazard when closing the scanning area. Keep your hands away from the danger area and make sure that no other person is situated at the scanner! In order to close the scanner again, please proceed as follows: Slightly lift the upper section of the scanning area to unlock the release lever.
- Page 120 ® Chapter XINO S700 Errors and faults Lift the snap-fit retaining bracket (20) and push the feeder up against the scanner until it clicks into place. Fig. 7-6 Closing the scanning area 3 Rev. 1.01 Technical changes reserved. page 7-6 ©...
-
Page 121: Access To The Turning Drum
® XINO S700 Chapter Errors and faults 7.2.1.2 Access to the turning drum In order to open the sheet reversal area, please proceed as follows: Opening the sheet reversal area Make sure that the scanning area is closed. Reach for the recessed grip at the rear of the scanner and jerk the flap up to the stop. -
Page 122: Access To The Paper Output
® Chapter XINO S700 Errors and faults 7.2.1.3 Access to the paper output In order to access the paper output, please proceed as follows: Lift the upper cover panel and fold it back completely. Opening the paper output Fig. 7-8 Opening the upper cover panel Lift the upper plate along with the sheet former. -
Page 123: Maintenance
® XINO S700 Chapter Maintenance Maintenance Safety information for maintenance During all activities requiring the covers to be opened it is prohibited to wear ties, jewellery (necklaces, pendants etc.) and long, untied hair! WARNING! Crush hazard. Hand crush hazard when closing covers. Keep your hands away from the danger area and make sure that no other person is situated at the scanner! NOTICE! -
Page 124: Maintenance Intervals
® Chapter XINO S700 Maintenance Maintenance intervals The maintenance intervals are scheduled for approx. 8 h of daily use of the scanner in a clean operating environment and with a good to moderate paper quality. If the actual duration significantly exceeds the specified daily use, the operating environment is heavily contaminated or the paper of poor quality, the maintenance intervals have to be adjusted accordingly. -
Page 125: Fig. 8-1 Cleaning Patch Code Sensors
® XINO S700 Chapter Maintenance Maintenance activities 8.3.1 Cleaning In order to achieve an ideal image quality and to prevent excessive wear, the scanner is to be kept free from dust and dirt as much as possible. PLEASE Cleaning measures inside the scanner going beyond those described in NOTE: this chapter, must only be performed by trained personnel instructed by microform. - Page 126 ® Chapter XINO S700 Maintenance 8.3.1.4 Cleaning transport rollers Over time paper transport inevitably leads to dirt accumulation at the transport rollers. One consequence of this may be that sheets get dirty during scanning. Also with an increasing contamination level the paper transport changes for the worse, which results in more frequent paper jams and other faults.
-
Page 127: Removing / Inserting The Feed Roller (Central Paper Feed)
® XINO S700 Chapter Maintenance 8.3.1.4.1 Removing / inserting the feed roller (central paper feed) Move the feeder tray into the position for a 500 sheet stack Feeder tray in 500 sheet position Fig. 8-2 Take hold of the left and right of the feed roller unit and push it towards the left until the retainer on the right is released. - Page 128 ® Chapter XINO S700 Maintenance Clean the rollers with a cloth moistened with cleaning agent. Apply the black guide plate of the feed roller unit diagonally to the left ball bearing guide inside the feeder. Fig. 8-5 Inserting the feed roller 1 Press the feed roller unit to the left against the spring-loaded guide and slightly forwards until it clicks into place.
-
Page 129: Removing / Inserting The Feed Rollers (Left-Hand Paper Feed)
® XINO S700 Chapter Maintenance 8.3.1.4.2 Removing / inserting the feed rollers (left-hand paper feed) Remove the first feed roller. Fig. 8-7 Removing the first feed roller Remove the second feed roller. Fig. 8-8 Removing the second feed roller Clean the rollers with a cloth moistened with cleaning agent or replace the feed rollers, if required. -
Page 130: Fig. 8-10 Inserting The First Feed Roller
® Chapter XINO S700 Maintenance Then reinsert the first feed roller. Make sure that at first you insert the feed roller horizontally. Then carefully push the feed roller upwards. Ensure that the feed roller can be moved without difficulty. Fig. 8-10 Inserting the first feed roller Rev. -
Page 131: Removing / Inserting The Separation Roller
® XINO S700 Chapter Maintenance 8.3.1.4.3 Removing / inserting the separation roller In order to remove the separation roller for cleaning, the feeder tray must be brought to the position for 500 sheet stacks and the feed roller unit must have been removed (chapter 8.3.1.4.1, page 8-5). -
Page 132: Fig. 8-13 Positioning The Separation Roller
® Chapter XINO S700 Maintenance Then reinsert the separation roller. In doing so, make sure that the two lateral guide slots of the roller on the left and right are equally aligned. Make sure that the roller is fully inserted in the lateral retaining plates. Fig. -
Page 133: Replacing The Roller Coating
® XINO S700 Chapter Maintenance 8.3.2 Replacing the roller coating Once the grip of the roller coating lessens, it must be replaced in order to ensure the failure-free paper transport. 8.3.2.1 Replacing the coating of the feed rollers In order to replace the roller coating of the feed rollers, the feed roller unit needs to be removed as described in chapter 8.3.1.4.1, page 8-5. -
Page 134: Fig. 8-17 Replacing The Roller Coating
® Chapter XINO S700 Maintenance Pull the worn roller coating sideways off the rollers. Slide on new roller coatings. Make sure that the coating is positioned evenly inside the guide of the roller. Fig. 8-17 Replacing the roller coating Place the rollers back in the retainer and close it with light pressure until the fasteners snap shut. -
Page 135: Replacing The Coating Of The Separation Roller
® XINO S700 Chapter Maintenance 8.3.2.2 Replacing the coating of the separation roller The separation rollers serve to separate the sheets prior to scanning. In order to replace the roller coating of the separation roller, the separation roller needs to be removed as described in chapter 8.3.1.4.3, page 8-9. -
Page 136: Replacing The Ink Cartridge
® Chapter XINO S700 Maintenance 8.3.3 Replacing the ink cartridge The scanner emits a warning message when the ink cartridge needs to be replaced. For the replacement of the ink cartridge please proceed as follows: Switch off the scanner (see chapter 6.1, page 6-1). Remove the print head from the retainer. -
Page 137: Fig. 8-22 Inserting The Ink Cartridge
® XINO S700 Chapter Maintenance Let go of the latch and make sure that the print head is fully inserted. Fig. 8-22 Inserting the ink cartridge Insert the print head into the tracking guide by • pressing the two rear plates of the clip together; •... -
Page 138: Performing A White Balance
® Chapter XINO S700 Maintenance 8.3.4 Performing a white balance In order to perform a white balance, please proceed as follows: Open the scanning area as described in chapter 7.2.1.1, page 7-3. Insert the sheet by means of which you want to carry out the white balance into the scanning area. - Page 139 ® XINO S700 Chapter Maintenance Start the white balance by pressing the confirm button. • You will be prompted to insert the sheet at the correct position and possi- ble to close the housing. Process with central paper feed Process with left-hand paper feed <...
- Page 140 ® Chapter XINO S700 Maintenance 10. The white balance will be carried out and the respective status indicated on the screen. Process with central paper feed Process with left-hand paper feed 11. Wait until the white balance is completed. Process with central paper feed Process with left-hand paper feed 12.
-
Page 141: Disassembly
® XINO S700 Chapter Disassembly Disassembly The disassembly may only be carried out by personnel certified and trained by microform GmbH. Rev. 1.01 Technical changes reserved. © Janich & Klass Computertechnik GmbH, Wuppertal, 2015 page 9-1... -
Page 143: Storage
® XINO S700 Chapter Storage Storage Store the scanner • in an upright position, • in dust- and water-proof packaging, • at ambient temperatures according to the technical data, chapter 2.3, page 2-10. Rev. 1.01 Technical changes reserved. © Janich & Klass Computertechnik GmbH, Wuppertal, 2015 page 10-1... -
Page 145: Disposal
® XINO S700 Chapter Disposal Disposal If no agreements have been made for return or disposal, have the dismantled components recycled: • Scrap metal. • Have plastics recycled. • Dispose of the remaining components sorted by their material properties. Electronic scrap, electronic components and cleaning agents are subject to hazardous waste treatment and must only be disposed of by licensed specialist companies! Rev. -
Page 147: Wear Parts And Accessories
® XINO S700 Chapter Wear parts and accessories Wear parts and accessories NOTICE! Using incorrect or defective spare and wear parts can lead to damages, malfunctions or total failure of the scanner. The use of non-approved spare parts voids all warranty, service, damage and liability claims against the manufacturer or his agents, dealers and representatives. -
Page 149: Annex
® XINO S700 Chapter Annex Annex 13.1 Declaration of conformity (translation of the original) Declaration of conformity (translation of the original) in accordance with the EC Machinery Directive 2006/42/EC, Annex II, Part 1, Section A Herewith we declare that the following machinery has been declared in conformity with the EC Machinery Directive 2006/42/EC.
Need help?
Do you have a question about the XINO S700 Series and is the answer not in the manual?
Questions and answers